


Table of contents
- What Is Stack?
- Where do we use Stacks?
- How to use Java's Built-In Functions for Stack Manipulation?
- How Does Internal Implementation of a Stack Work in Java?
- How to Create Your Custom Stack in Java?
- How to remove data from the stack?
- What Is Queue?
- Where do we use Queue?
- How to use Java's Built-In Functions for Queue Manipulation?
- How Does Internal Implementation of a Queue Work in Java?
- How to Create Your Custom Queue in Java?
- How to remove data from the queue?
- What is a circular queue?
- Why do we use circular queues?
- How to create your custom circular queue in Java?
- How to insert an item in the circular queue?
- How to remove an item from a circular queue?
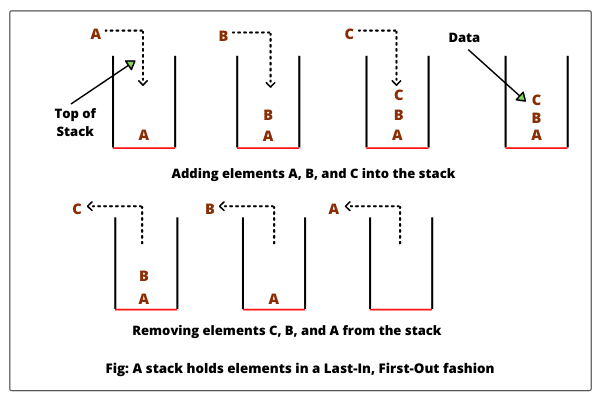
What Is Stack?
Stack is a linear data structure similar to arrays and linked lists, restricting the random access of elements.
It is like a container of pieces that can only be stacked on top of each other and removed from that same direction. That's why Stack doesn't support traversal or random indexing.
Where do we use Stacks?
Word Reversal: You can reverse a word by pushing its letters onto a stack and then popping them back.
Undo Functionality: Text editors use stacks to implement "undo" operations, allowing users to revert text changes.
Backtracking: In situations like mazes, backtracking involves storing possible choices on a stack and popping them to retrace steps.
Language Processing: Stacks are used internally for managing parameters, local variables, and recursion checks in compilers.
How to use Java's Built-In Functions for Stack Manipulation?
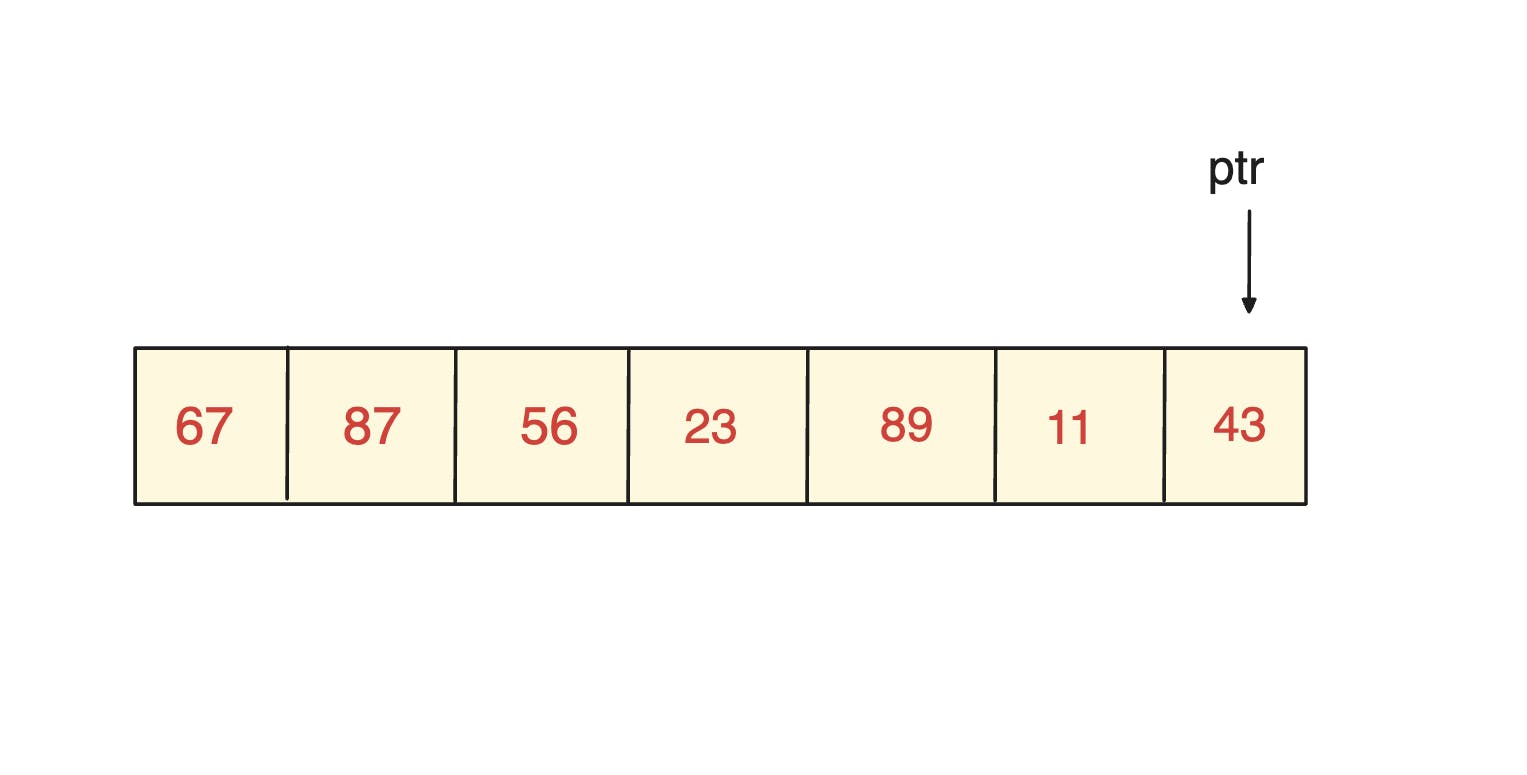
We first create a stack using Stack<Integer> stack = new Stack<>(); to hold integers. We then use the push method to add elements to the stack. Each call to push adds an element to the top of the stack.
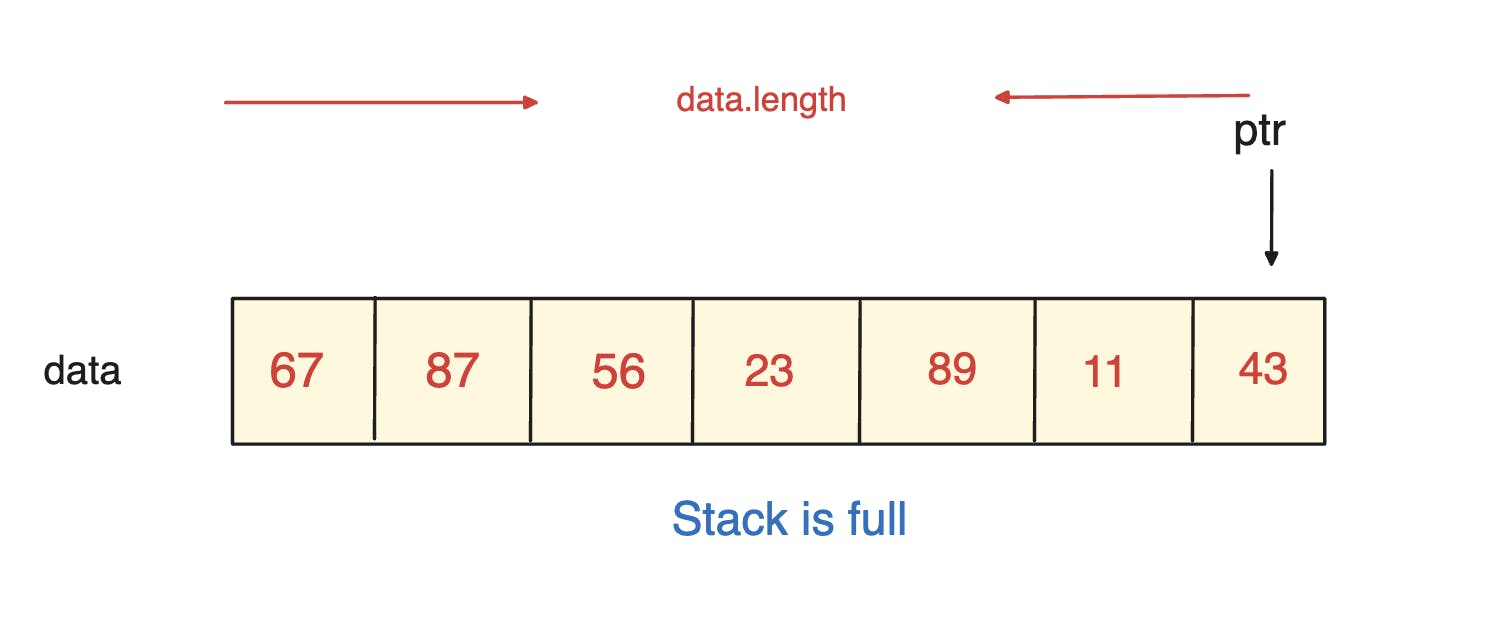
push() :
public static void main(String[] args){
Stack<Integer> stack = new Stack <> ();
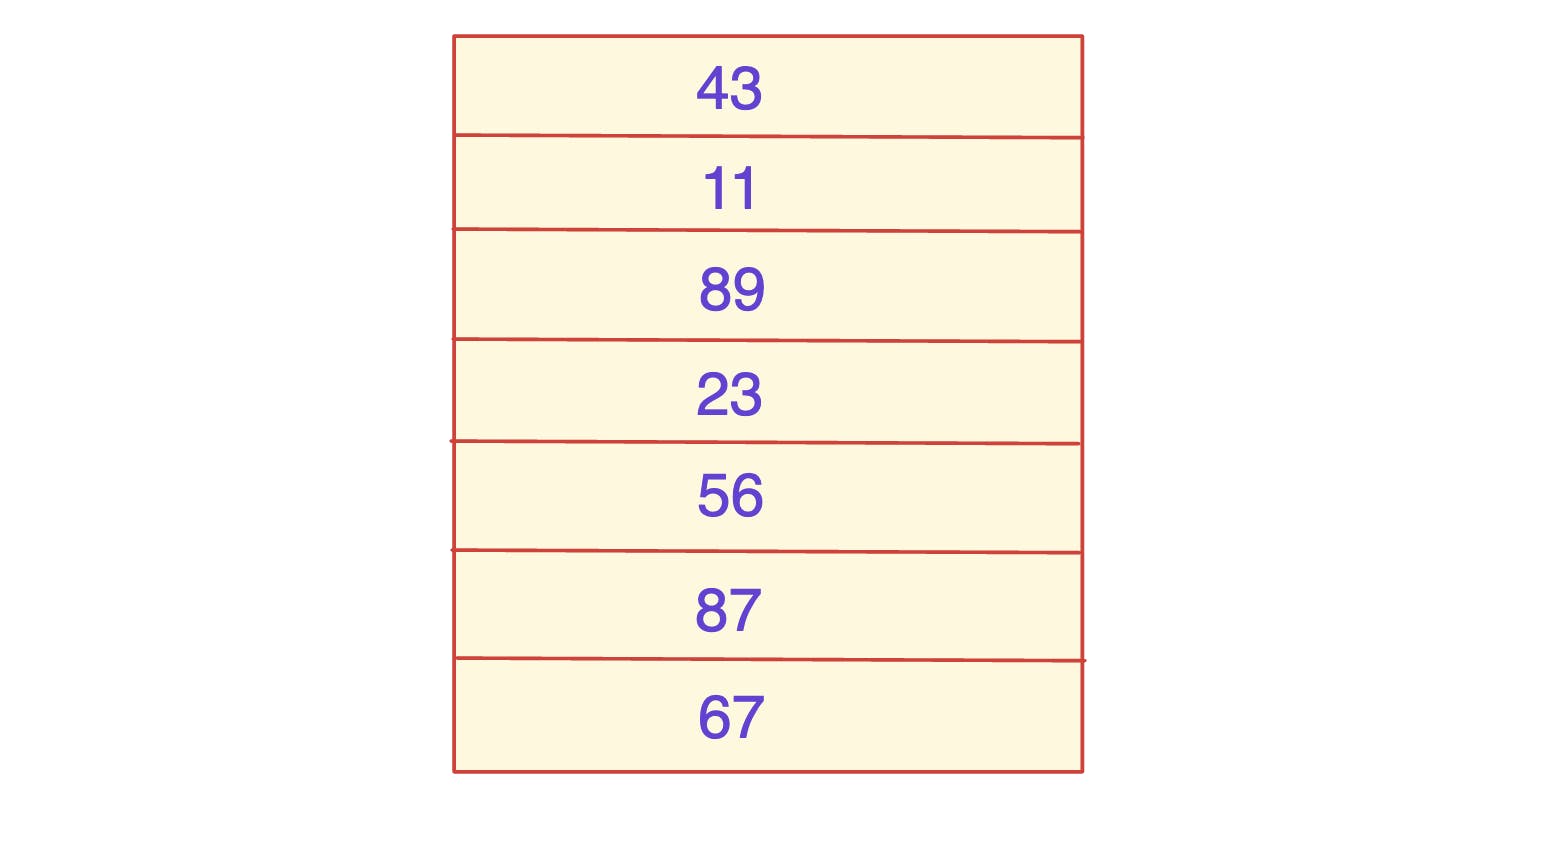
stack.push(67);
stack.push(87);
stack.push(56);
stack.push(23);
stack.push(89);
stack.push(11);
stack.push(43);
pop() :
pop() removes and returns the top element from the stack.
stack.pop();
Notice how elements pushed last onto the stack are the first to be popped from it.
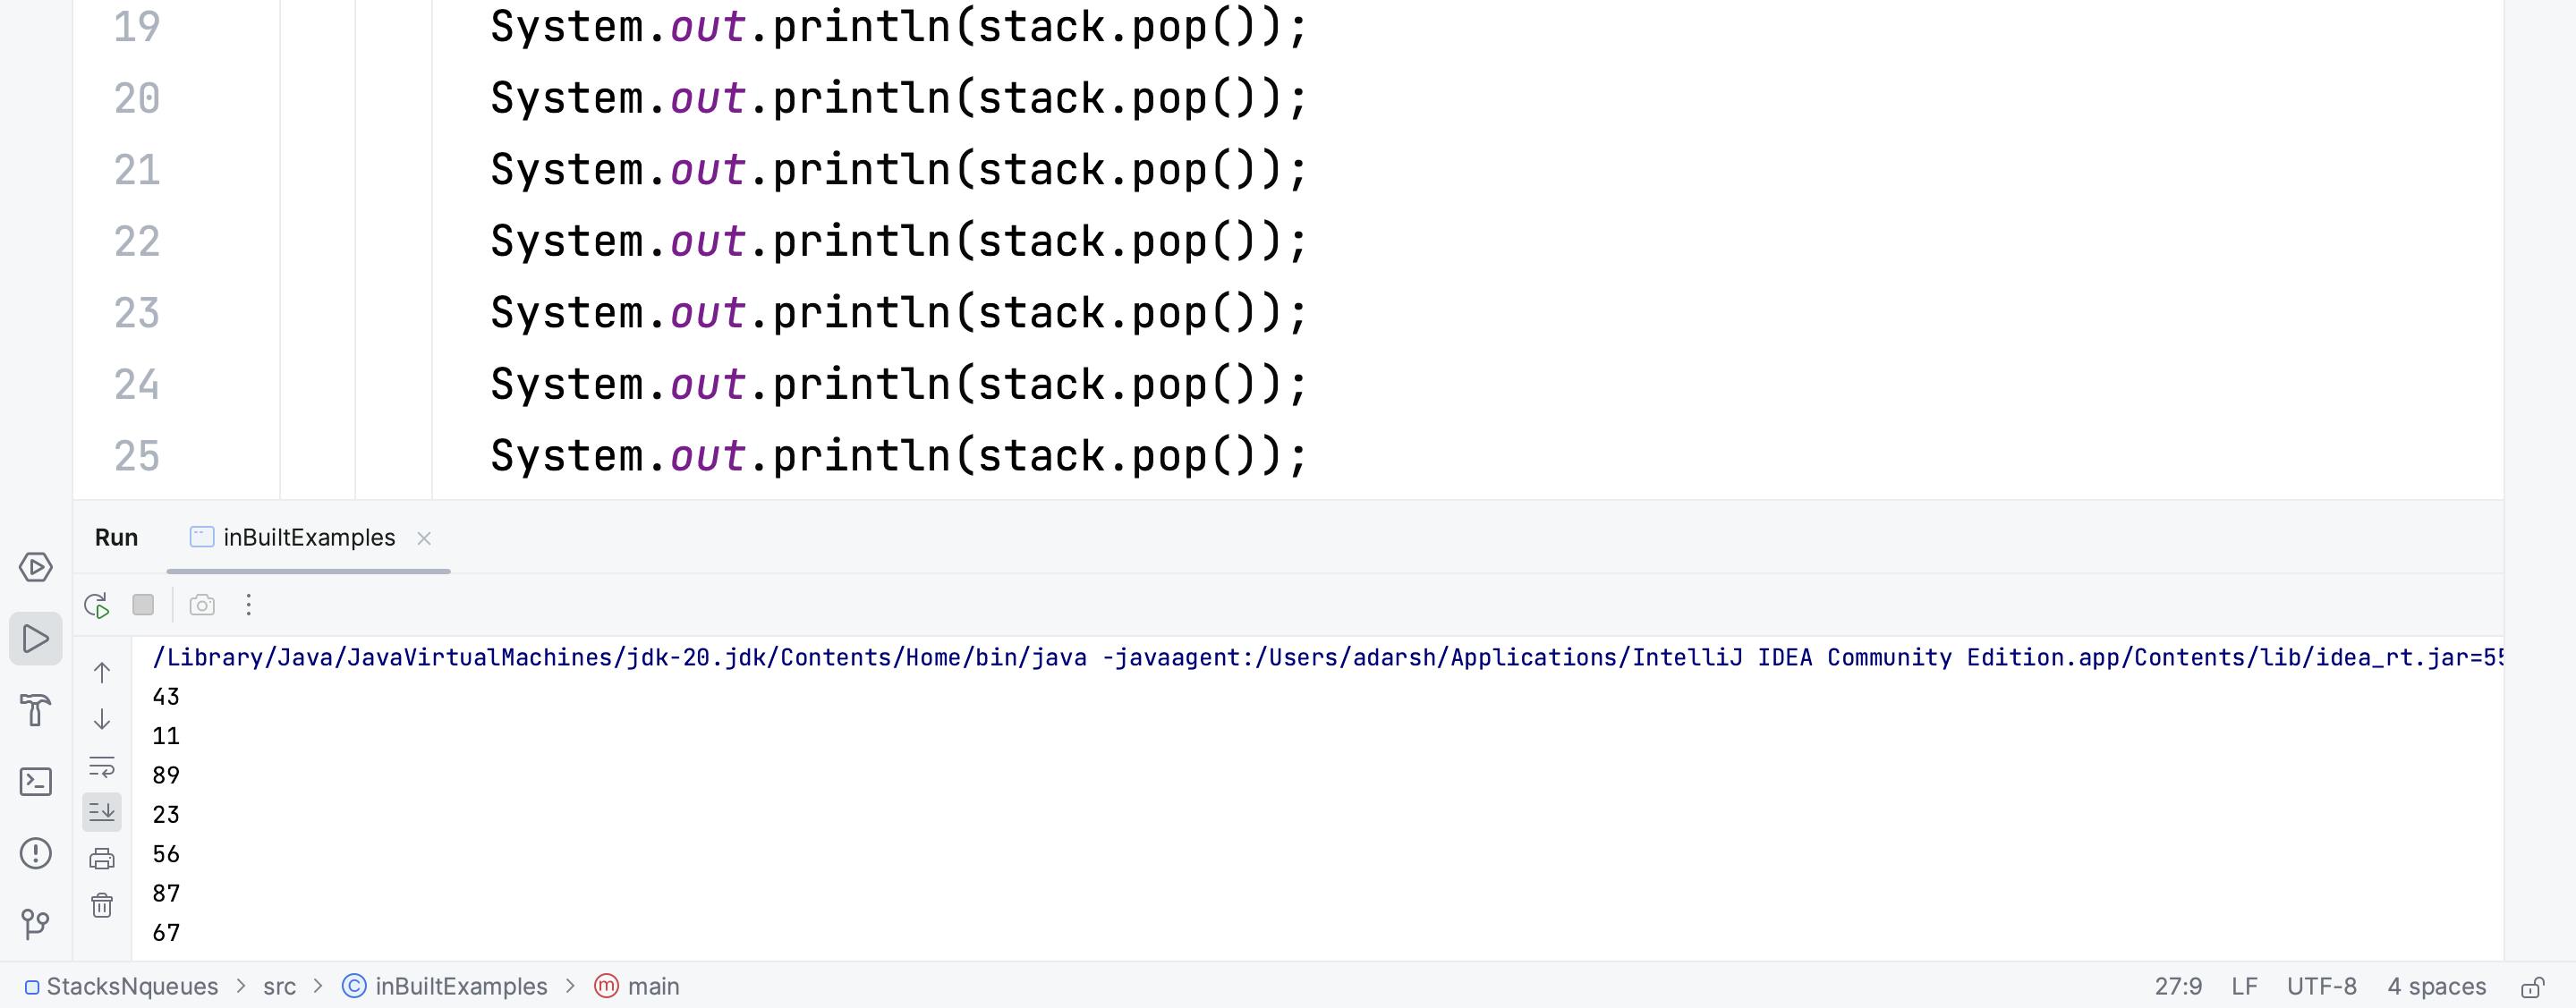
Now that we've removed all the elements, the stack is empty. If you attempt to remove an element from an empty stack, it will result in an underflow error or exception.

How Does Internal Implementation of a Stack Work in Java?
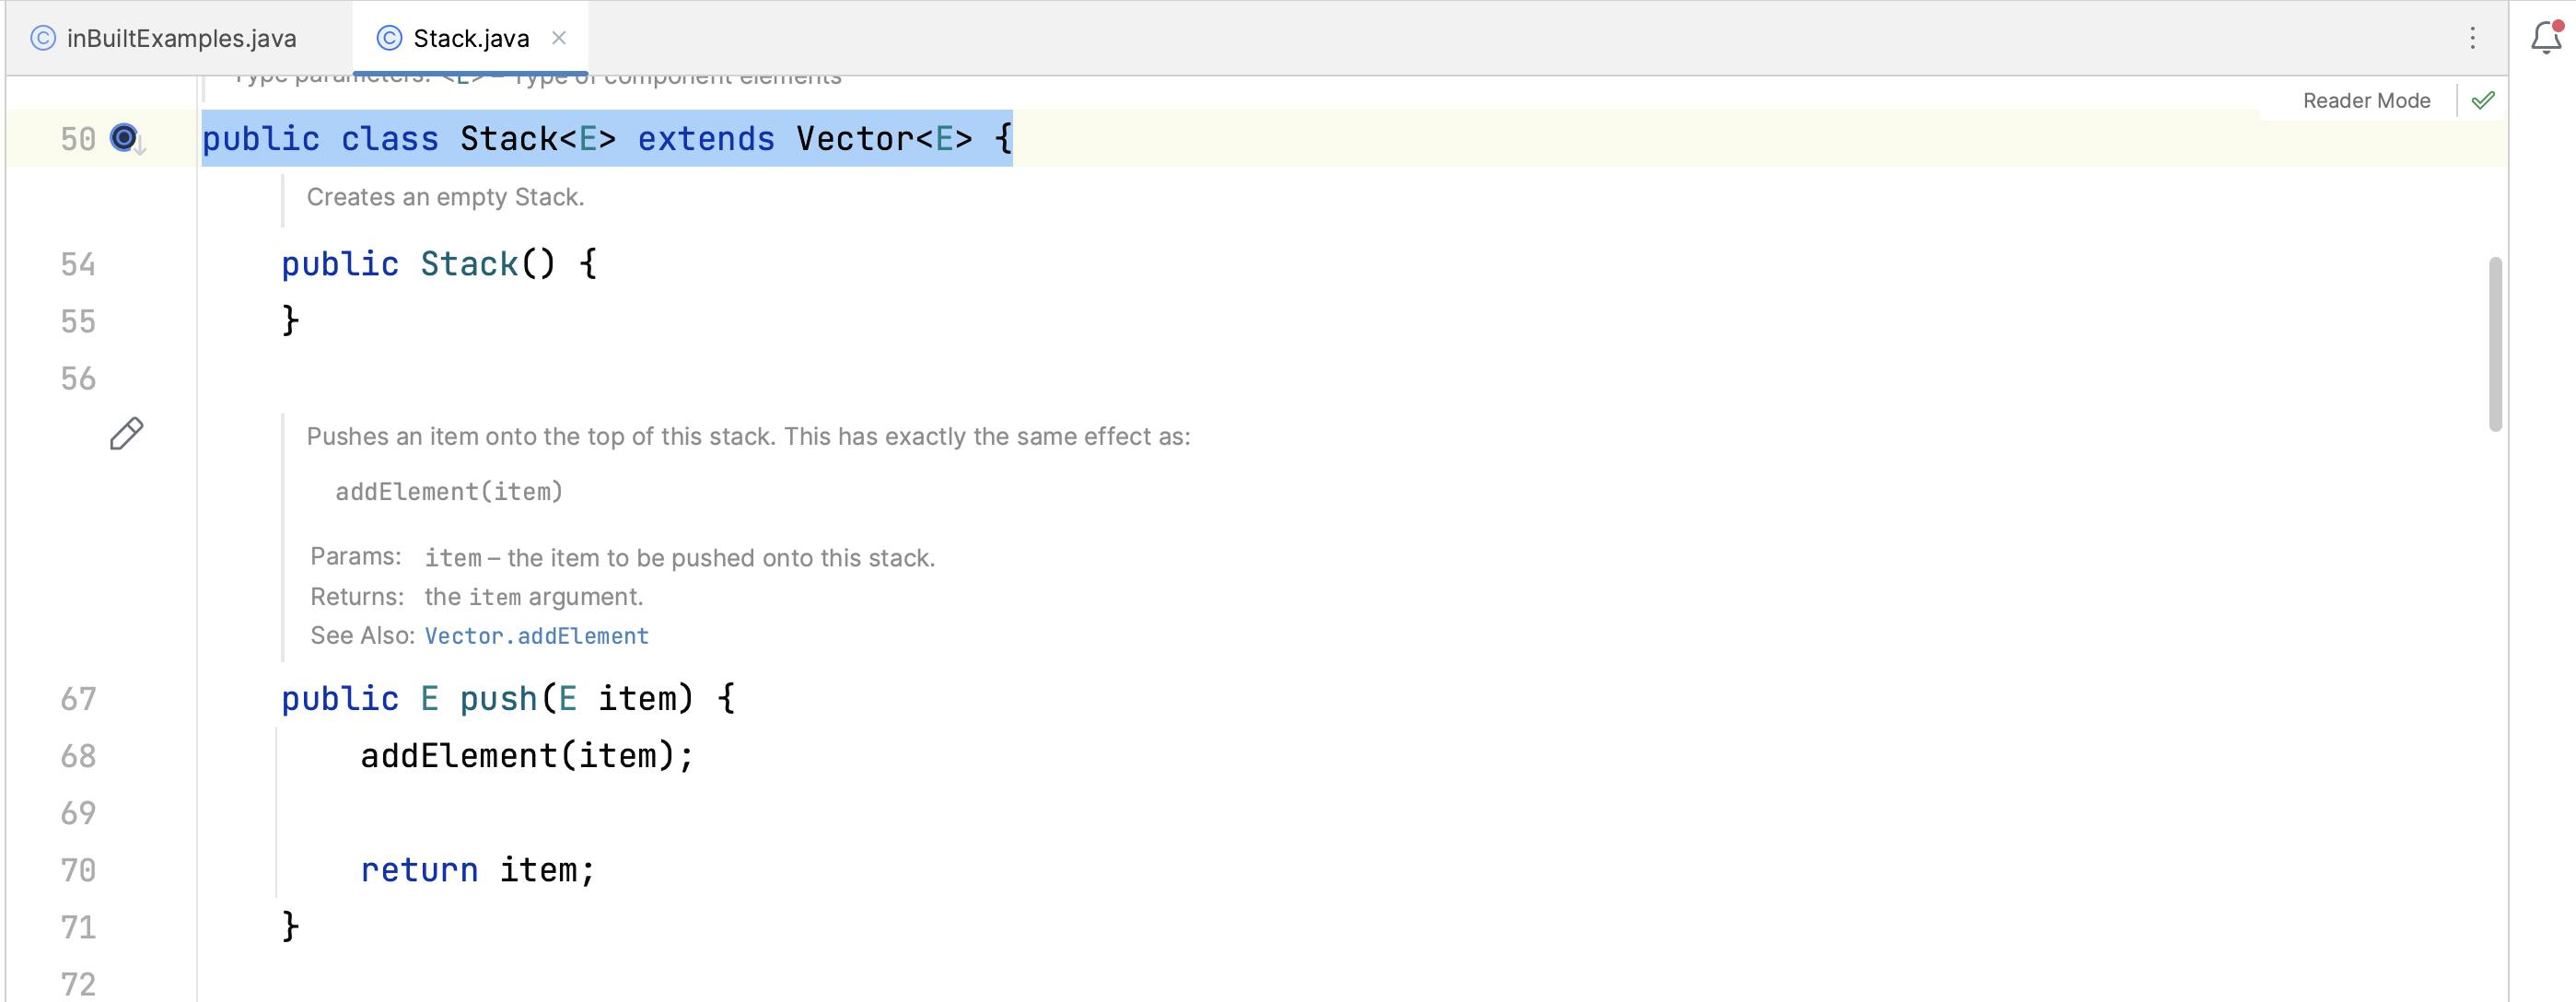
Java's Stack class utilises inheritance by extending the Vector class. A Stack essentially inherits the core functionality of a Vector with more additional methods and constraints to enforce stack behaviour, such as push and pop operations.
Internally, the Stack class relies on a dynamic array, similar to the structure used by Vector, to store its elements.
This dynamic array serves as the actual storage for elements, allowing the stack to automatically adjust its size by growing or shrinking as needed.
In the Vector class, the declaration protected Object[] elementData; defines a protected instance variable known as elementData. This array serves as the fundamental data storage for the Vector class, holding the elements that are added to the vector.
Vector is a class that encapsulates this array along with a set of methods and behaviours for dynamic resizing, element access, and manipulation.
In essence, elementData is the backbone that enables Vector to function as a dynamic array, but Vector provides a higher-level interface and additional functionality beyond what a simple array would offer.
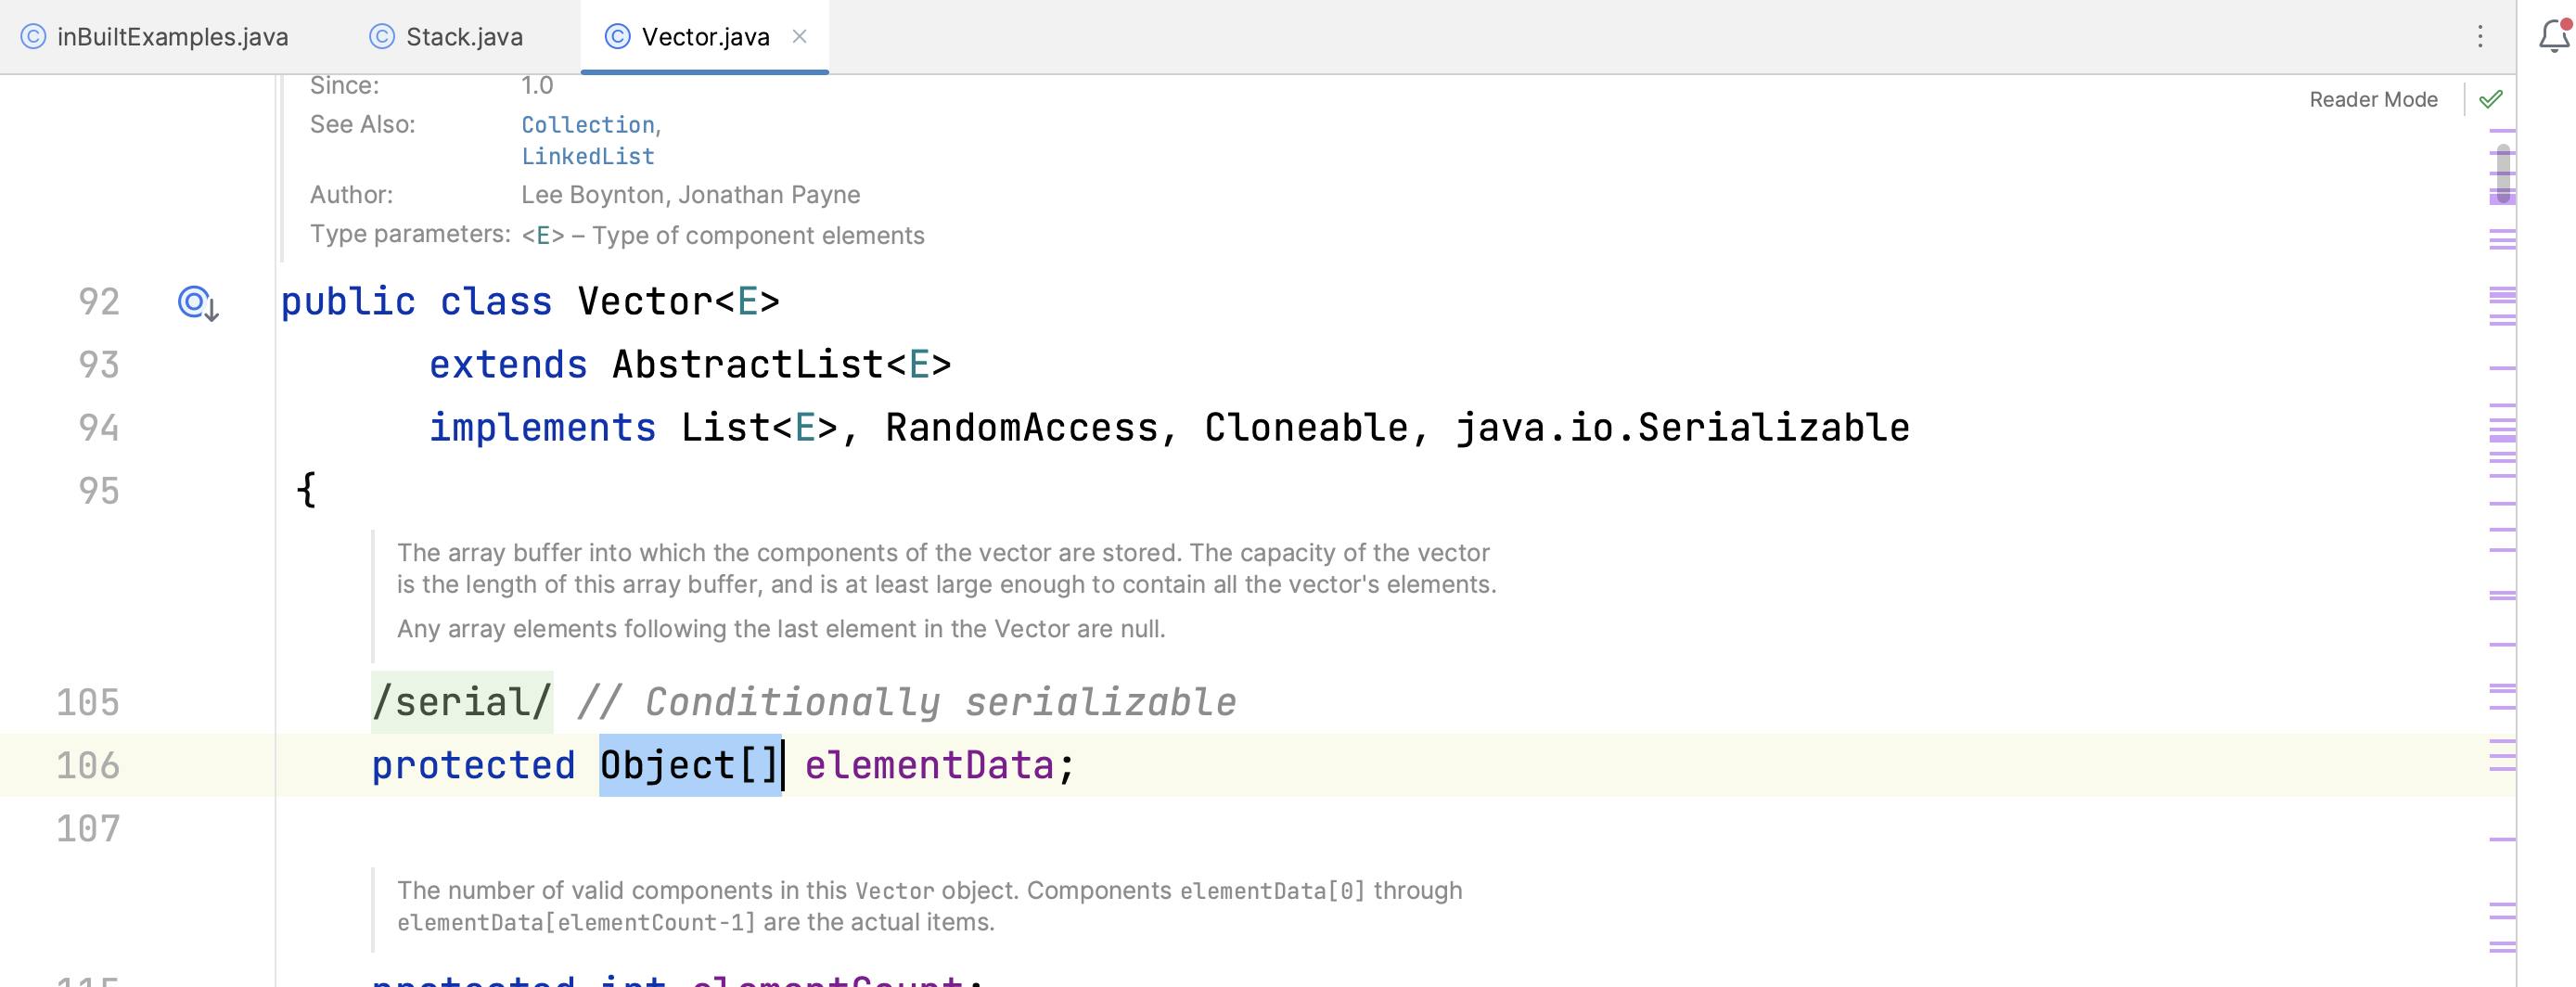
Think of it this way: our stack is built on top of a vector, and a vector is like an array. So, our stack is kind of like an array.
How to Create Your Custom Stack in Java?
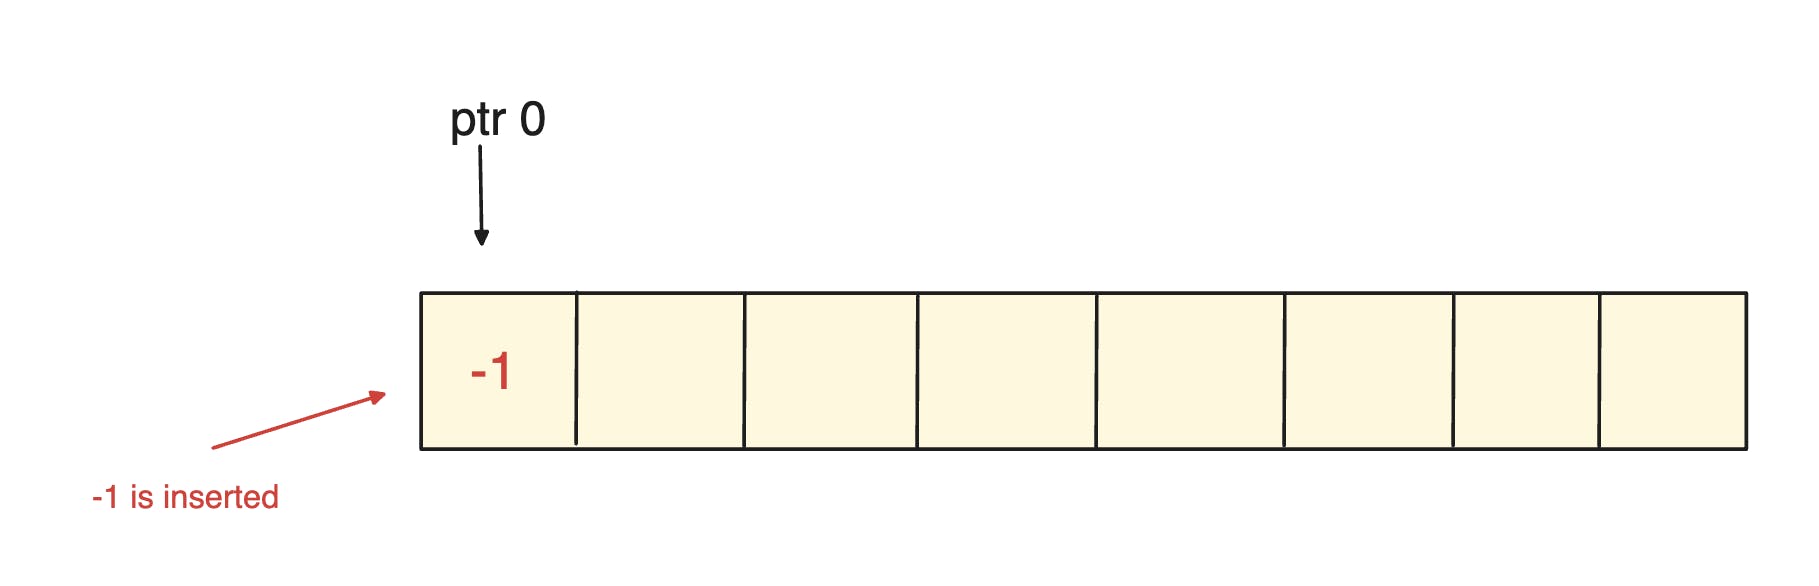
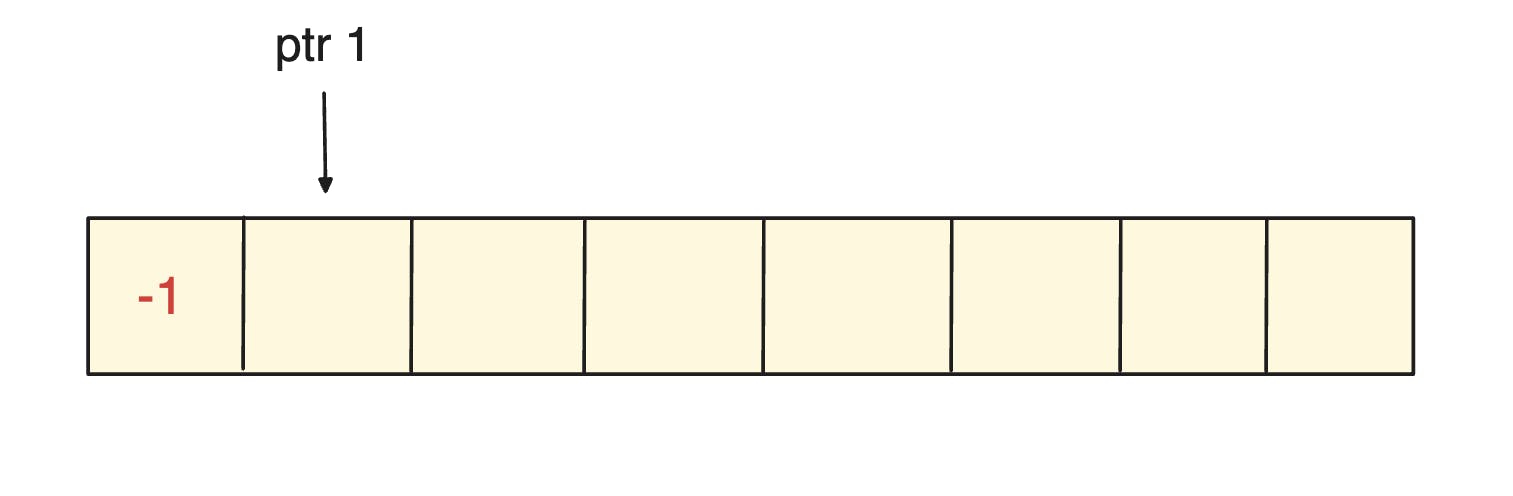
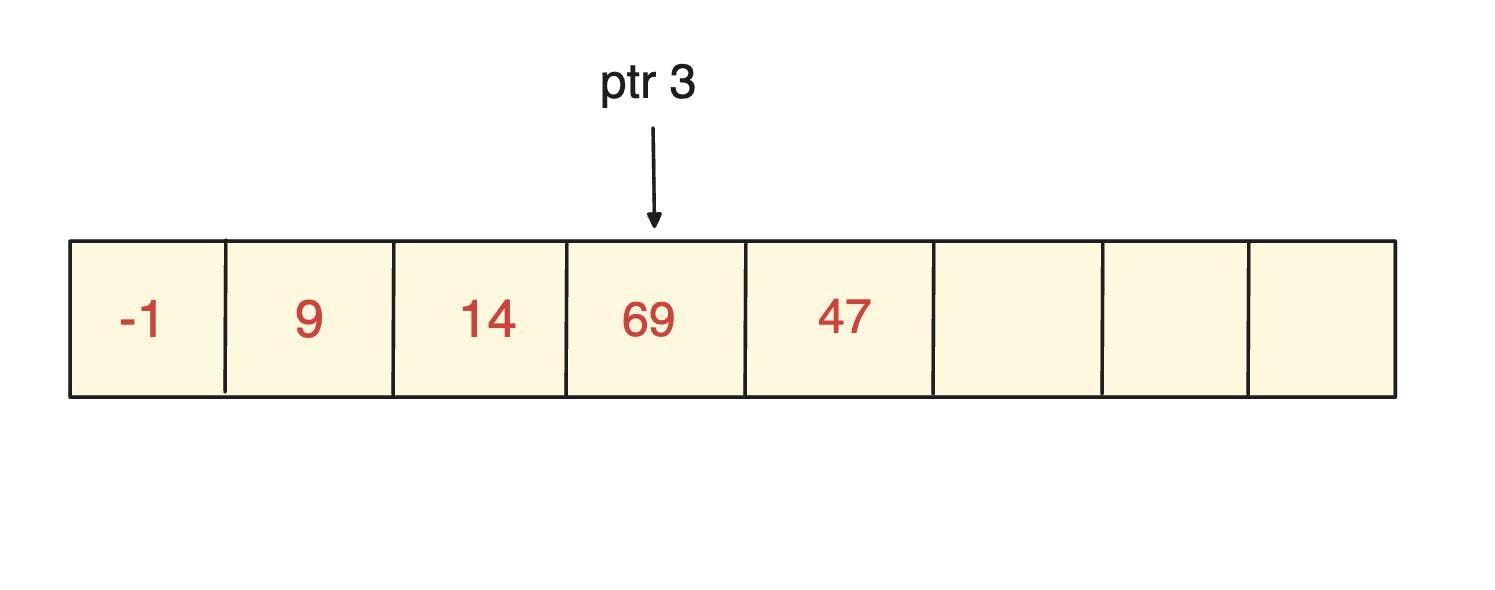
Let's gain a basic understanding of how we can utilise a pointer to create a custom stack in Java. To illustrate this concept, imagine an array with 9 elements, which we'll use to simulate a stack.
In this representation, the value -1 is used to indicate the stack pointer's position. Since -1 is not a valid index in the array, it signifies that the stack is empty.
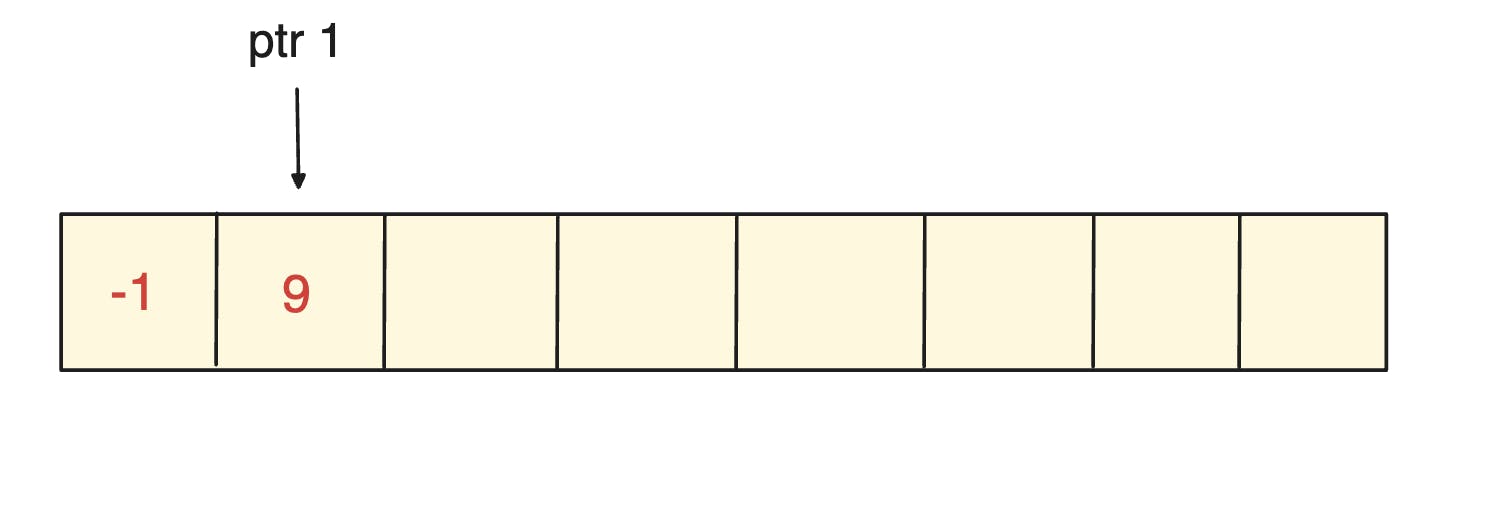
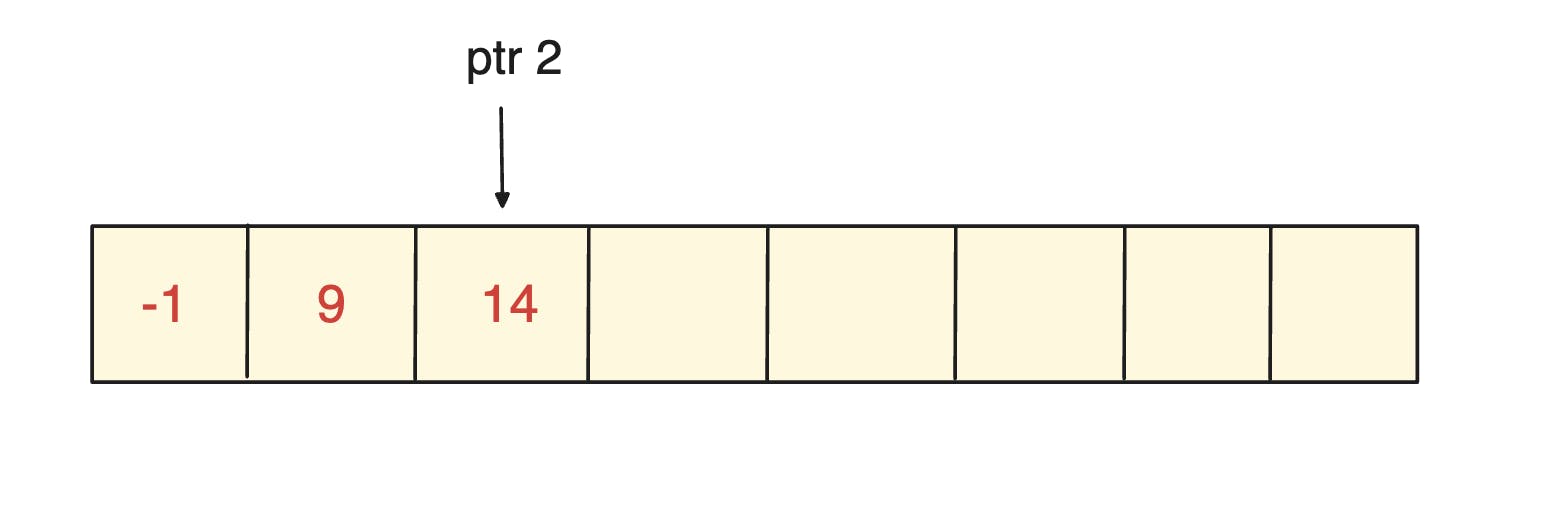
If we want to add data, we need to increment the pointer, right?
Now, we will increment the pointer again and then fill in the data.
And so on...
How to remove data from the stack?
Suppose this is our stack array, and we want to remove elements from it.
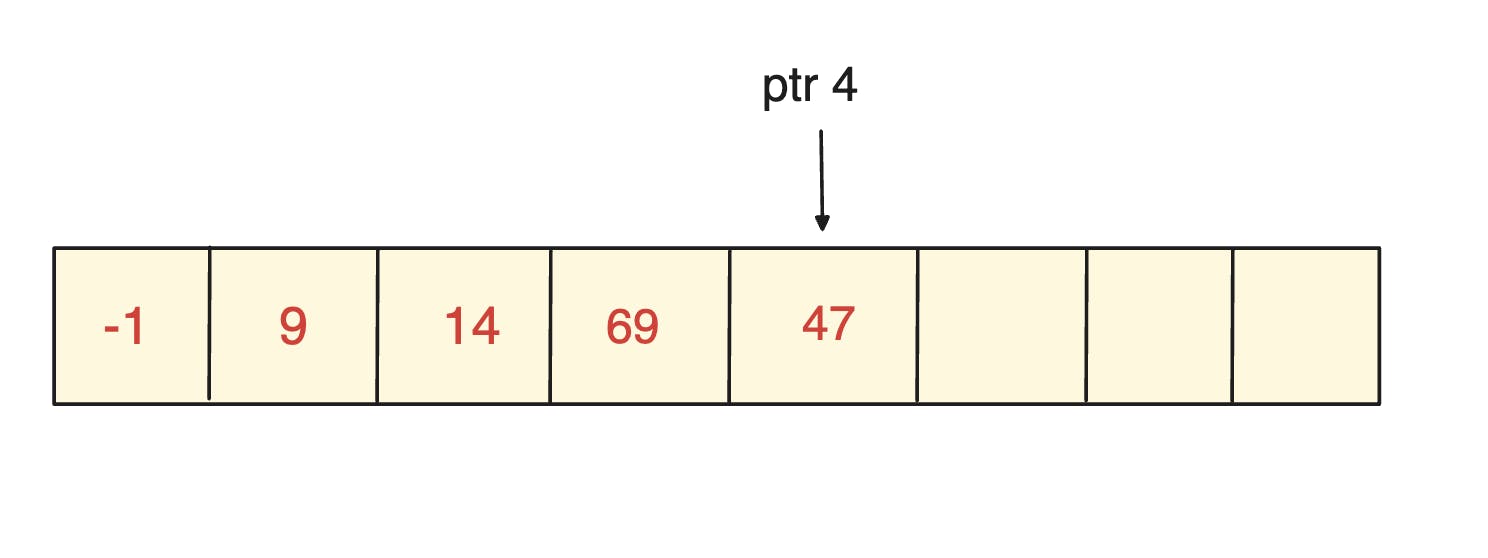
To remove data, we simply decrement the pointer by 1.
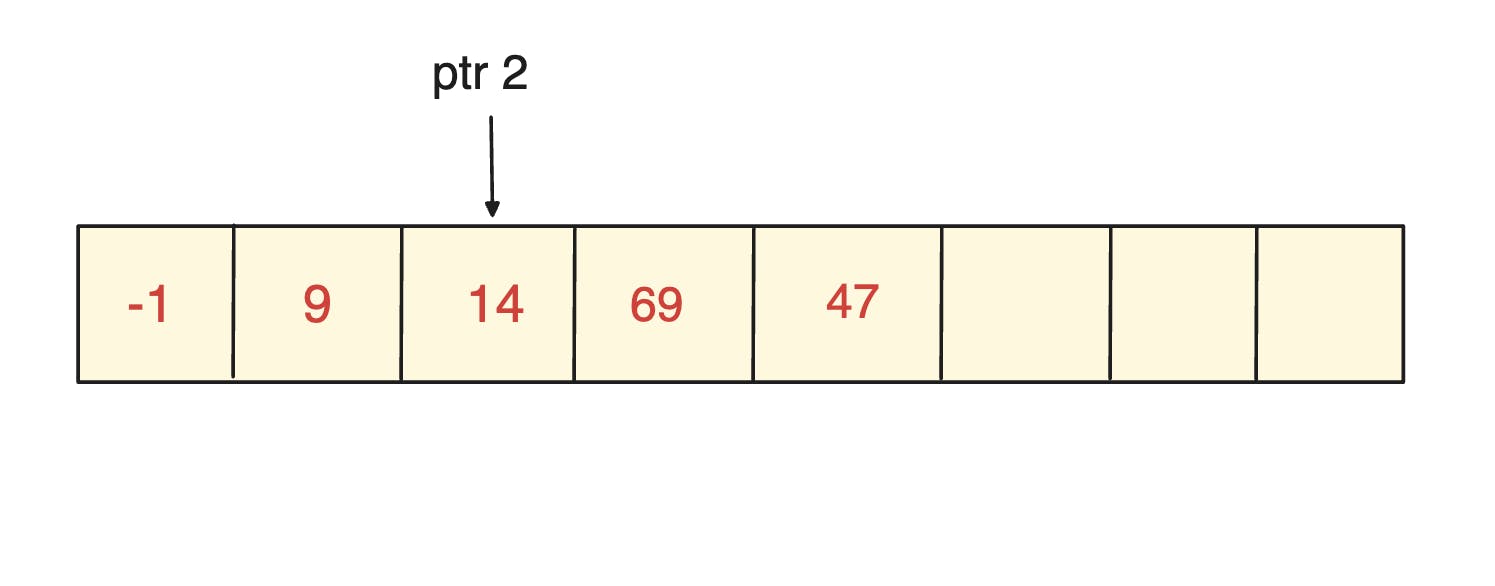
Now, what about the values we've just removed?
They technically remain in the stack, but they are no longer relevant. In this data structure, we always know that the pointer points to the number at the top of the stack. Right?
So, Any numbers following this pointer are essentially ignored, as they are not considered part of the active stack. But it is a good practice to display the item that is removed.
Custom class:
import java.util.Arrays;

public class CustomStack {
    protected int[] data;
    private static final int DEFAULT_SIZE = 10;
    int ptr = -1; //initially stack is empty

    public CustomStack() {
        this(DEFAULT_SIZE);
    }

    public CustomStack(int size) {
        this.data = new int[size];
    }

    public boolean push(int item) {

        if (isFull()){
            System.out.println("Stack is full!");
            return false;
        }

        ptr++;
        data[ptr] = item;
        return true;
    }
    public int pop() throws StackException{
        if (isEmpty()){
            throw new StackException("Can not pop from an empty stack!!");
        }
        int removed = data[ptr];
        ptr--;
        return removed;
    }
    private boolean isFull(){
        return ptr == data.length - 1;//ptr is at last index
    }

    public int peek() throws StackException{
        if (isEmpty()){
            throw new StackException("Can not peek from an empty stack!!");
        }
        return data[ptr];
    }

    private boolean isEmpty(){
        return ptr == -1;
    }
}
Exception class:
Invoke the constructor of the exception(super) class & pass the provided messages as an argument.
Basically, telling the exception class "Take this message I'm giving you & use it like an exception message"
public class StackException extends Exception{
    public StackException(String message) {
        super(message);
    }
}
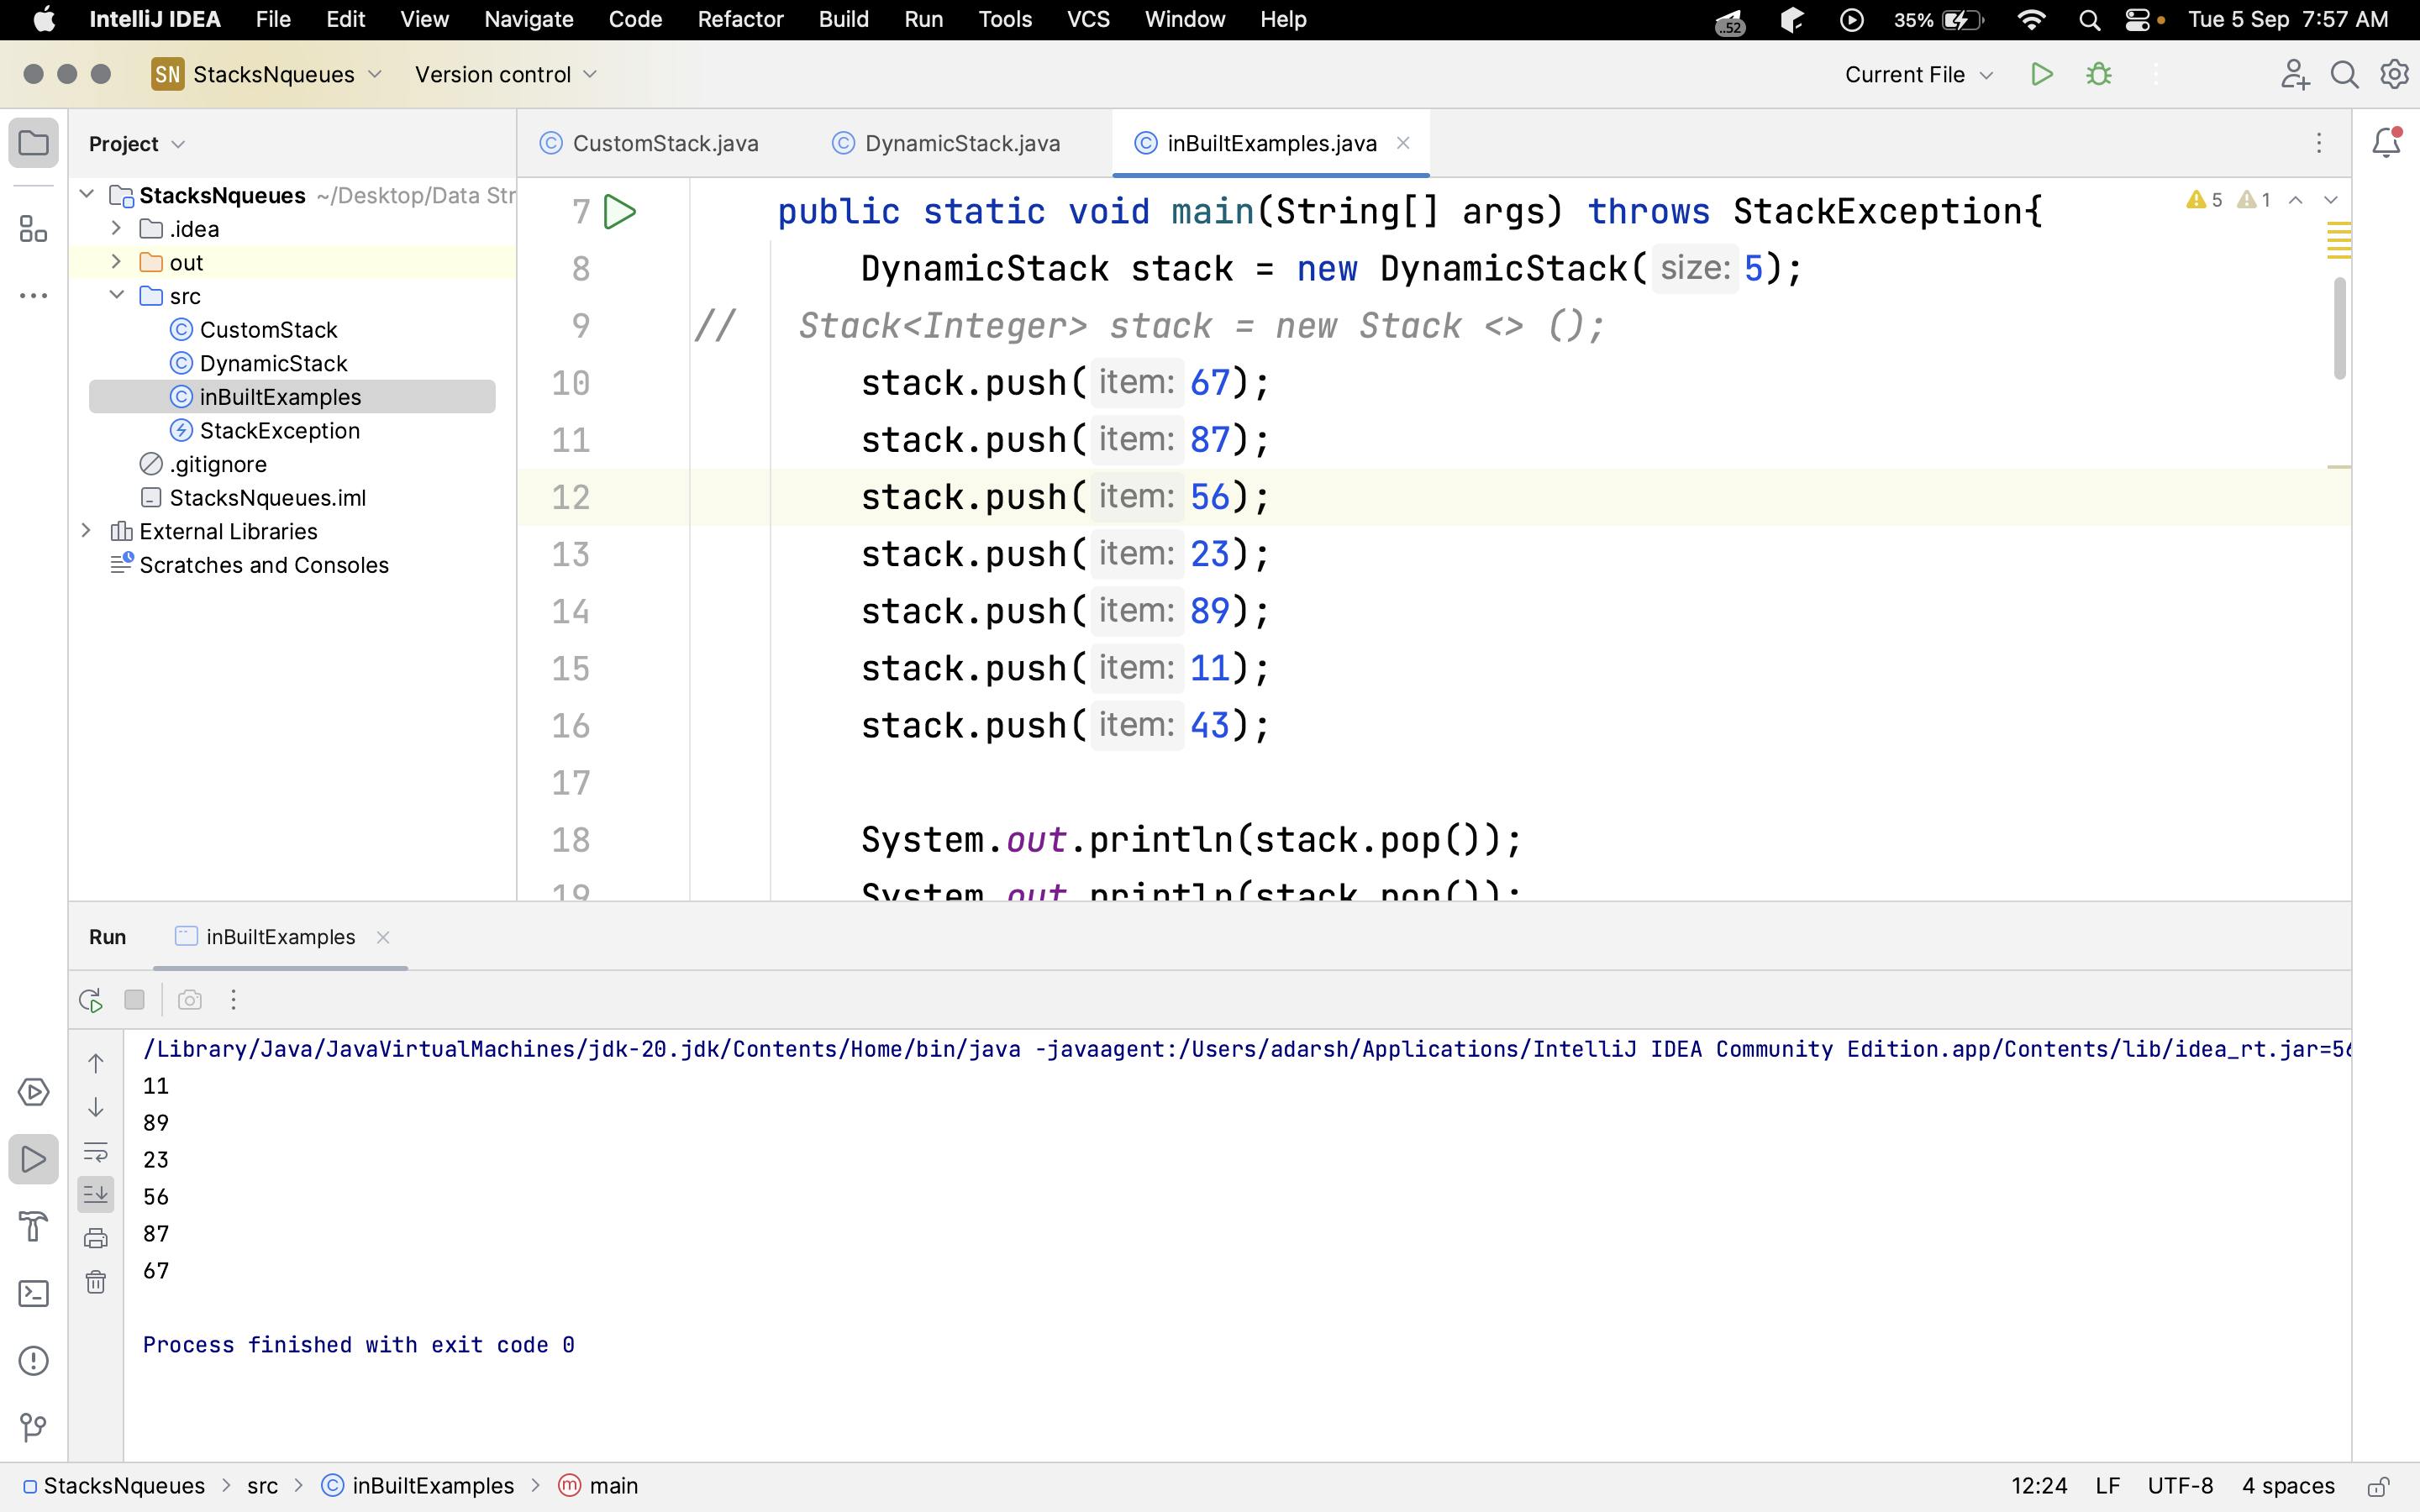
Main class:
import java.util.Stack;
import java.util.Deque;
public class inBuiltExamples {
public static void main(String[] args) {
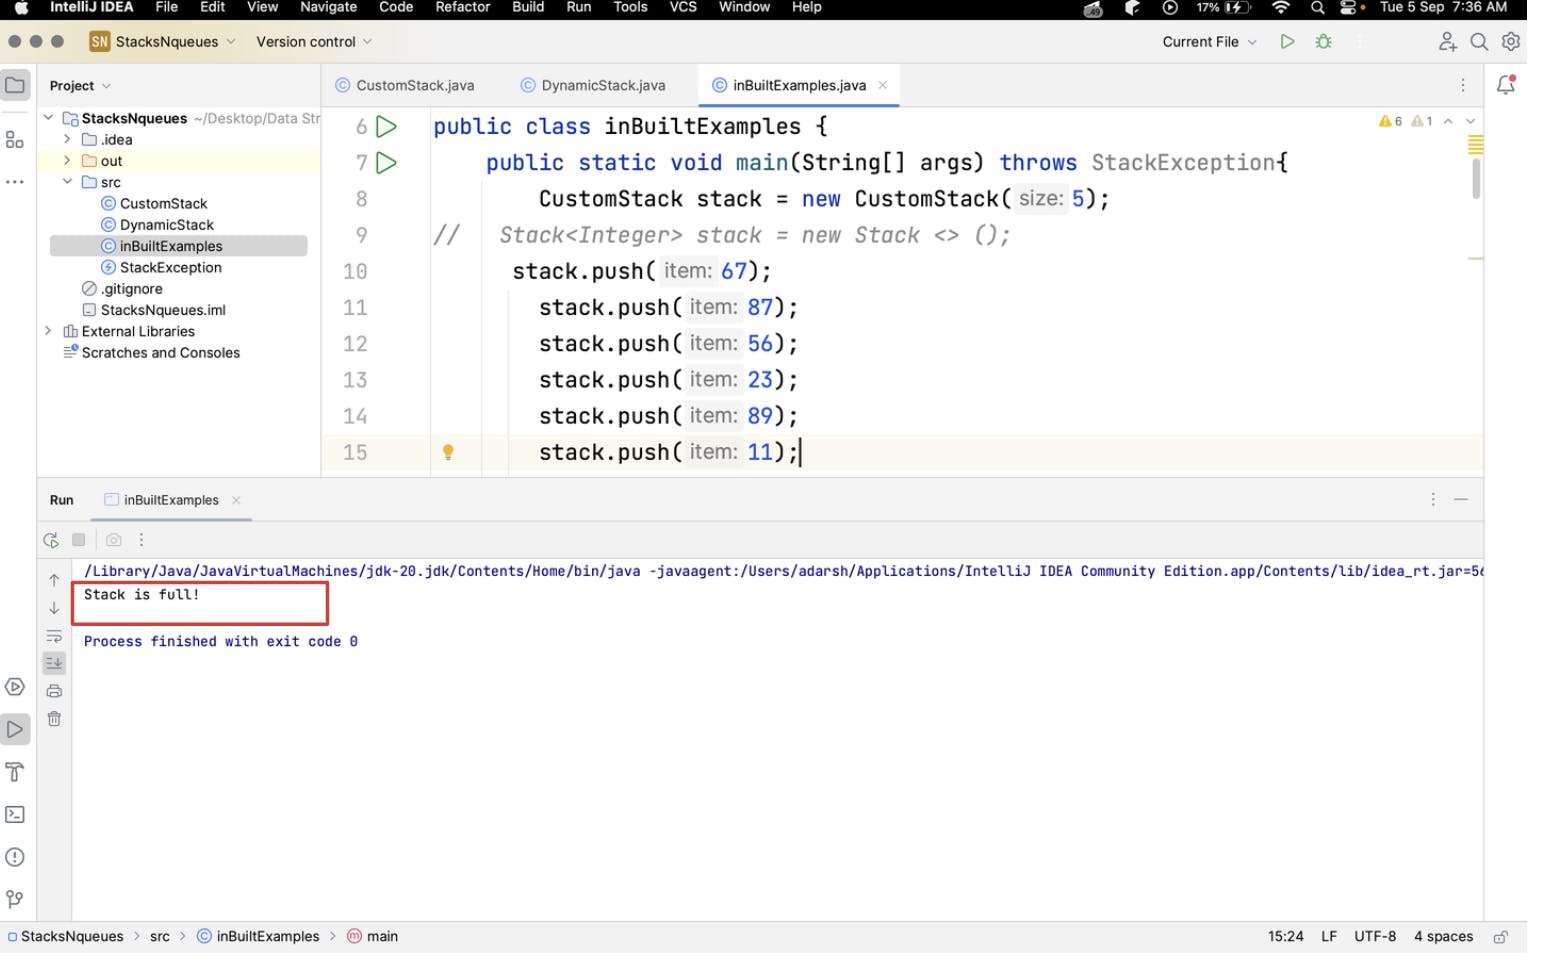
CustomStack stack = new CustomStack(7);
stack.push(67);
stack.push(87);
stack.push(56);
stack.push(23);
stack.push(89);
stack.push(11);
stack.push(43);
System.out.println(stack.pop());
System.out.println(stack.pop());
System.out.println(stack.pop());
System.out.println(stack.pop());
System.out.println(stack.pop());
System.out.println(stack.pop());
System.out.println(stack.pop());
System.out.println(stack.pop());
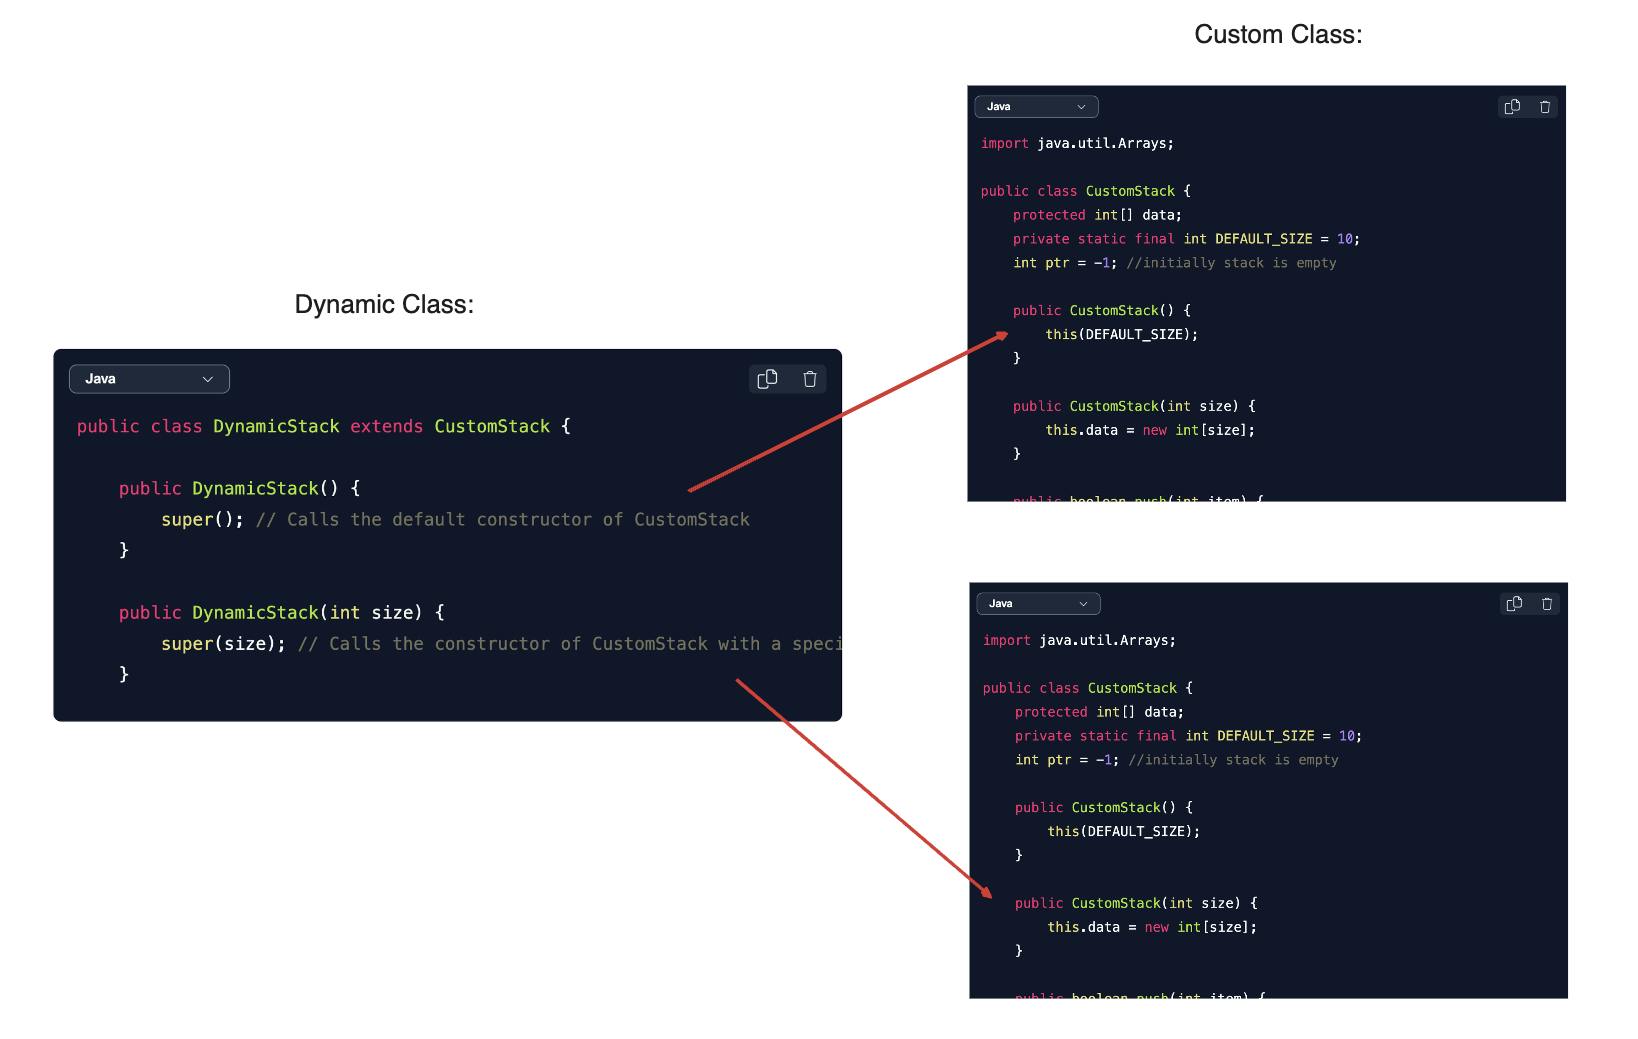
How to Create a Dynamic Custom Stack in Java?
The DynamicStack class extends CustomStack to inherit its functionality. It introduces two constructors: one for a default-sized stack and another for a stack with a specific initial size.
This allows DynamicStack dynamically adapts to the number of elements, automatically resizing itself when necessary, making it a flexible choice for stack management in Java.
public class DynamicStack extends CustomStack {

    public DynamicStack() {
        super(); // Calls the default constructor of CustomStack
    }

    public DynamicStack(int size) {
        super(size); // Calls the constructor of CustomStack with a specified size
    }
These are the various functions that we can perform on our custom stack:
Pop
Peek (or Top)
isEmpty
isFull
Push
Now, let's consider which one of these stack functions might create a problem if we want to add more elements to the stack. push() right?
We will create a temporary array with a size that is twice the size of the data array.
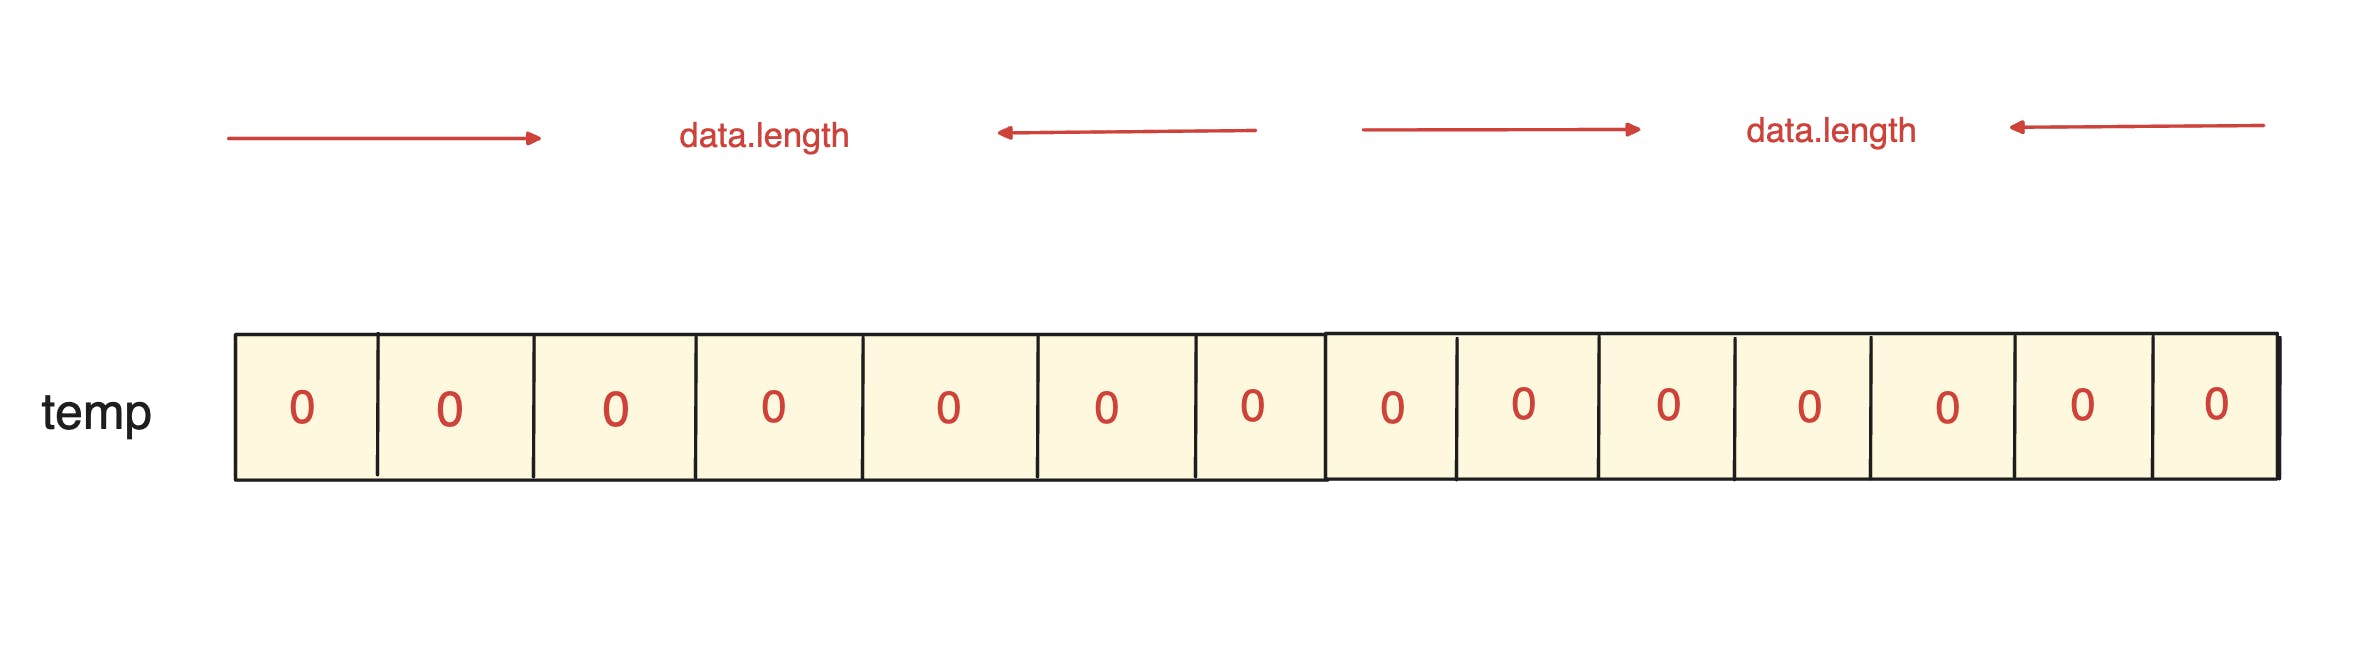
Next, we'll copy all the elements from the data array to the temp array and Update the data array to the new larger array.
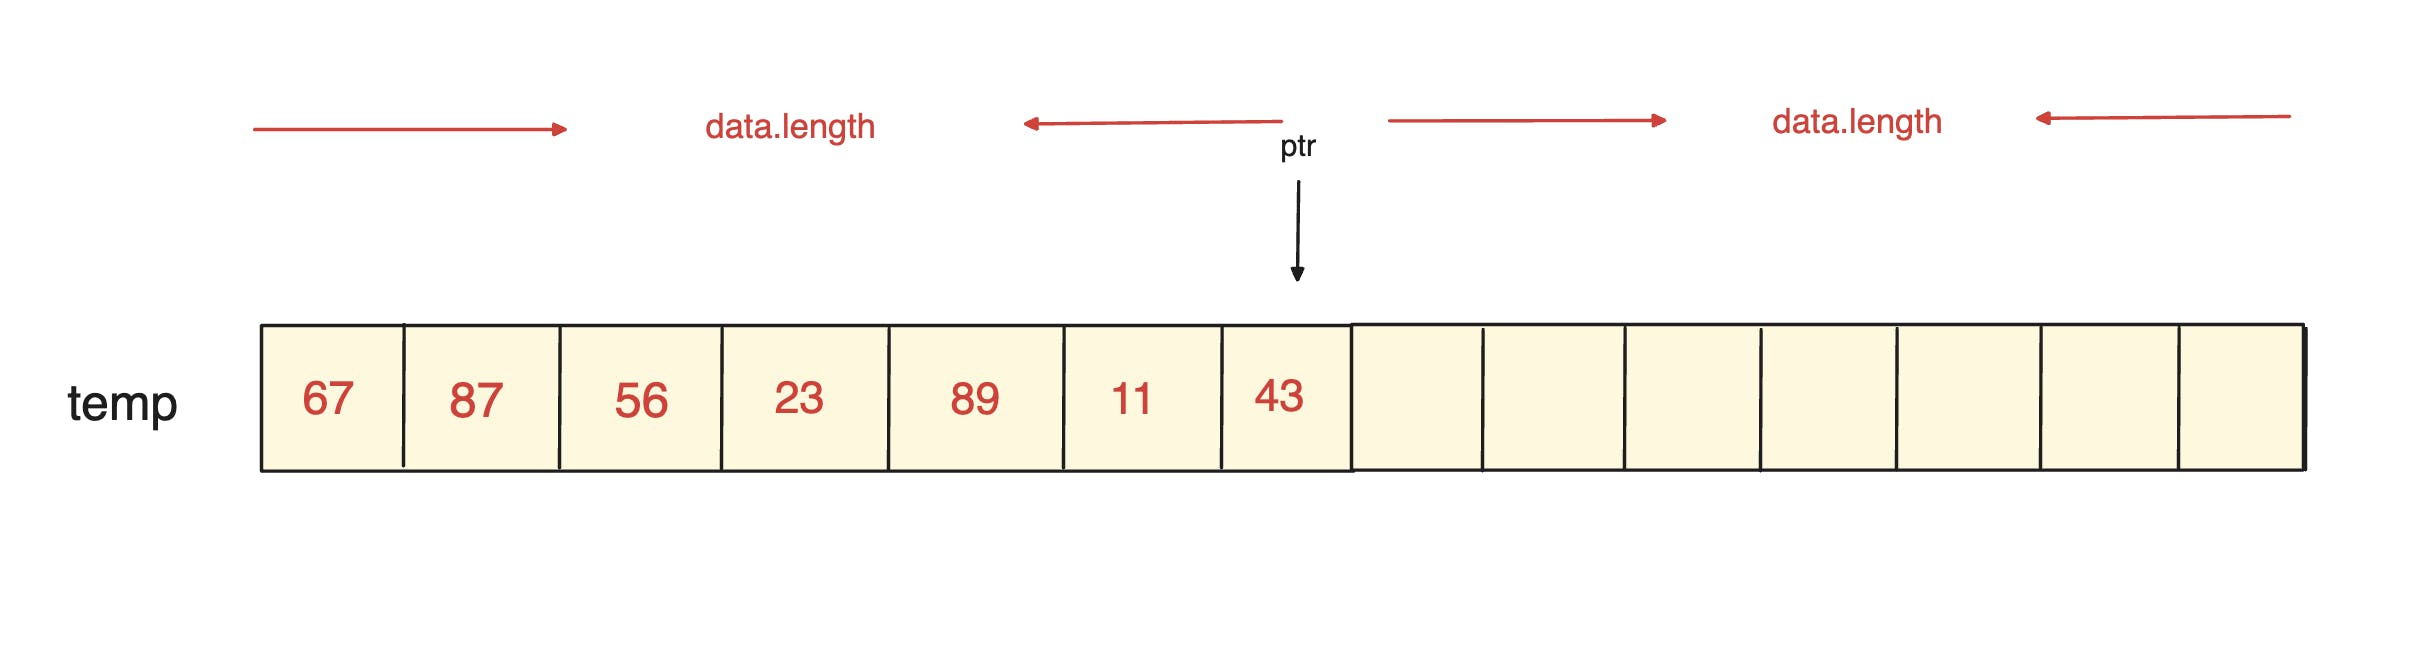
Now, let's take a closer look at the code.
public class DynamicStack extends CustomStack {
public DynamicStack() {
super(); // Calls the default constructor of CustomStack
}
public DynamicStack(int size) {
super(size); // Calls the constructor of CustomStack with a specified size
}
@Override
public boolean push(int item) {
// Check if the stack is full
if (this.isFull()) {
// Double the array size
int[] temp = new int[data.length * 2];
// Copy all previous items to the new data array
for (int i = 0; i < data.length; i++) {
temp[i] = data[i];
}
data = temp; // Update the data array to the new larger array
}
// At this point, we know the array is not full, so insert data normally
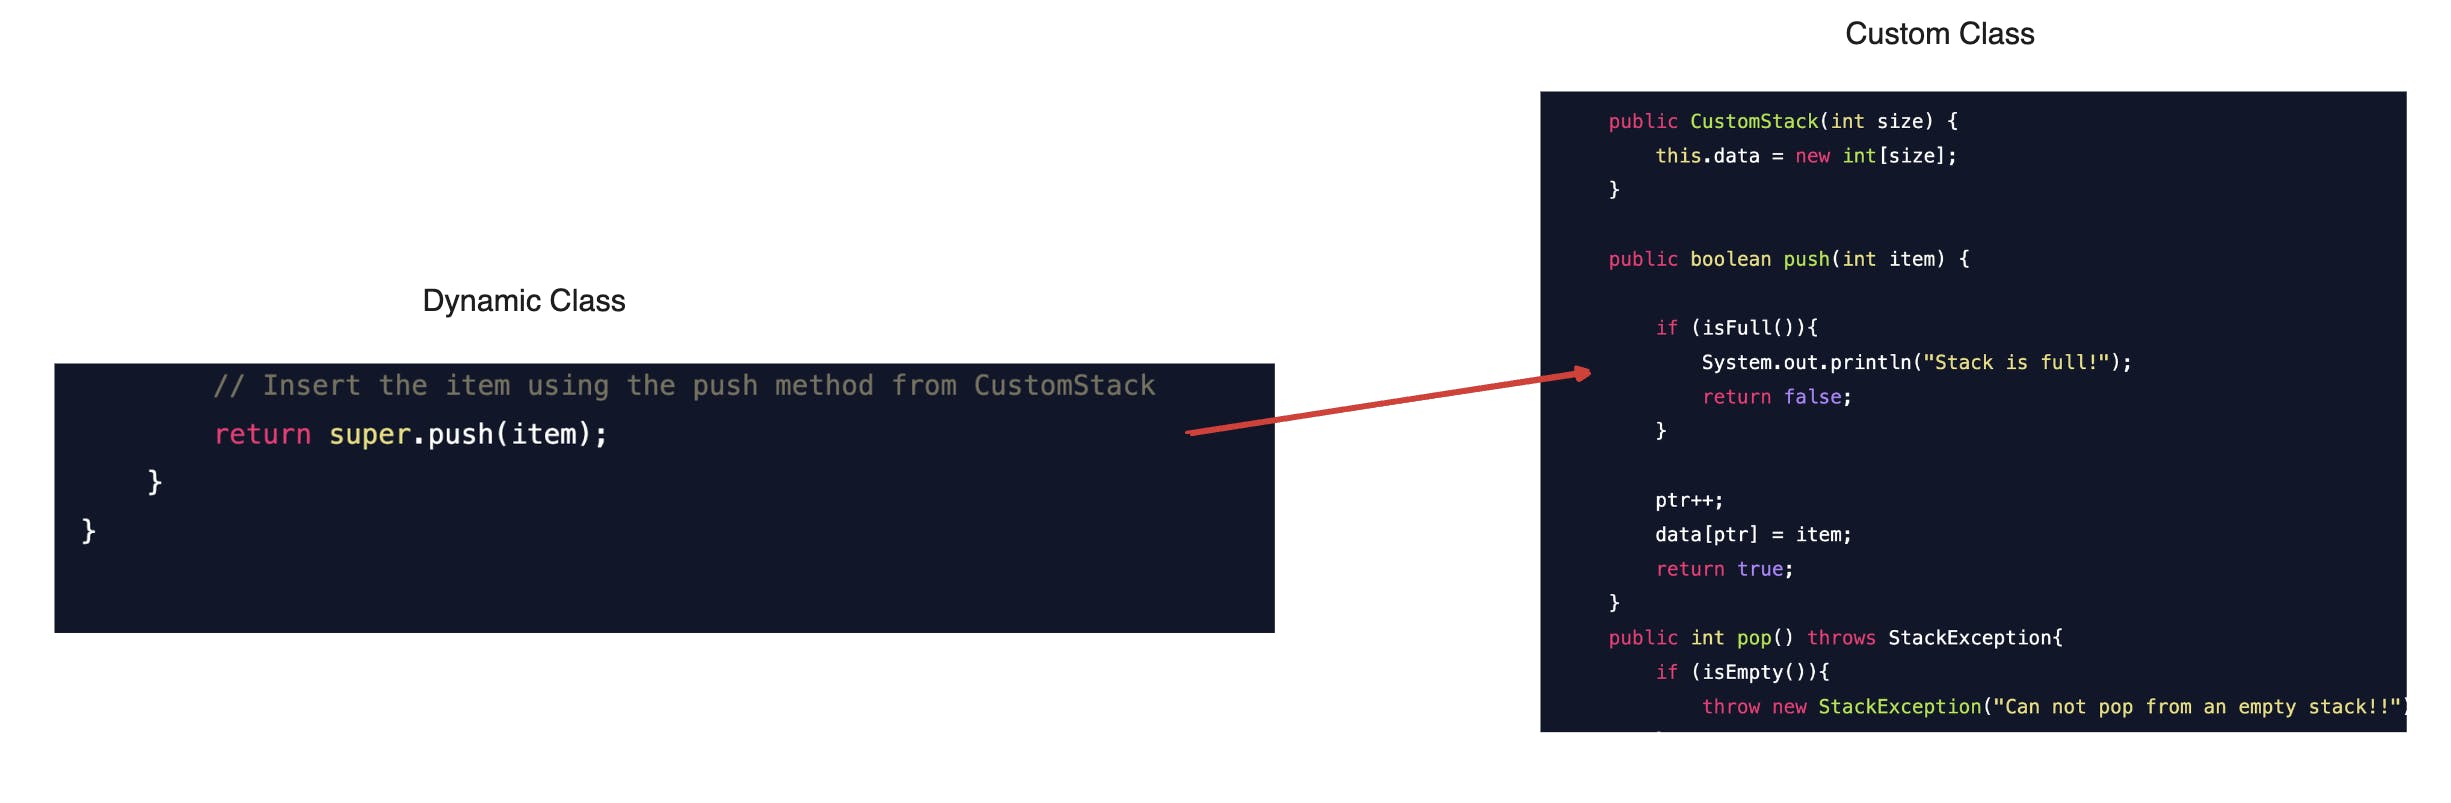
// Insert the item using the push method from CustomStack
return super.push(item);
}
}
But when we call the push method from DynamicStack successfully inserts the element.
You can use a more general type to refer to a more specific object.
Suppose you have a big container called CustomStack that can hold things. Now, you make a smaller container called DynamicStack that fits inside the big one. You can still put things in the smaller container and use it inside the big one. But remember, the smaller container can only do what both containers can do For instance, you can create a DynamicStack object and assign it to a CustomStack variable like this: CustomStack stack = new DynamicStack(5);.
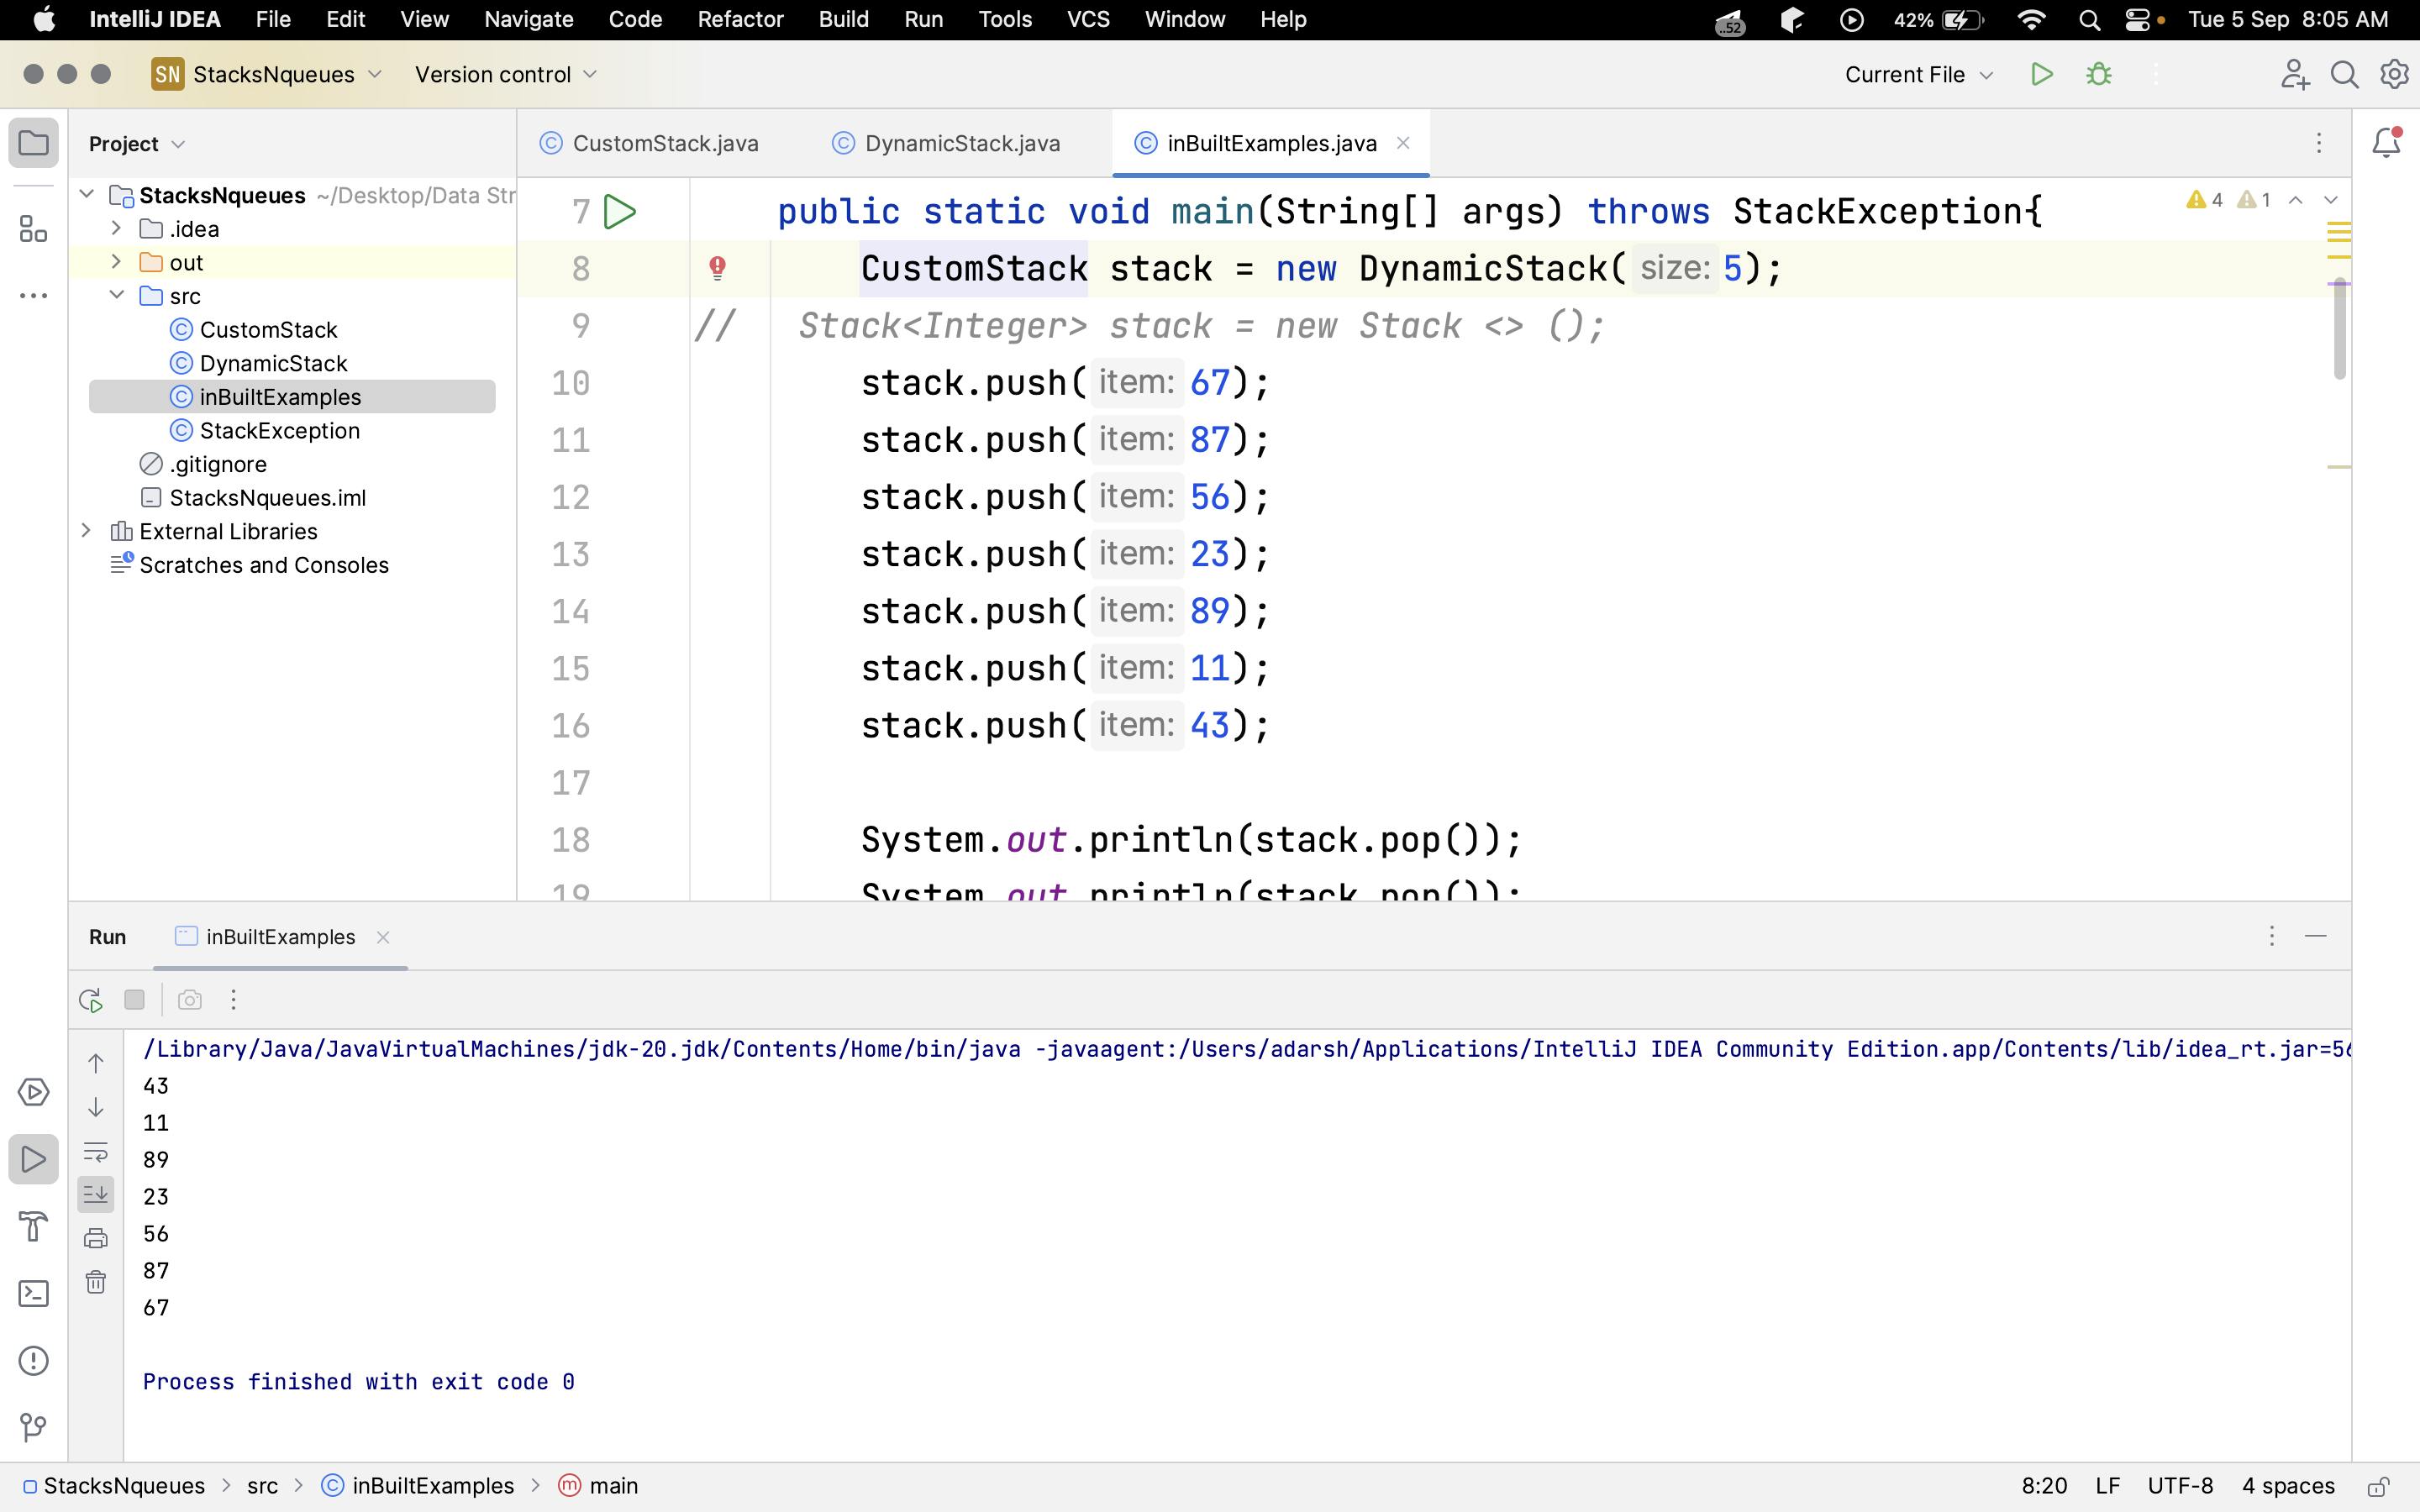
This works because DynamicStack is a kind of CustomStack, so you can use it where a CustomStack is expected.
However, when you use the stack variable, you can only use the features that both CustomStack and DynamicStack has in common. Are any special features unique to DynamicStack won't be available through this variable.
What Is Queue?
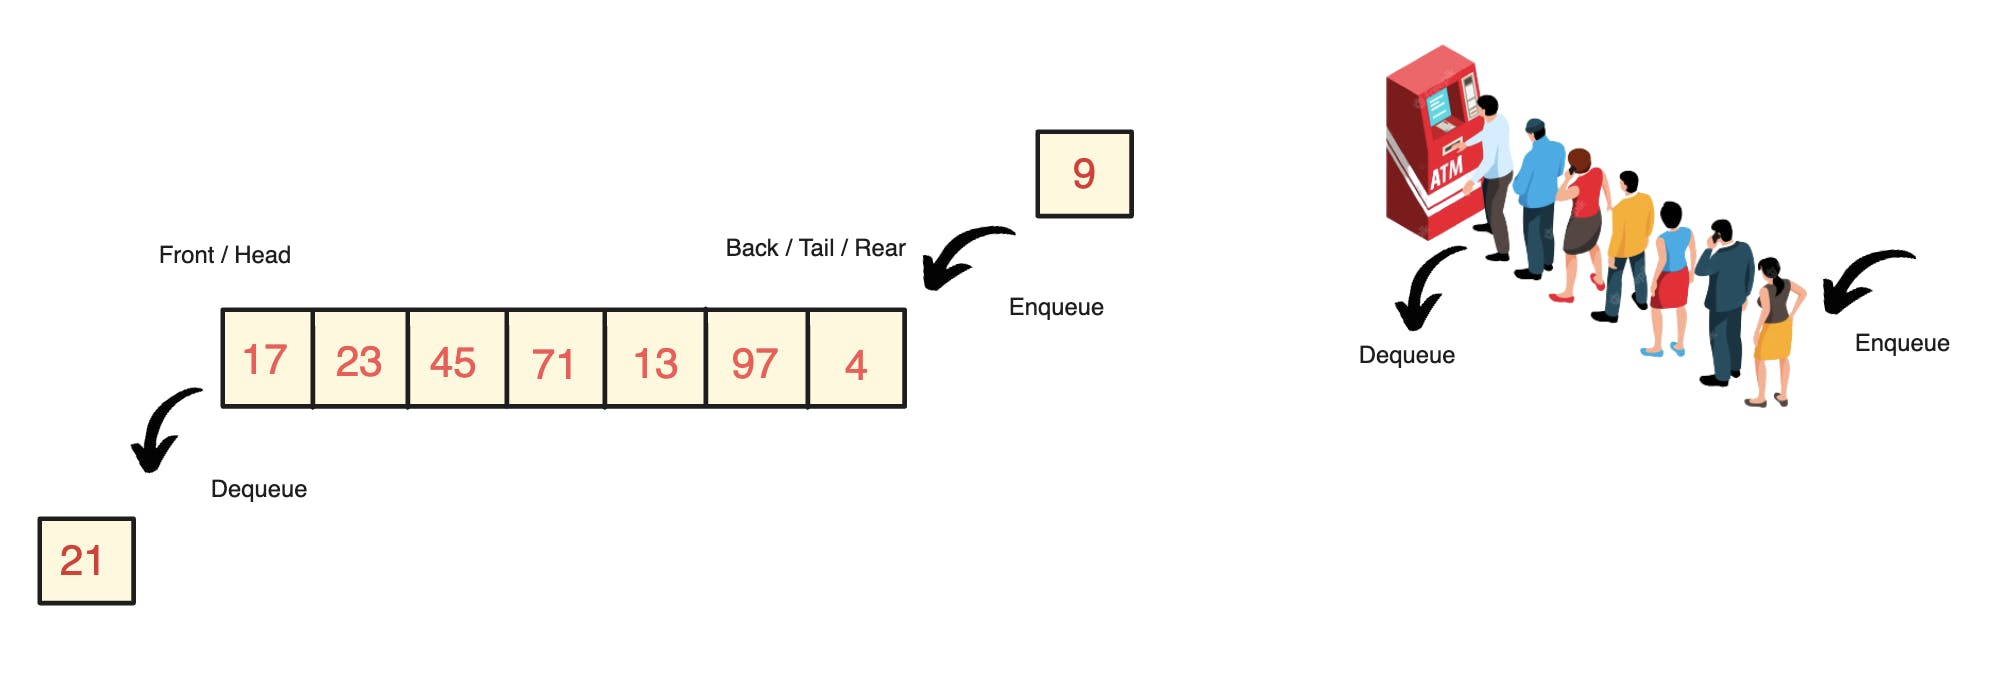
A queue is a container of objects (a linear collection) that are inserted and removed according to the first-in-first-out (FIFO) principle.
It's like a line of people waiting for a service: the first person to arrive is the first one to be served. In a queue, elements are added at one end (rear) and removed from the other end (front).
Where do we use Queue?
Task Scheduling: Managing processes and threads in operating systems is a fundamental and pervasive application of queues.
Print Queue: Printers are ubiquitous in homes and offices, making print queues a common and widely recognised use case.
Breadth-First Search (BFS): BFS is a fundamental algorithm used in various domains, including computer graphics, network routing, and more.
Message Queues: With the rise of distributed systems, message queues have gained significant popularity for managing asynchronous communication in web applications, microservices architectures, and cloud computing.
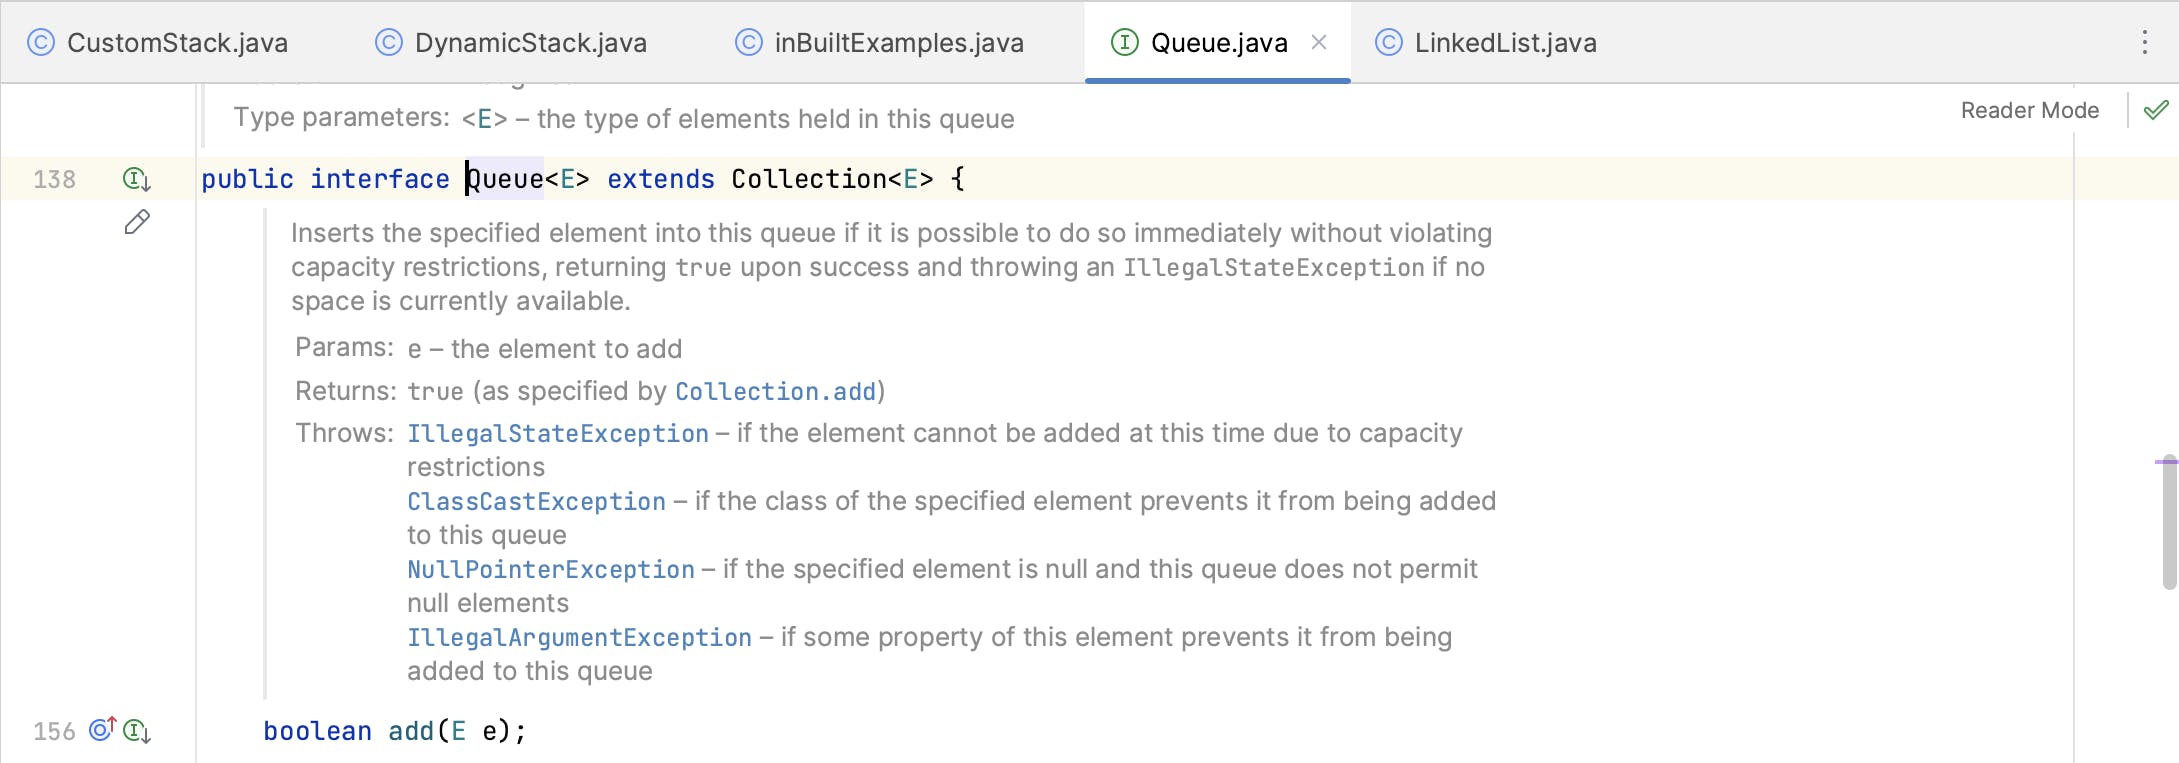
How to use Java's Built-In Functions for Queue Manipulation?
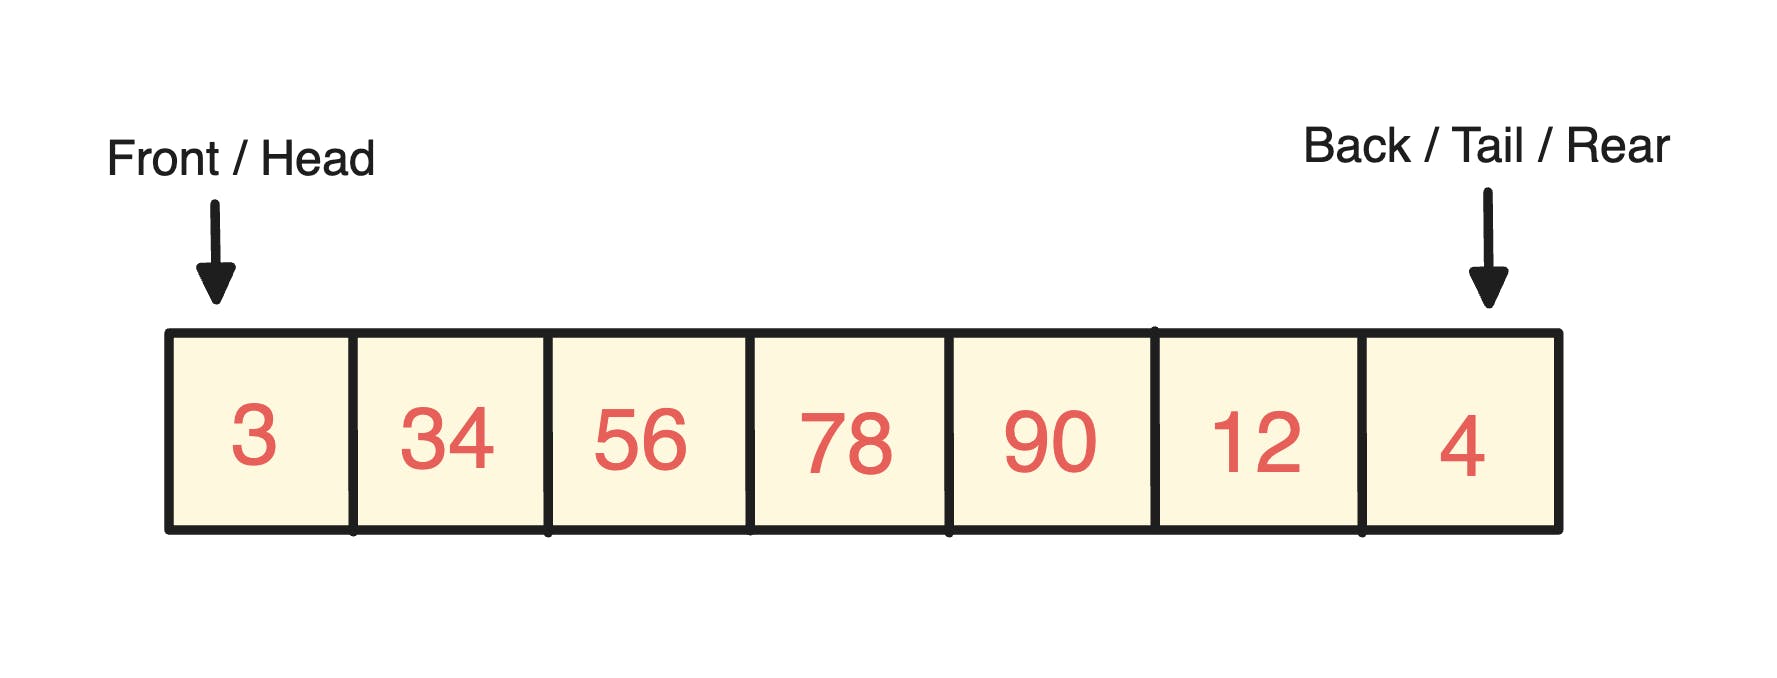
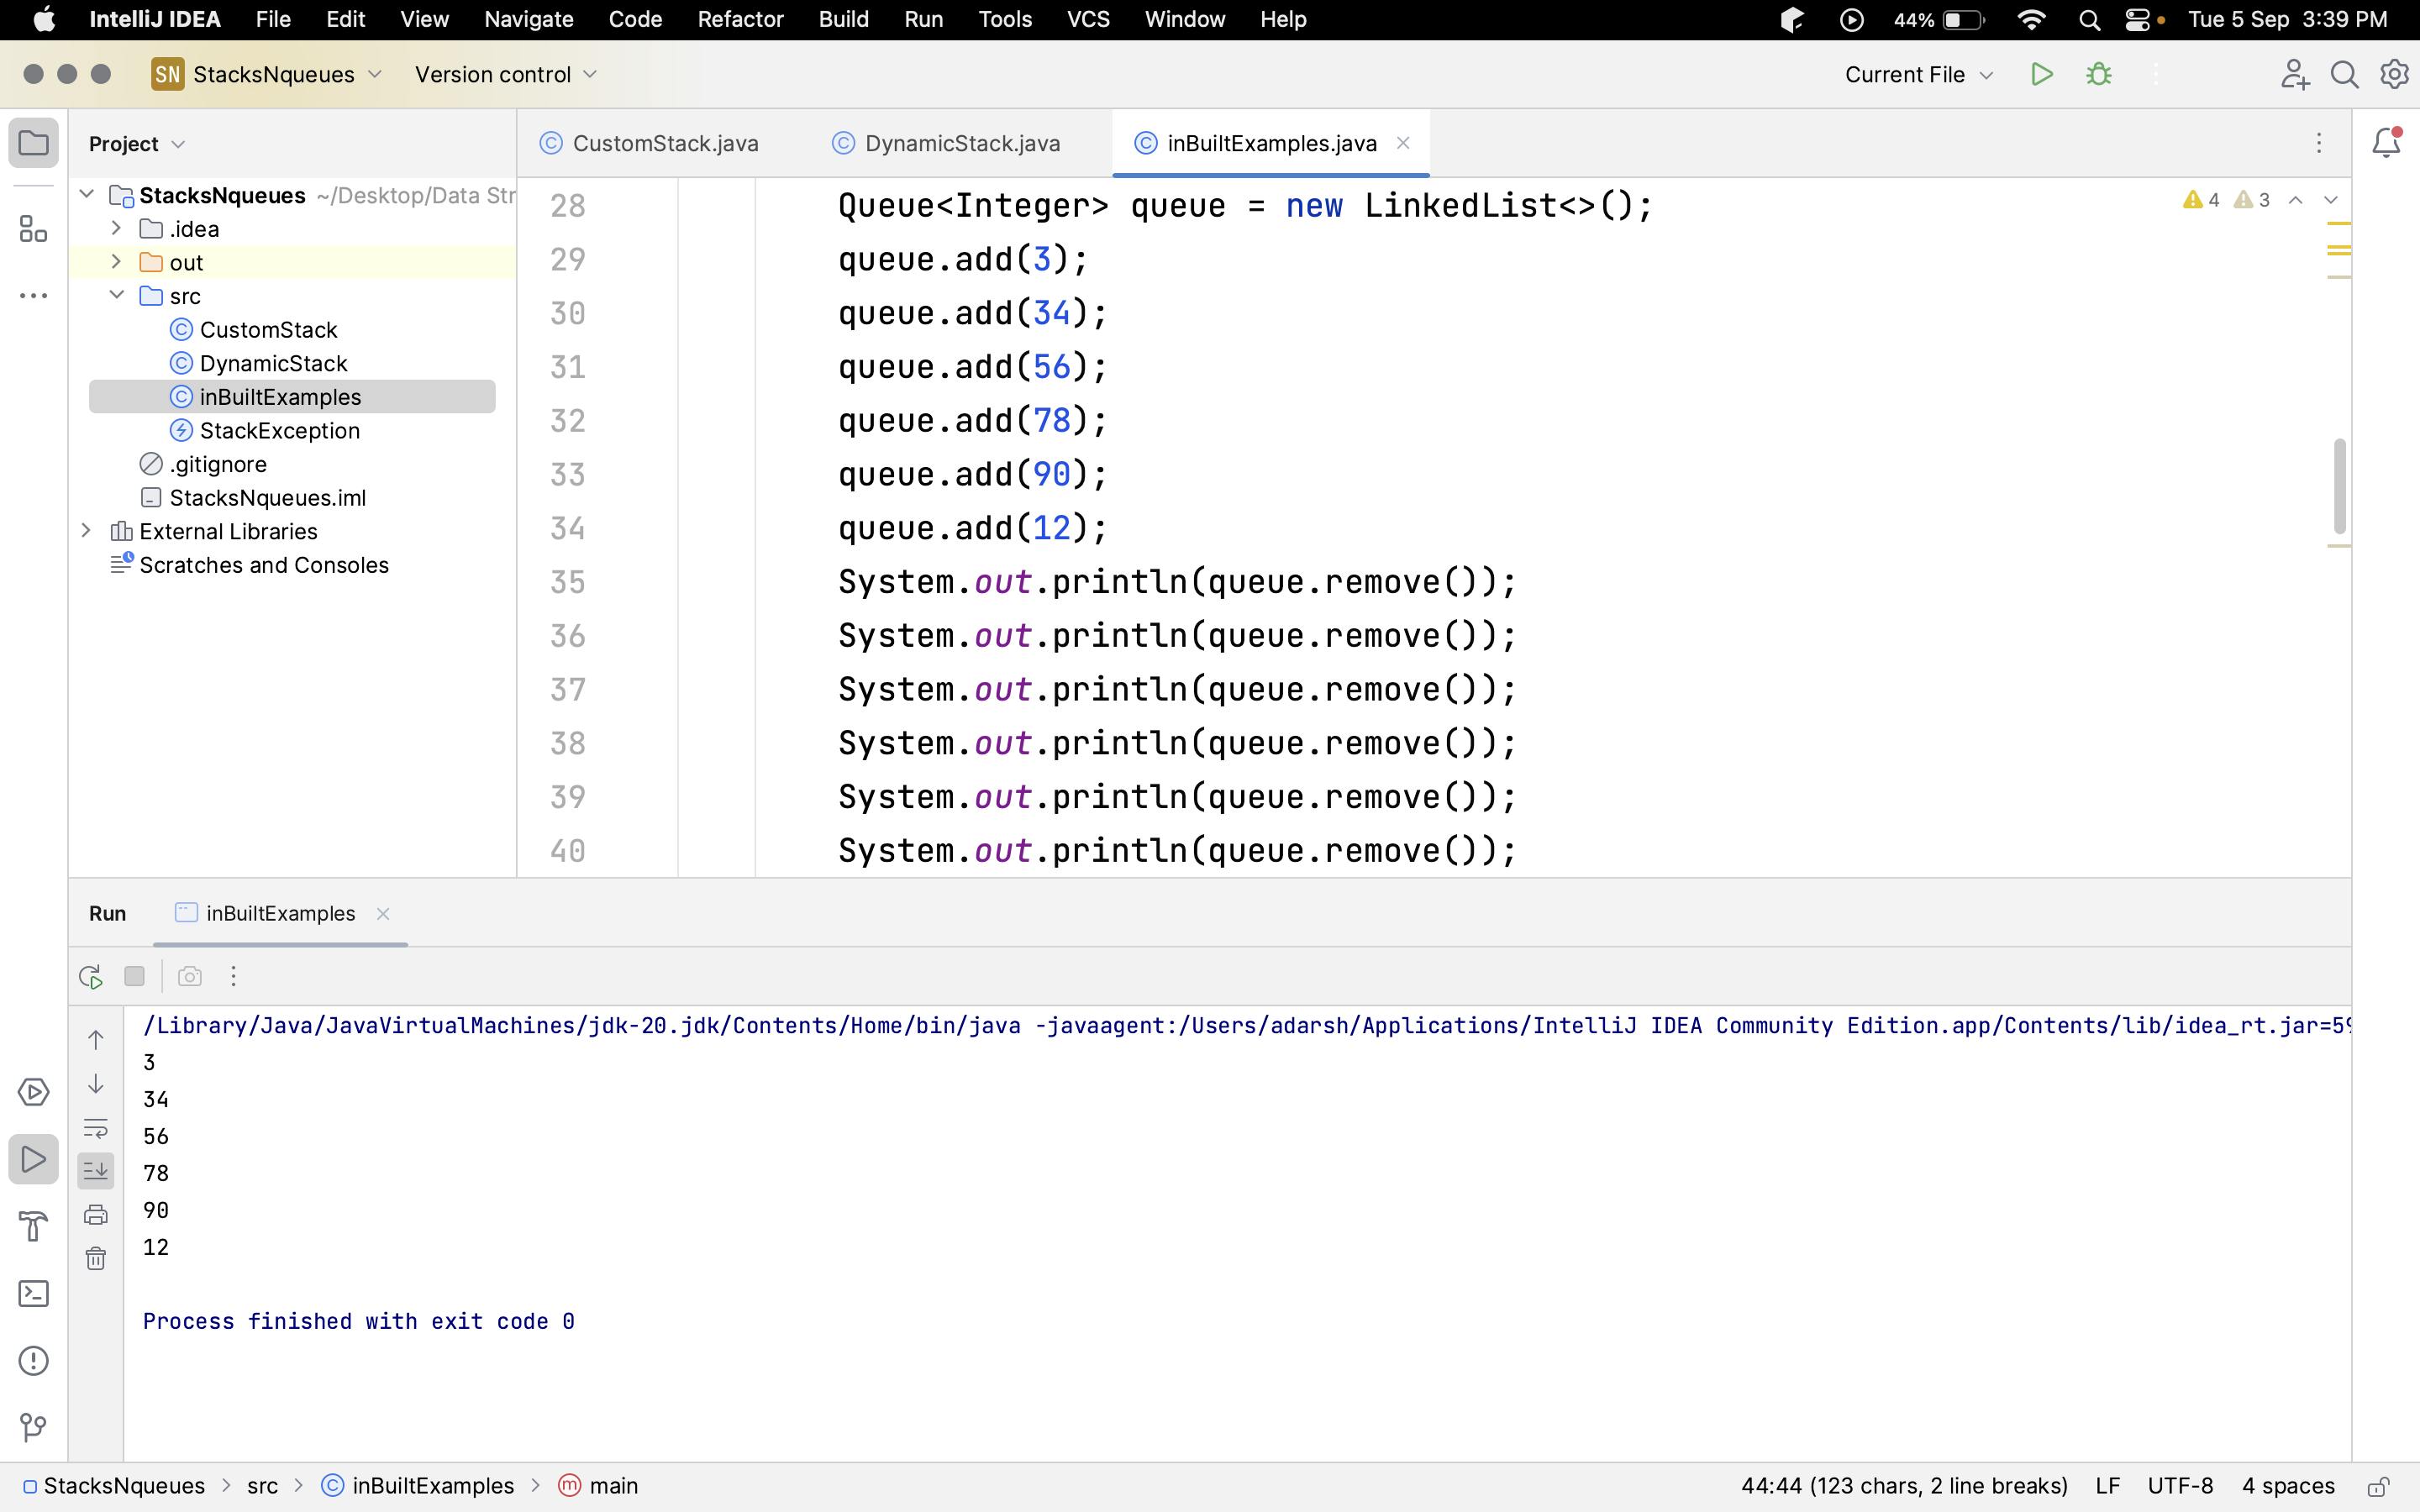
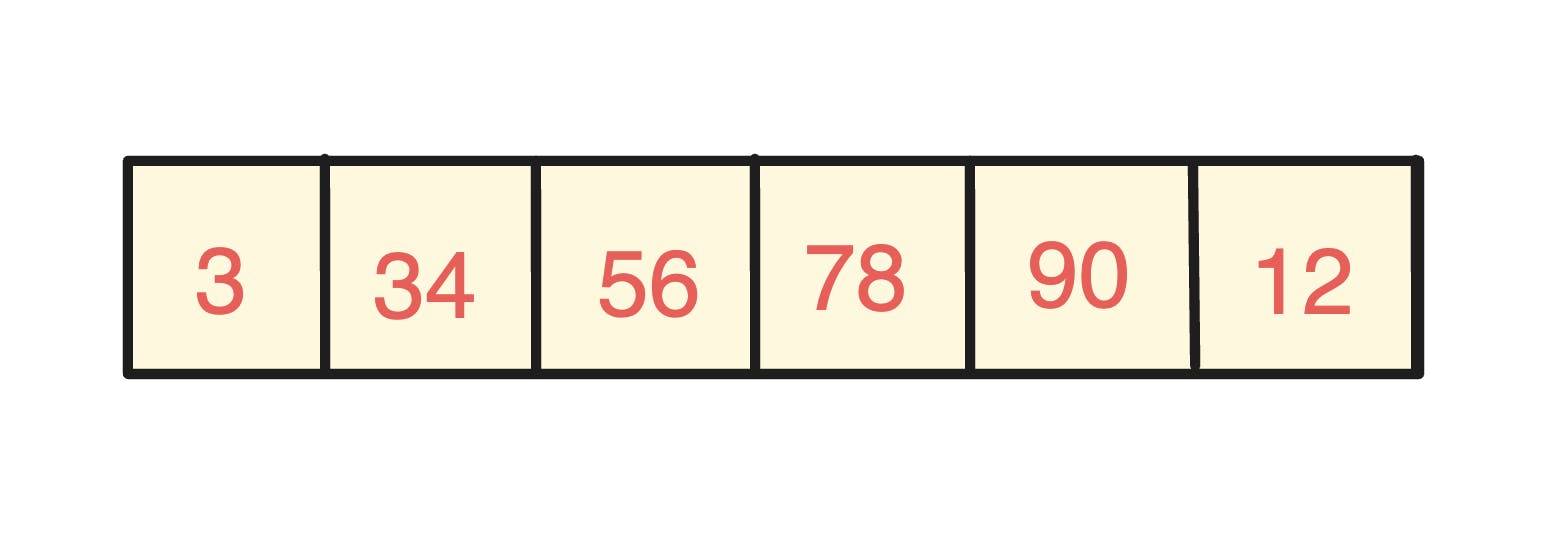
Start by creating a queue using Queue<Integer> queue = new LinkedList<>(); to store integers. To add elements to the queue, we can either use the offer or add method. Each call inserts an element at the end of the queue.
add() :
Queue<Integer> queue = new LinkedList<>();
        queue.add(3);
        queue.add(34);
        queue.add(56);
        queue.add(78);
        queue.add(90);
        queue.add(12);
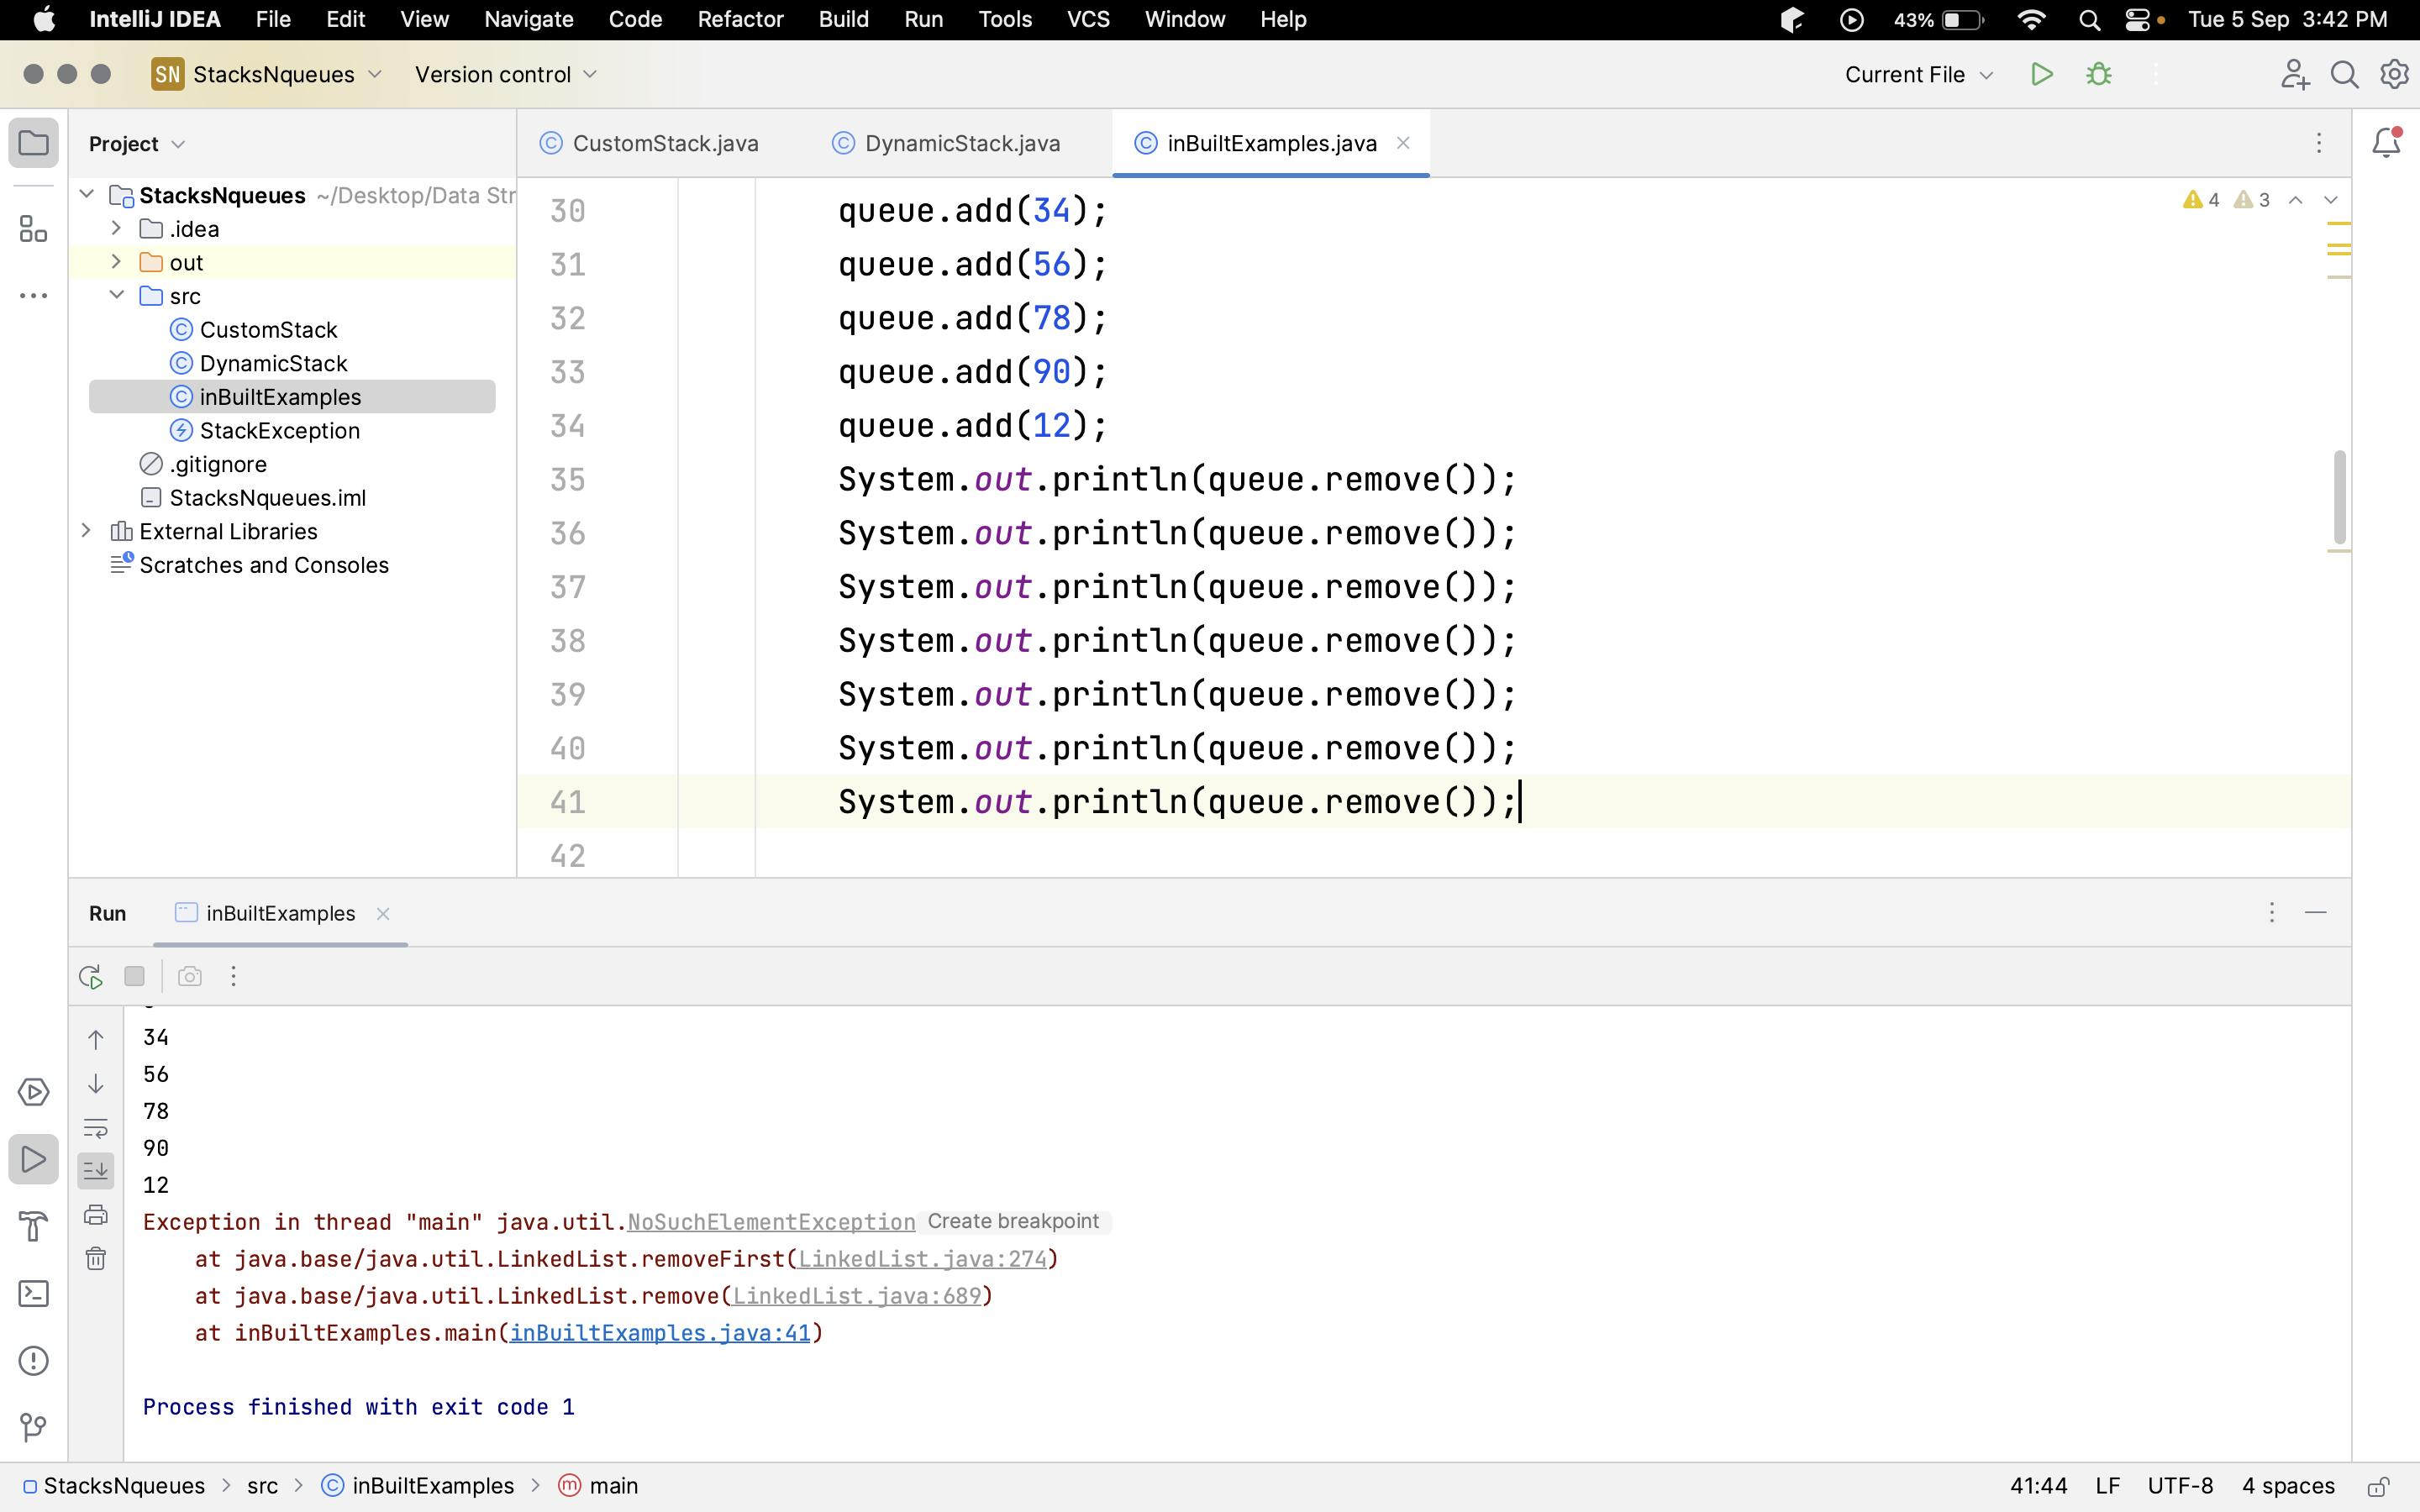
remove() :
The remove() method removes and returns the head (front) element of a queue. It throws a NoSuchElementException if the queue is empty.
System.out.println(queue.remove());
Notice how elements pushed first onto the stack are the first to be popped from it.
Now that we've removed all the elements, the stack is empty. If you attempt to remove an element from an empty stack, it will result in an NoSuchElementException.
How Does Internal Implementation of a Queue Work in Java?
The Queue interface serves as a foundation for implementing various queue data structures. Much like Java's Stack class extends Vector, queue implementations utilize underlying data structures and inherit common behaviors from Java's collections framework.
The LinkedList class can function as a queue by adhering to the Queue interface's methods. Internally, it's structured as a doubly linked list, which allows for efficient element addition and removal, aligning with the FIFO principle.
Similarly, the ArrayDeque class provides a dynamic array-based implementation for queues, making it suitable for both general queue and double-ended queue (Deque) functionality.
The PriorityQueue class offers a priority queue implementation using a binary heap, which sorts elements based on their priorities.
Think of it this way: An interface defines what to do, not how to do it.
How to Create Your Custom Queue in Java?
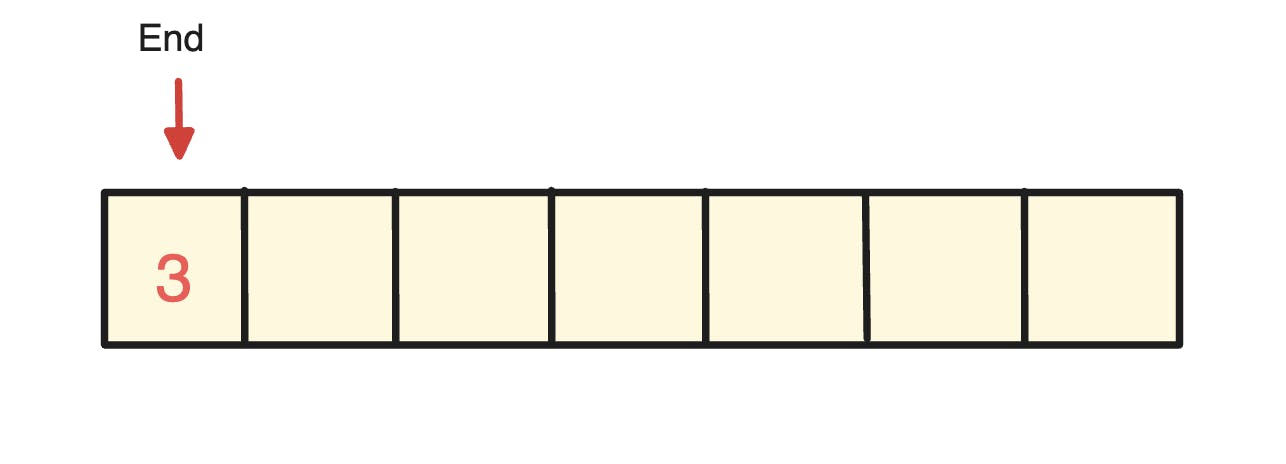
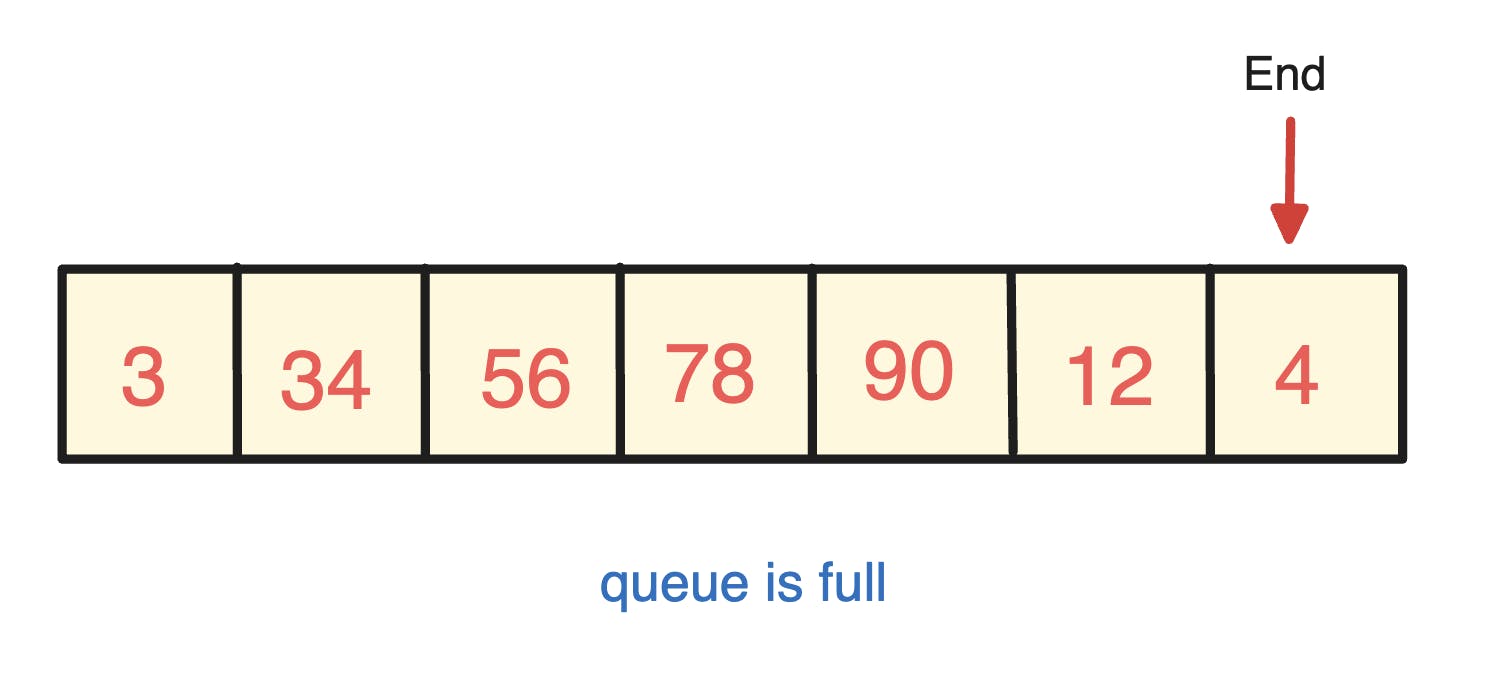
Let's explore how we can use a pointer to make a custom queue in Java. We'll have just one pointer called end, and it will show us where the queue ends.
Initially, when the queue is empty, the single pointer can be set to a specific value, such as 0, to indicate the empty state.
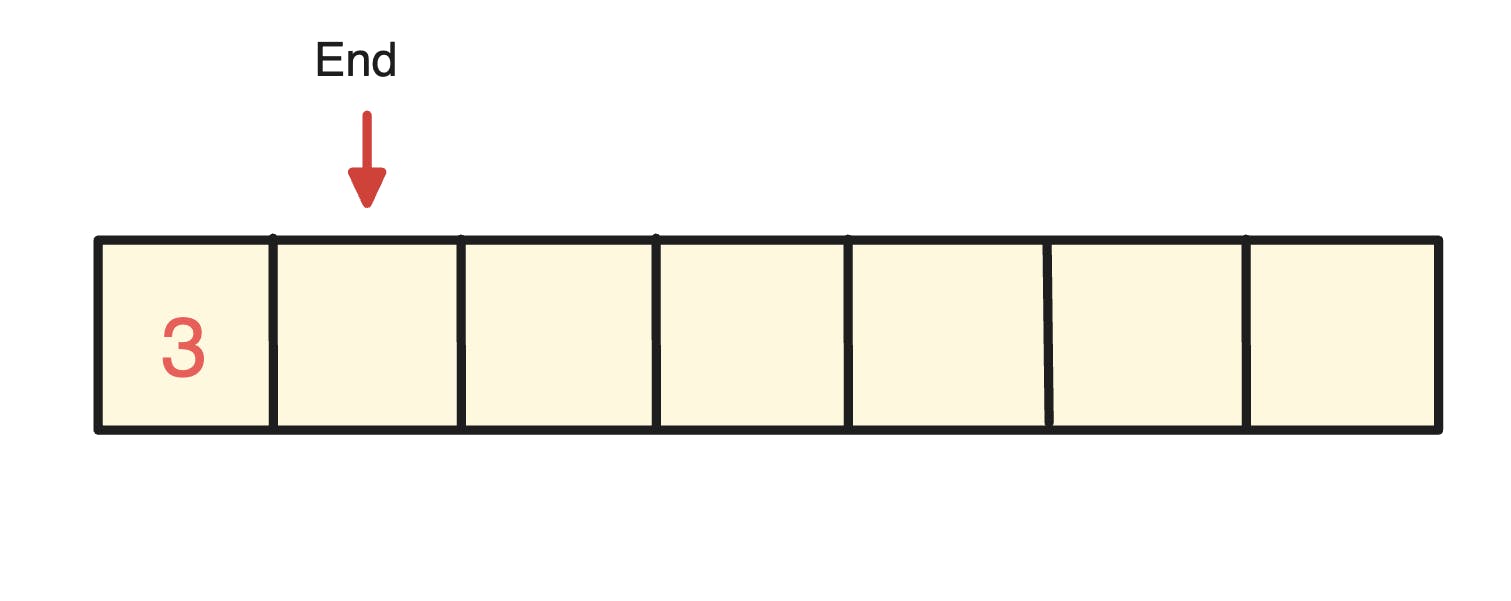
All these empty blocks within the queue represent elements initialized as objects of arrays. Therefore, by default, these elements contain the default value for their data type, which in this case is 0. (I missed this step while creating these images, and it would be a hectic task to recreate them.)
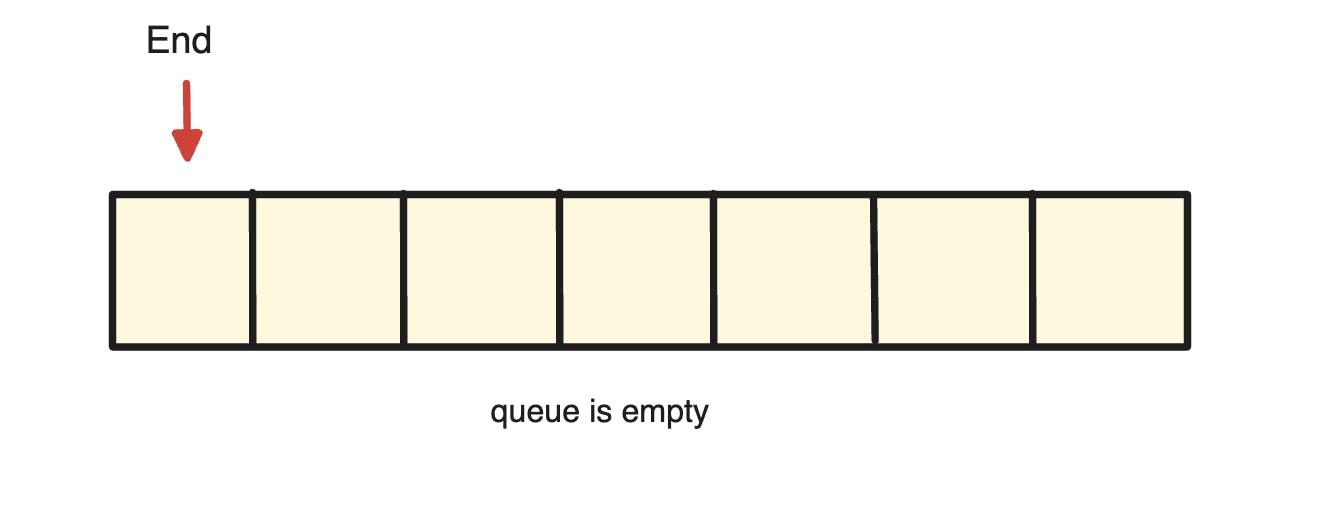
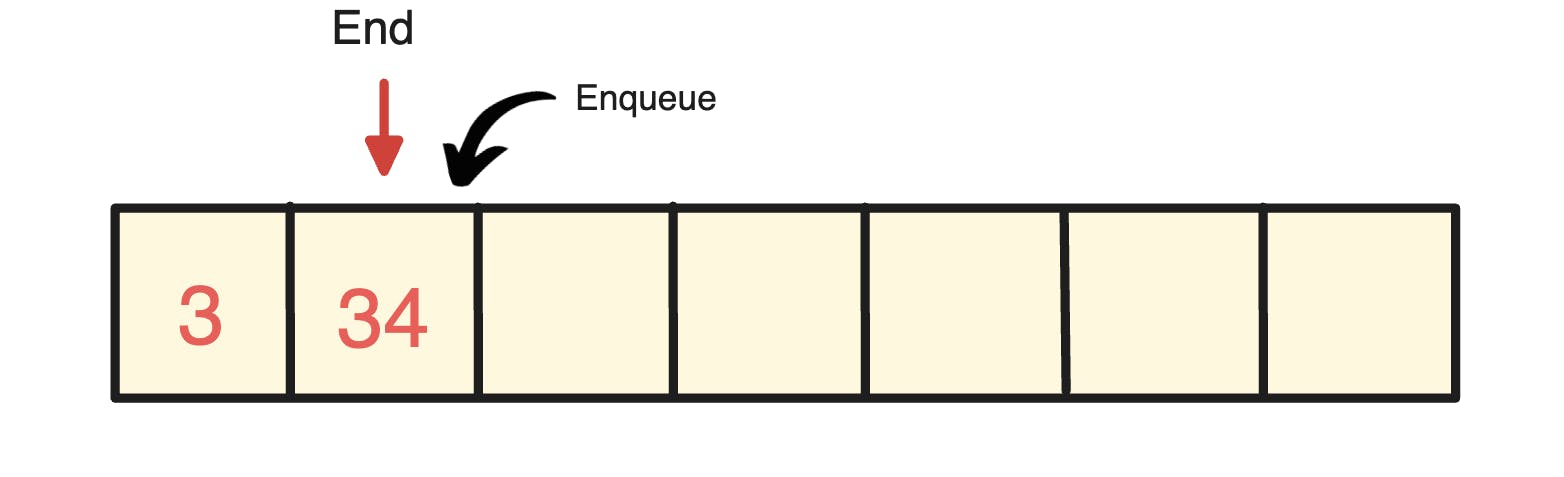
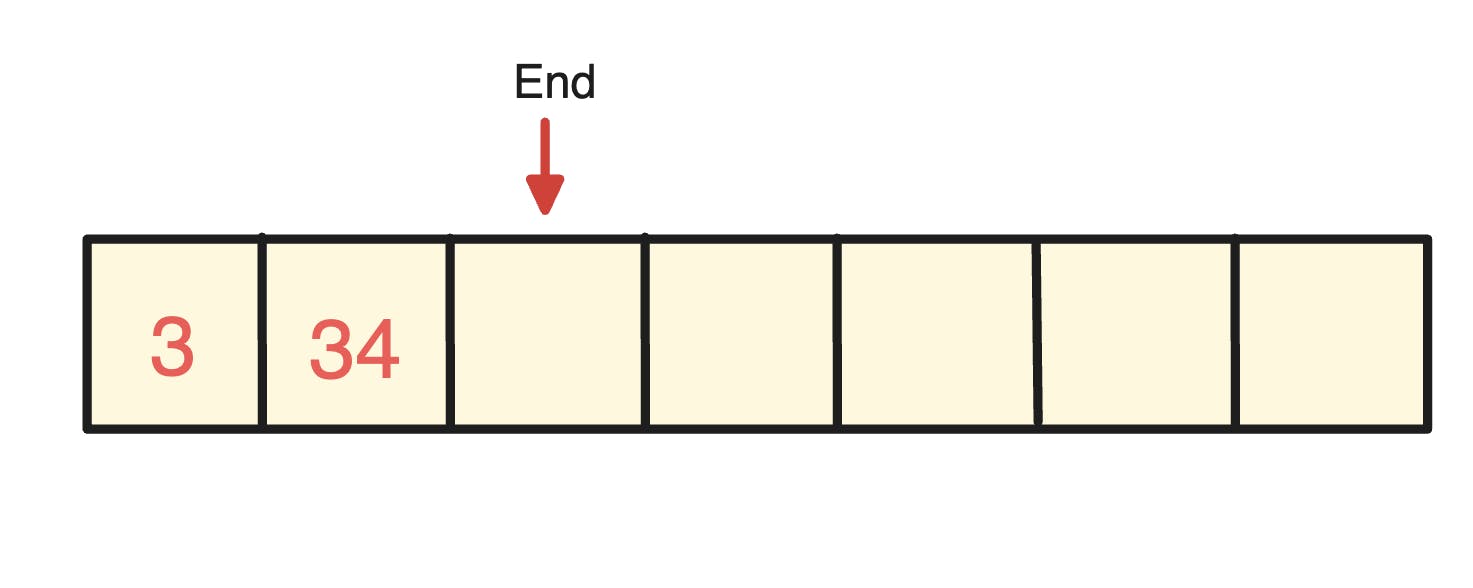
When you Insert the first element into the queue, it will be placed at position 0 and pointed by the end. Then the pointer is moved forward to the new position.
and so on...
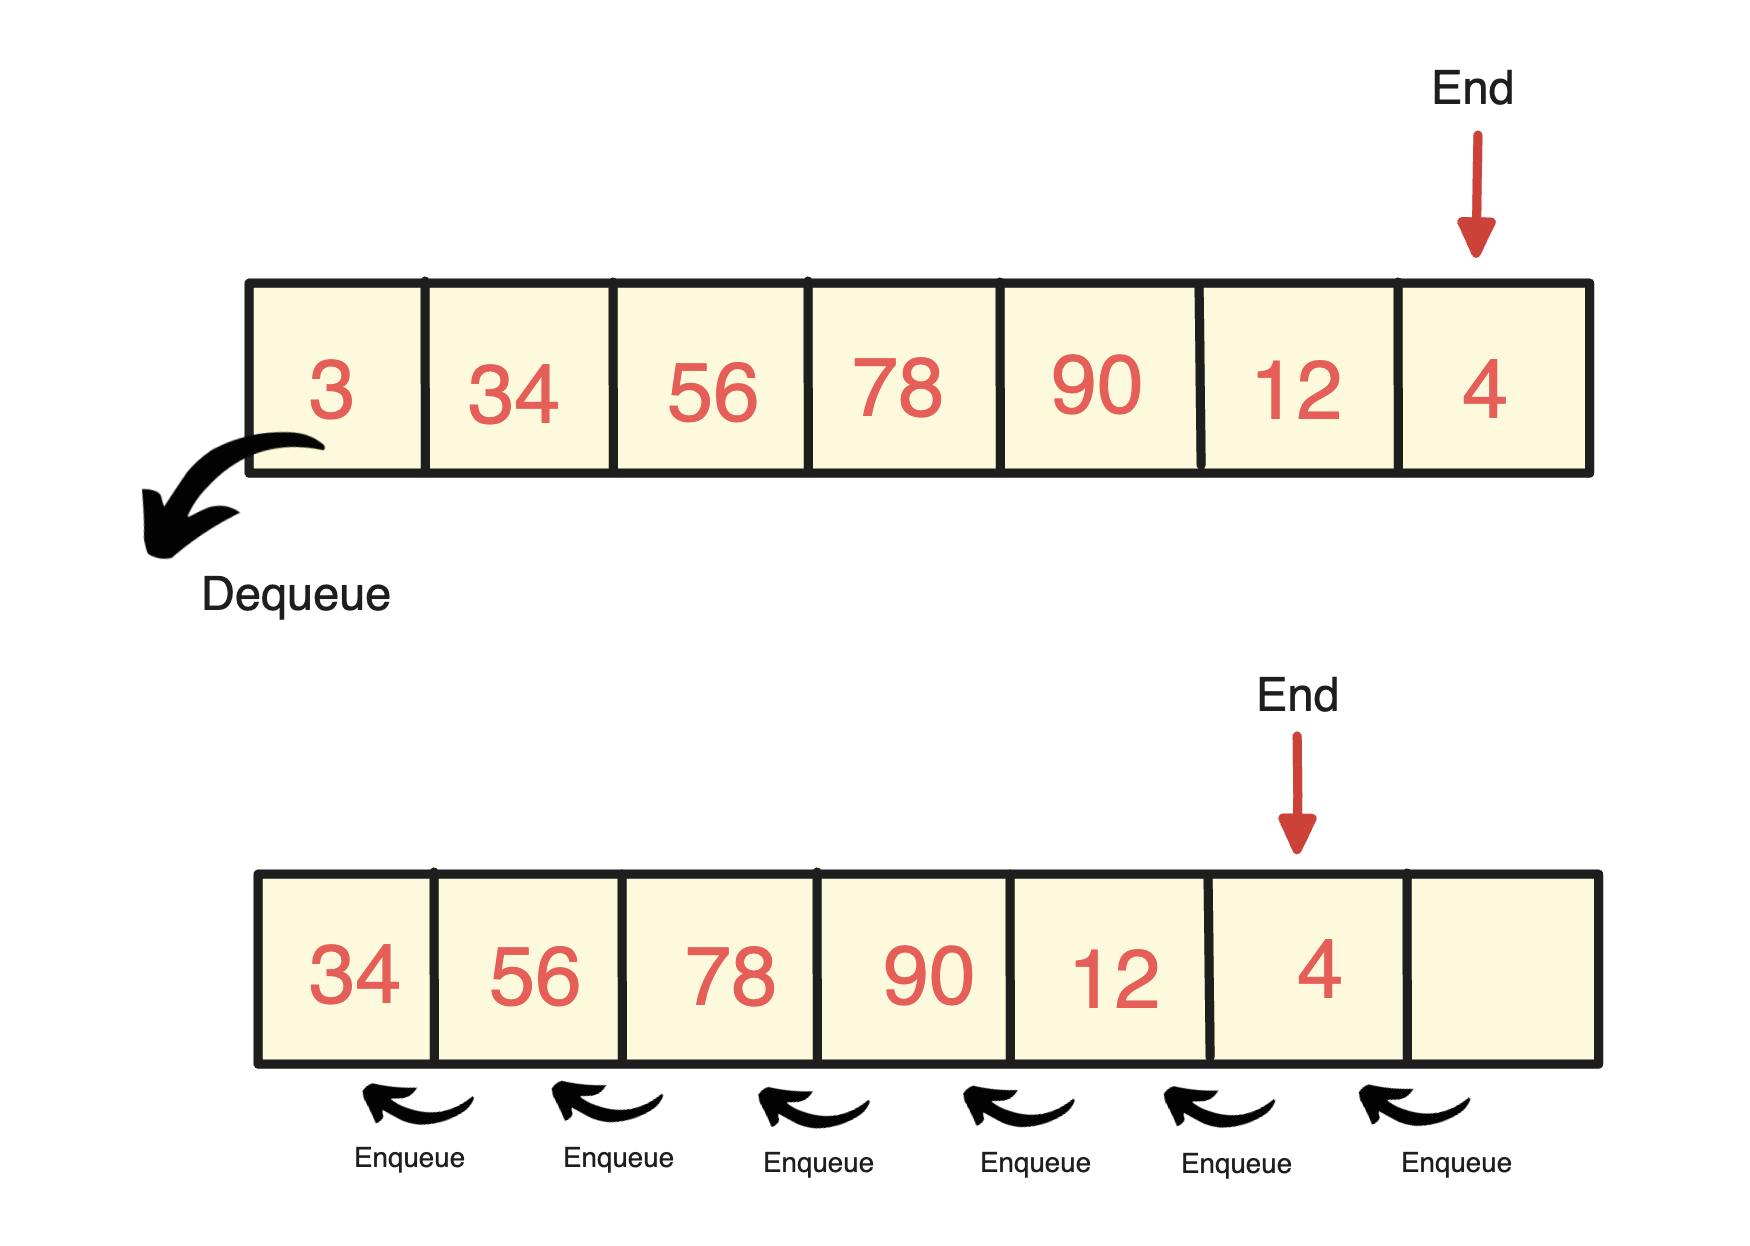
How to remove data from the queue?
Suppose this is our queue array, and we want to remove elements from it.
We will take out the first element and move all the others one step ahead by doing data[i-1] = data[i] for each element in the queue. This process has a time complexity of O(n).
We're also decreasing the value of 'i' by 1, like i--.
Custom class:
public class CustomQueue {
    protected int[] data;
    private static final int DEFAULT_SIZE = 10;
    int end = 0;

    public CustomQueue() {
        this(DEFAULT_SIZE);
    }

    public CustomQueue(int size) {
        this.data = new int[size];
    }
    public boolean isFull(){
        return end == data.length;//end is at last index
    }
    public boolean isEmpty(){
        return end == 0;
    }

    public boolean insert(int item){
        if(isFull()){
            return false;
        }
        data[end++] = item;
        return true;
    }
    public int remove() throws Exception{
        if(isEmpty()){
            throw new Exception("Queue is Empty");
        }
        int removed  = data[0];
        //shift the elements towards head
        for (int i = 1; i < end; i++){
            data[i-1] = data[i];
        }
        end--;
        return removed;
    }
    public int front() throws Exception{
        if(isEmpty()){
            throw new Exception("Queue is Empty");
        }
        return data[0];
    }

    public void display(){
        for(int i = 0; i < end; i++){
            System.out.print(data[i]+" ");
        }
        System.out.println("End");
    }

}
Main class:
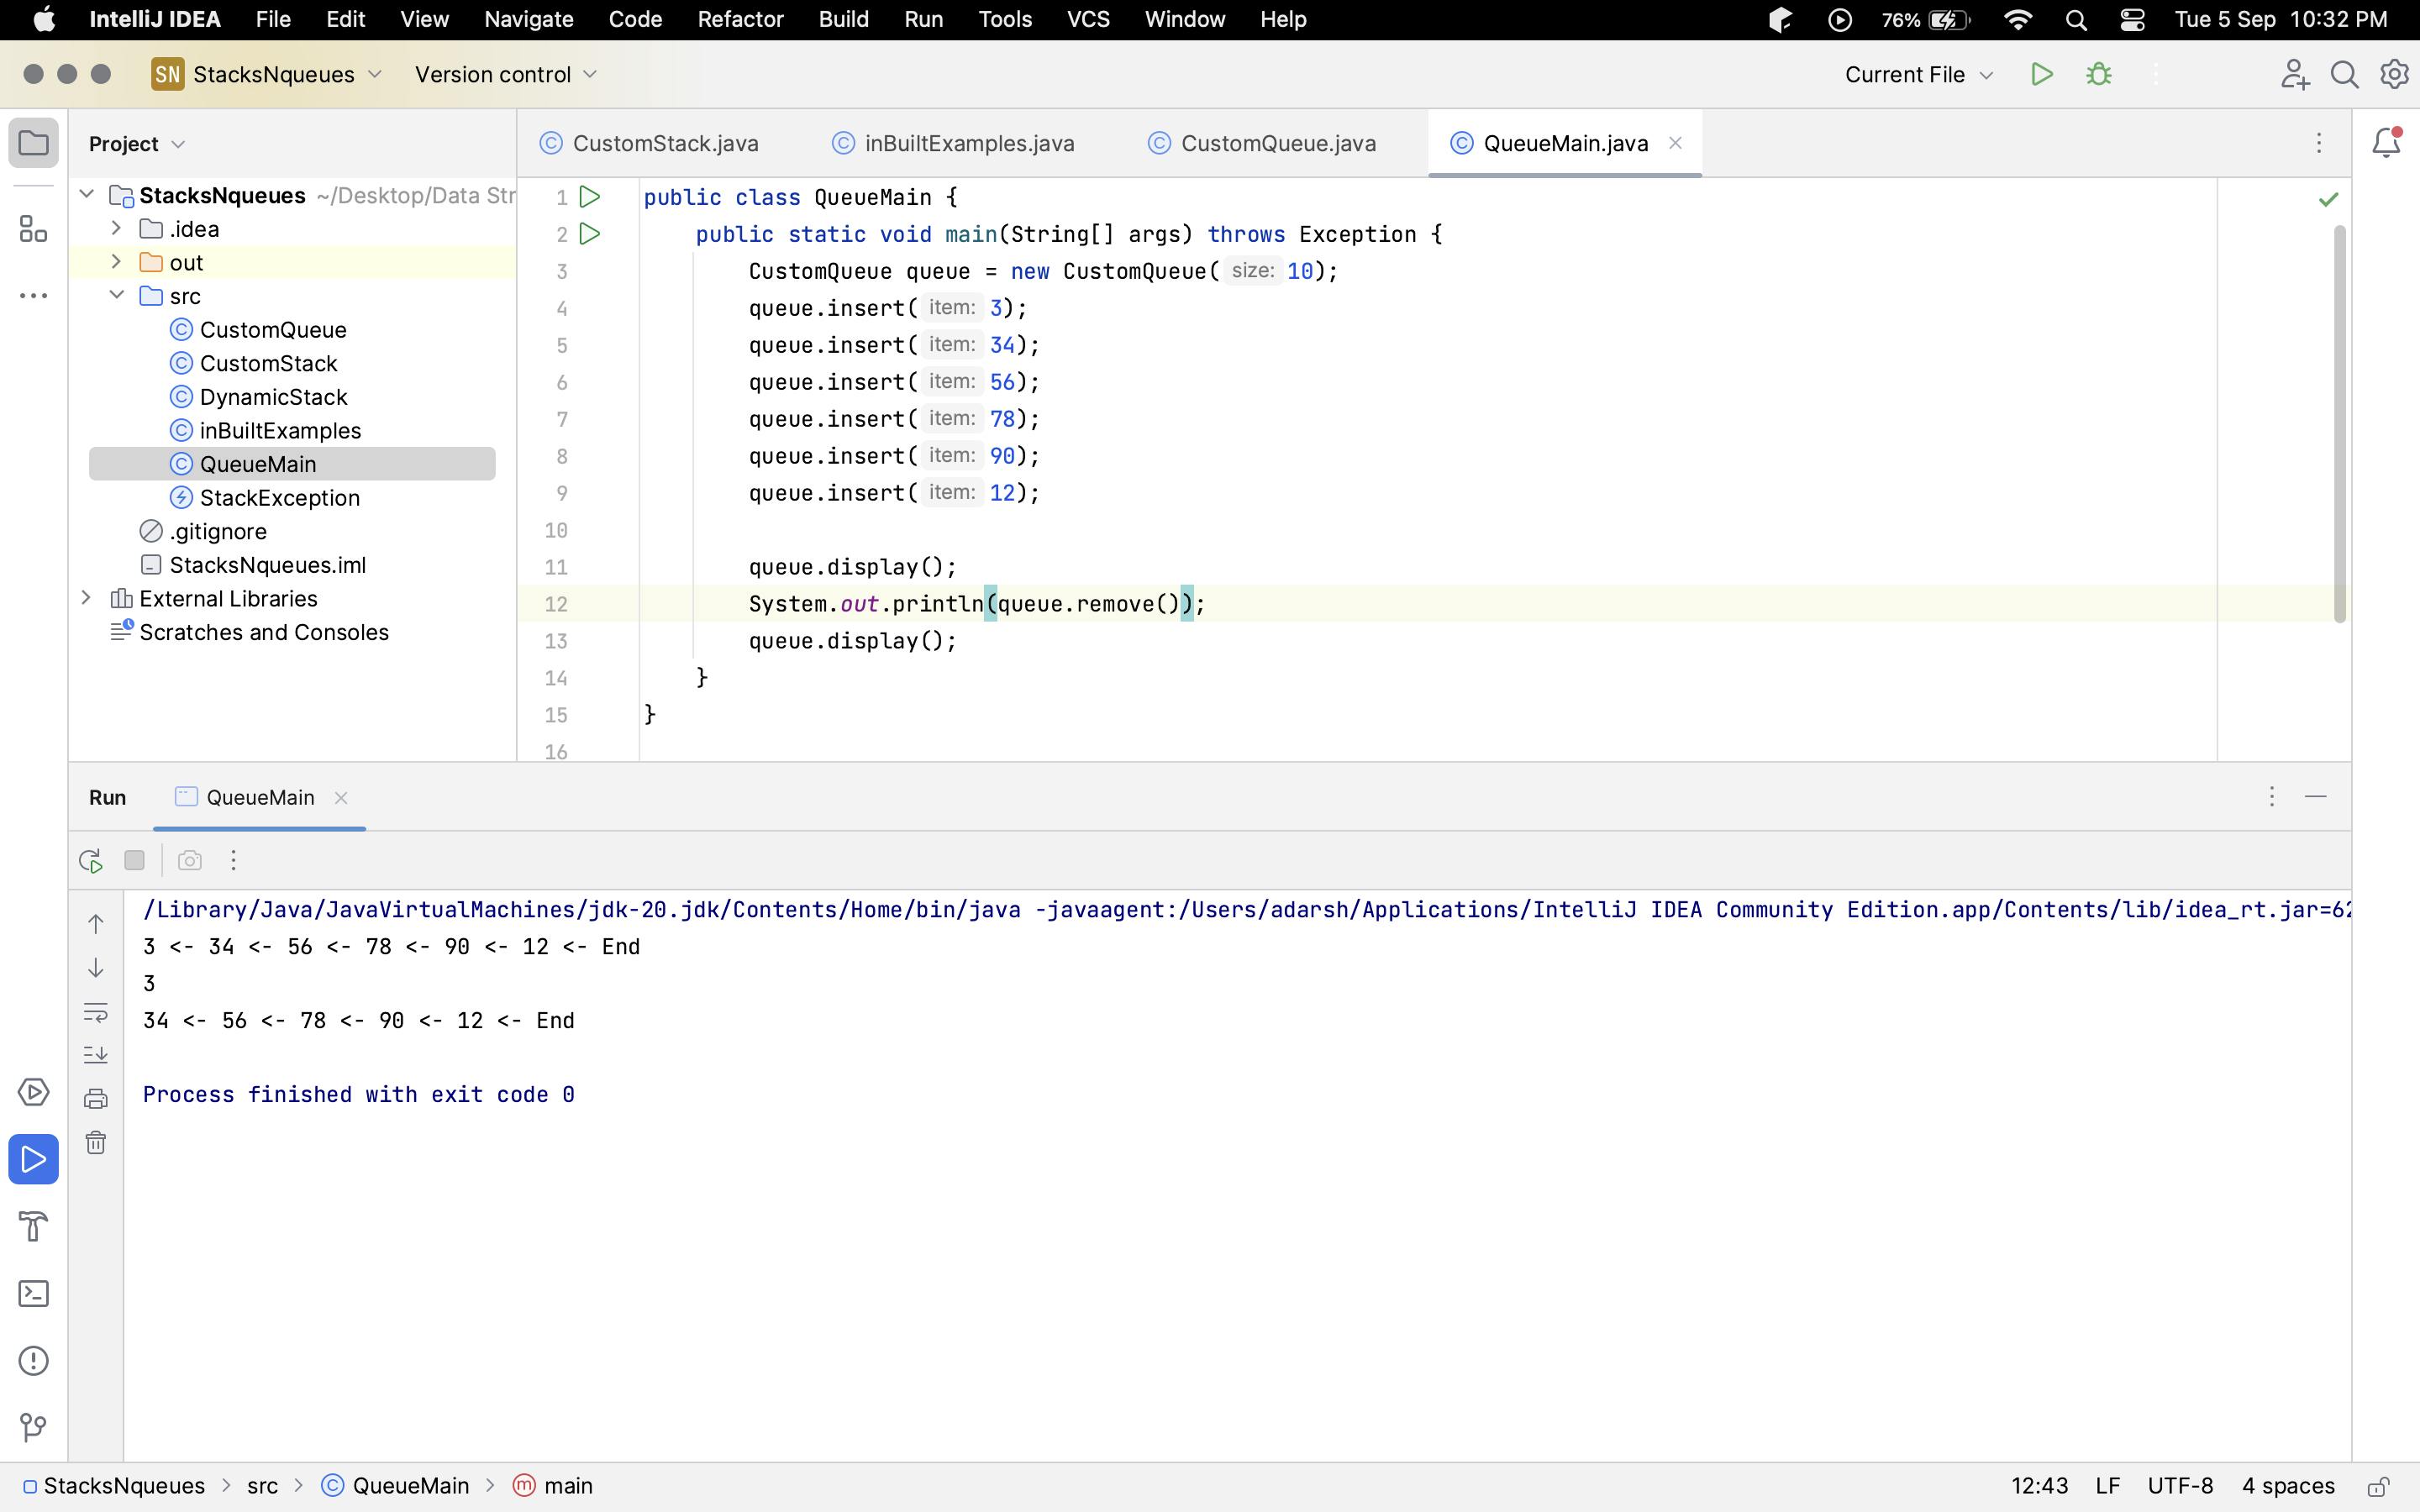
public class QueueMain {
    public static void main(String[] args) {
        CustomQueue queue = new CustomQueue(10);
        queue.insert(3);
        queue.insert(34);
        queue.insert(56);
        queue.insert(78);
        queue.insert(90);
        queue.insert(12);

        queue.display();
        System.out.println(queue.remove());
        queue.display();
    }
}
What is a circular queue?
A circular queue, (circular buffer or a ring buffer), is a fixed-size, continuous collection of elements. It is called "circular" because when elements are dequeued (removed), the space they occupy becomes available for new elements, and the queue's front and rear pointers wrap around to the beginning of the queue if they reach the end.

Try to grab this example to understand how elements are inserted into a circular queue.
Why do we use circular queues?
Circular queues are advantageous when you need efficient space usage, continuous data flow, and a way to avoid resizing issues. They are ideal for cyclic and streaming data scenarios.
How to create your custom circular queue in Java?
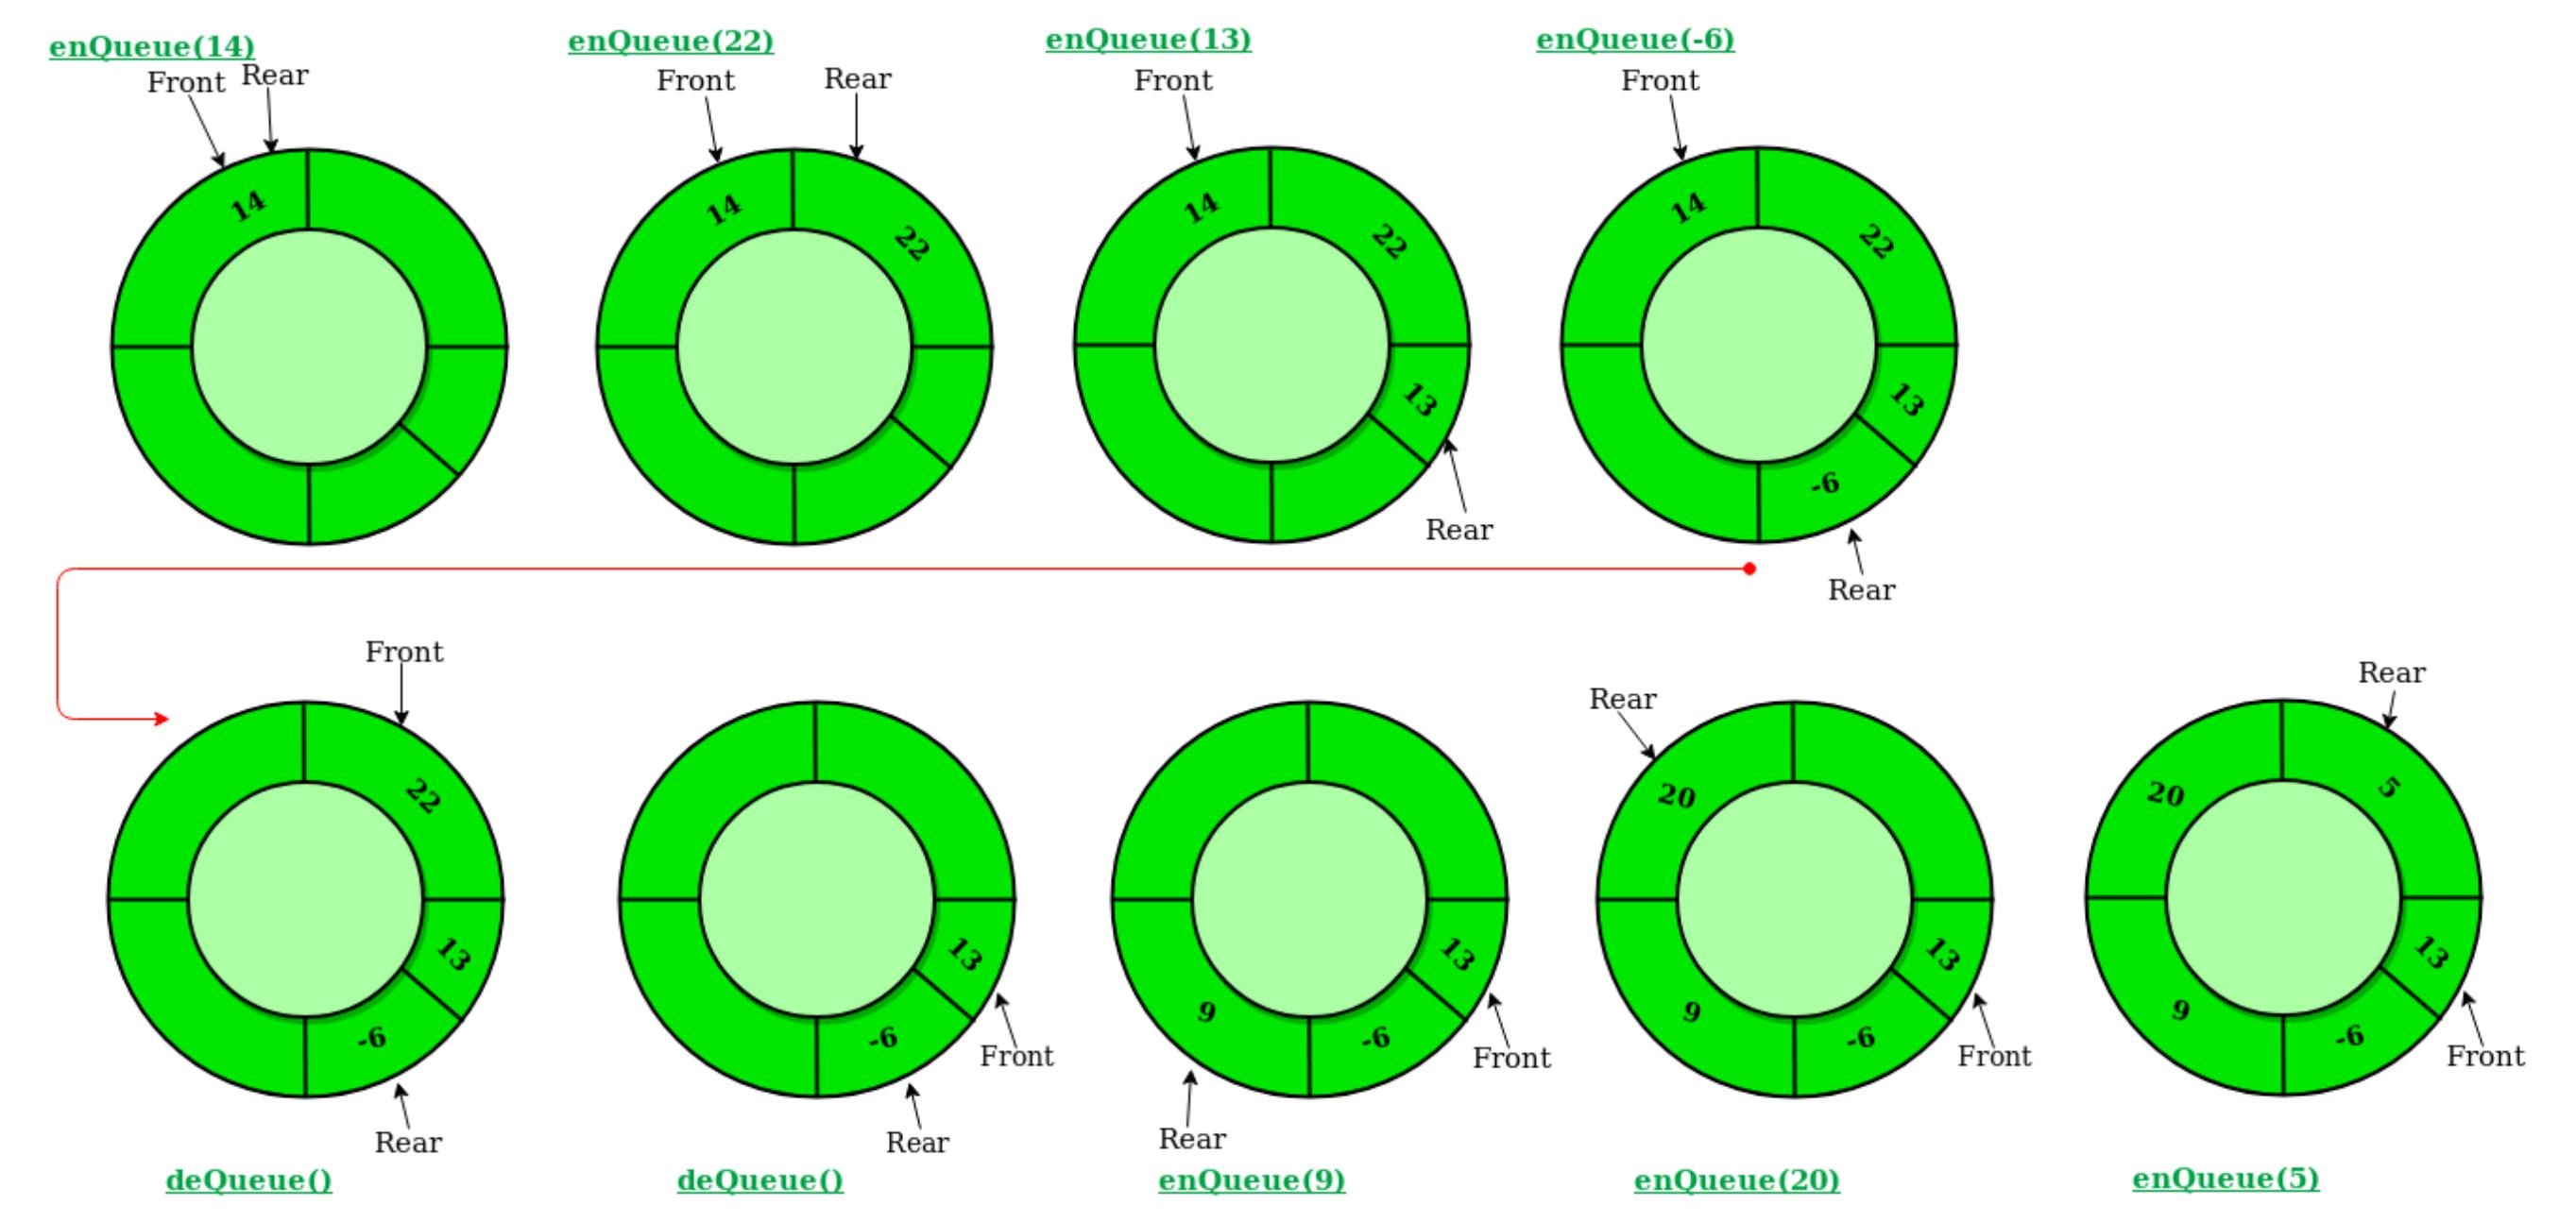
Let's gain a basic understanding of how we will utilize two-pointers to create a custom circular queue in Java. To illustrate this concept, imagine an array that we'll use to simulate a circular queue. (Remember that an array is the underlying structure of a circular queue, so don't be confused by the illustrations where both array and circular queues are used interchangeably to represent elements.)
We will use two pointers, front and end, to transform this array into a circular queue.
How to insert an item in the circular queue?
Both pointers are at index 0 of this circular queue. When we enqueue (insert) 3, the insertion takes place at the end, which in this case is 0, so the element will be placed at position 0.
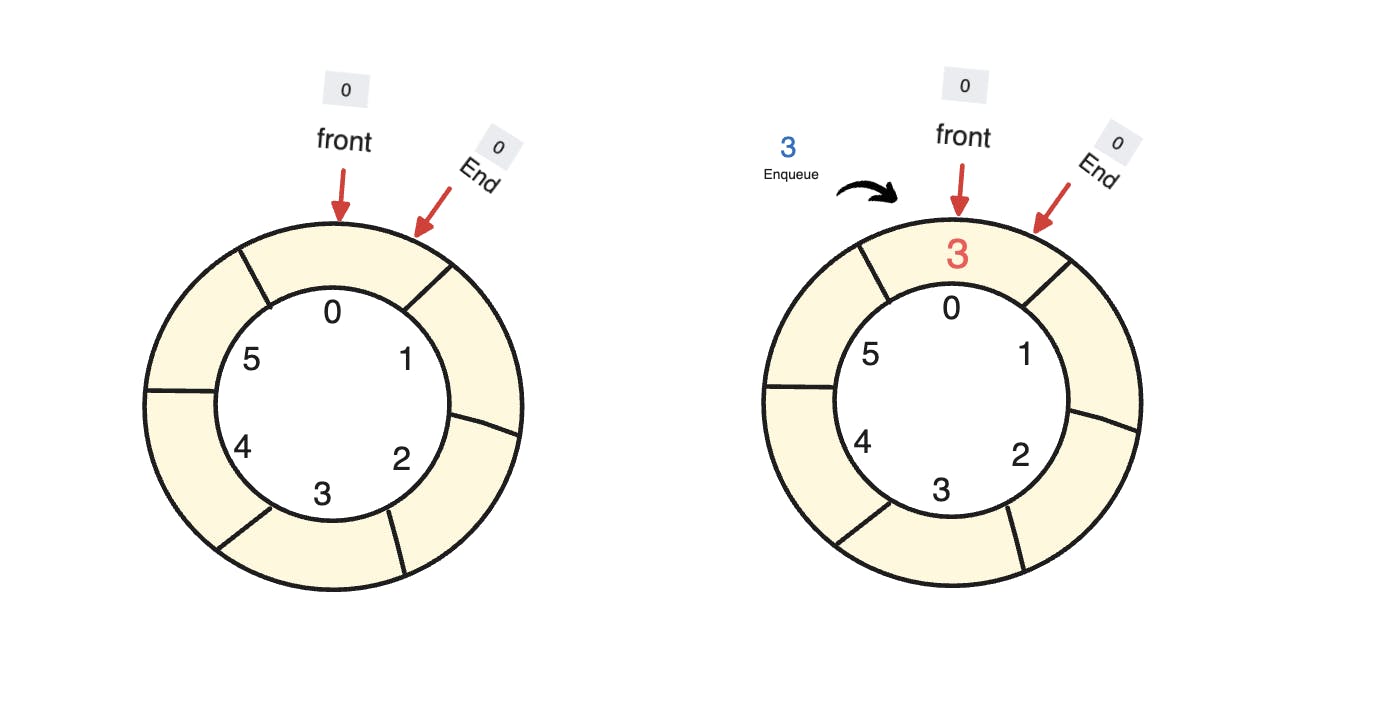
We then increment our end pointer. If we have to enqueue again, we will fill it from the end in the circular queue.
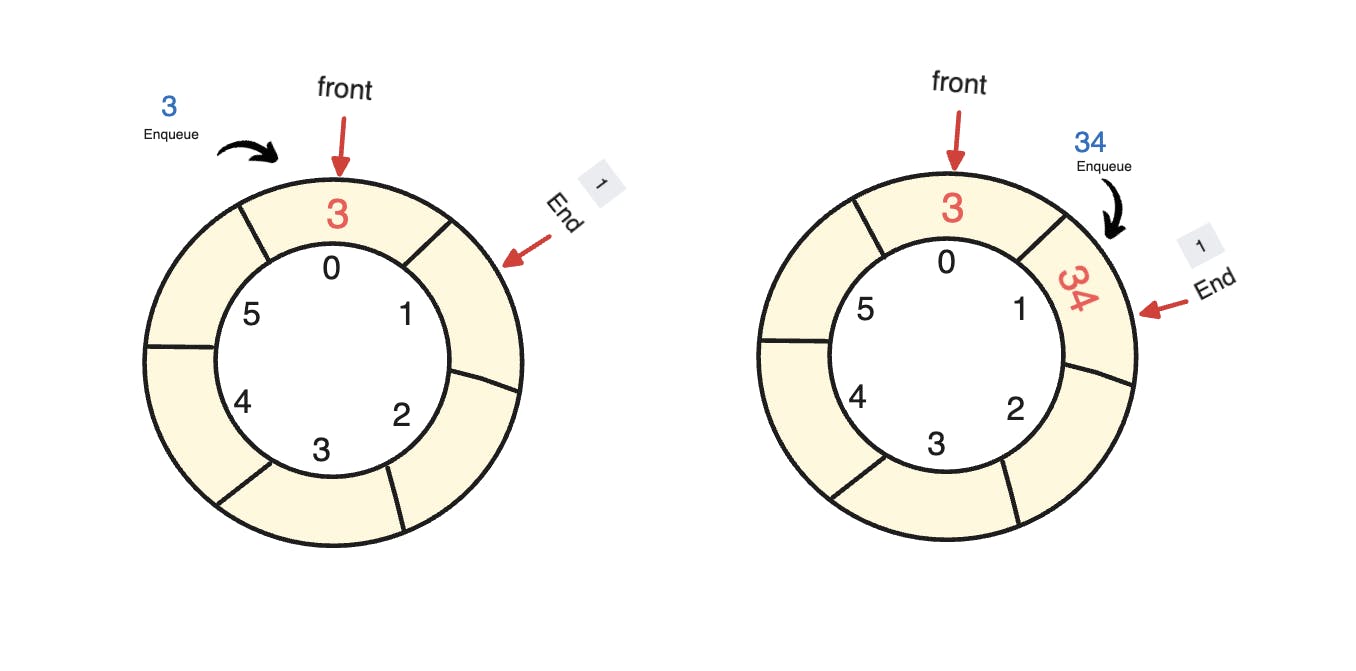
Just increase the end and enqueue the element, and so on...
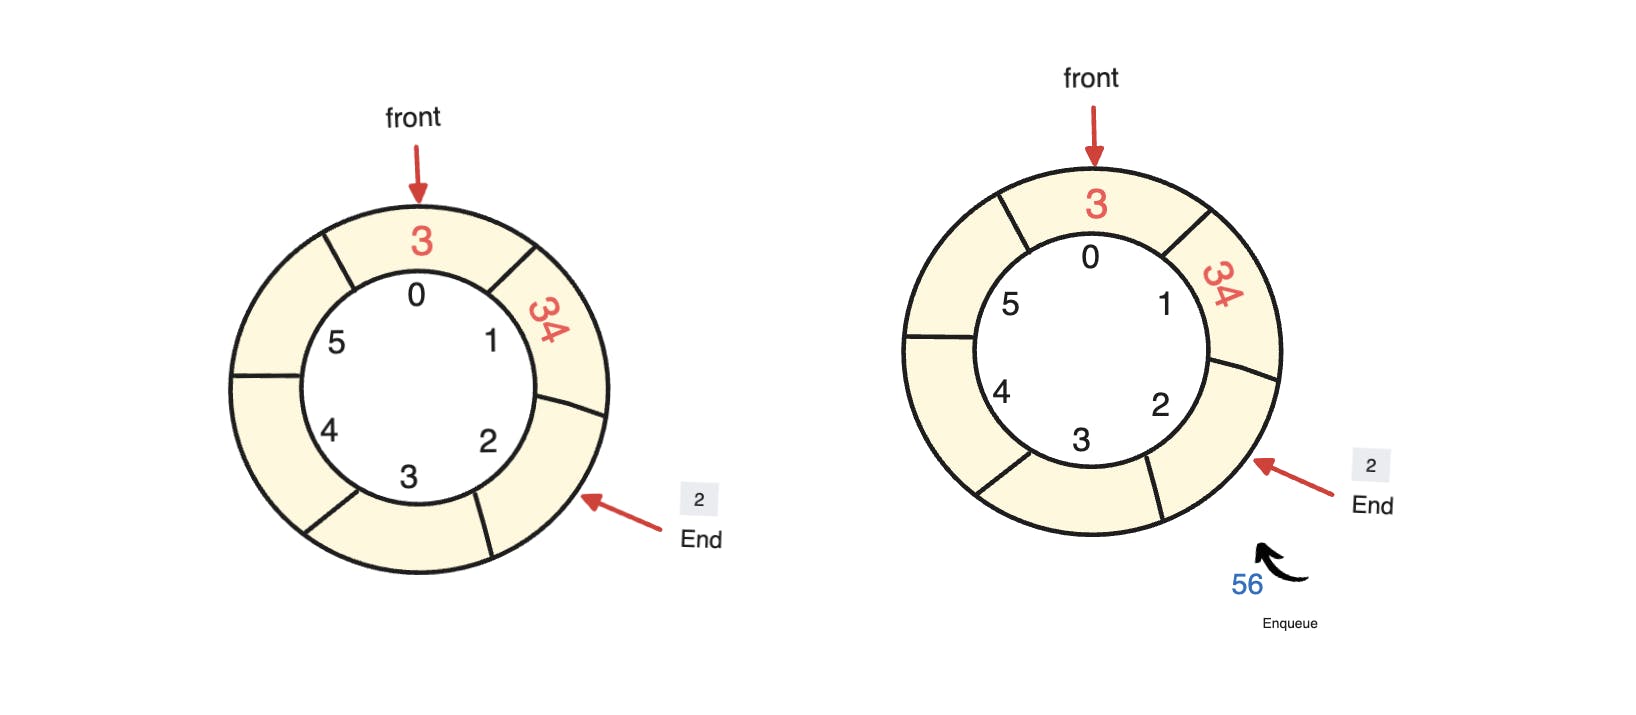
That brings us to the logic during the insertion phase:
data[end] = item;
end++;
How to remove an item from a circular queue?
Suppose initially we have a full circular queue, and we want to dequeue (remove) an element. We will simply increase the front pointer by 1.
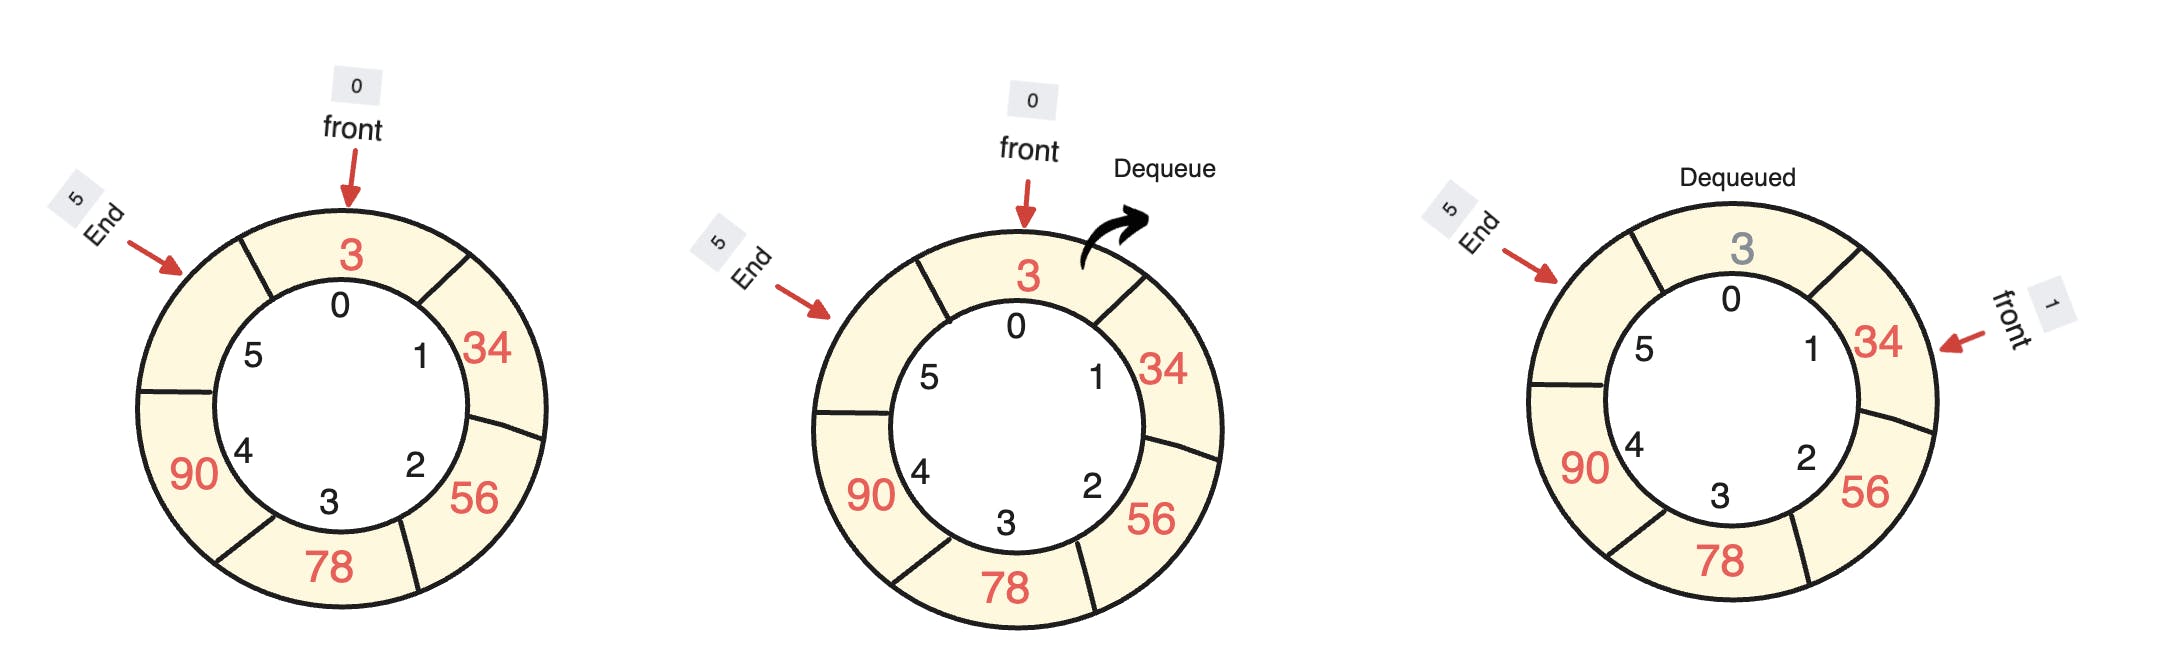
If we have to dequeue more elements, we perform the same process by incrementing the front pointer for each dequeue operation.
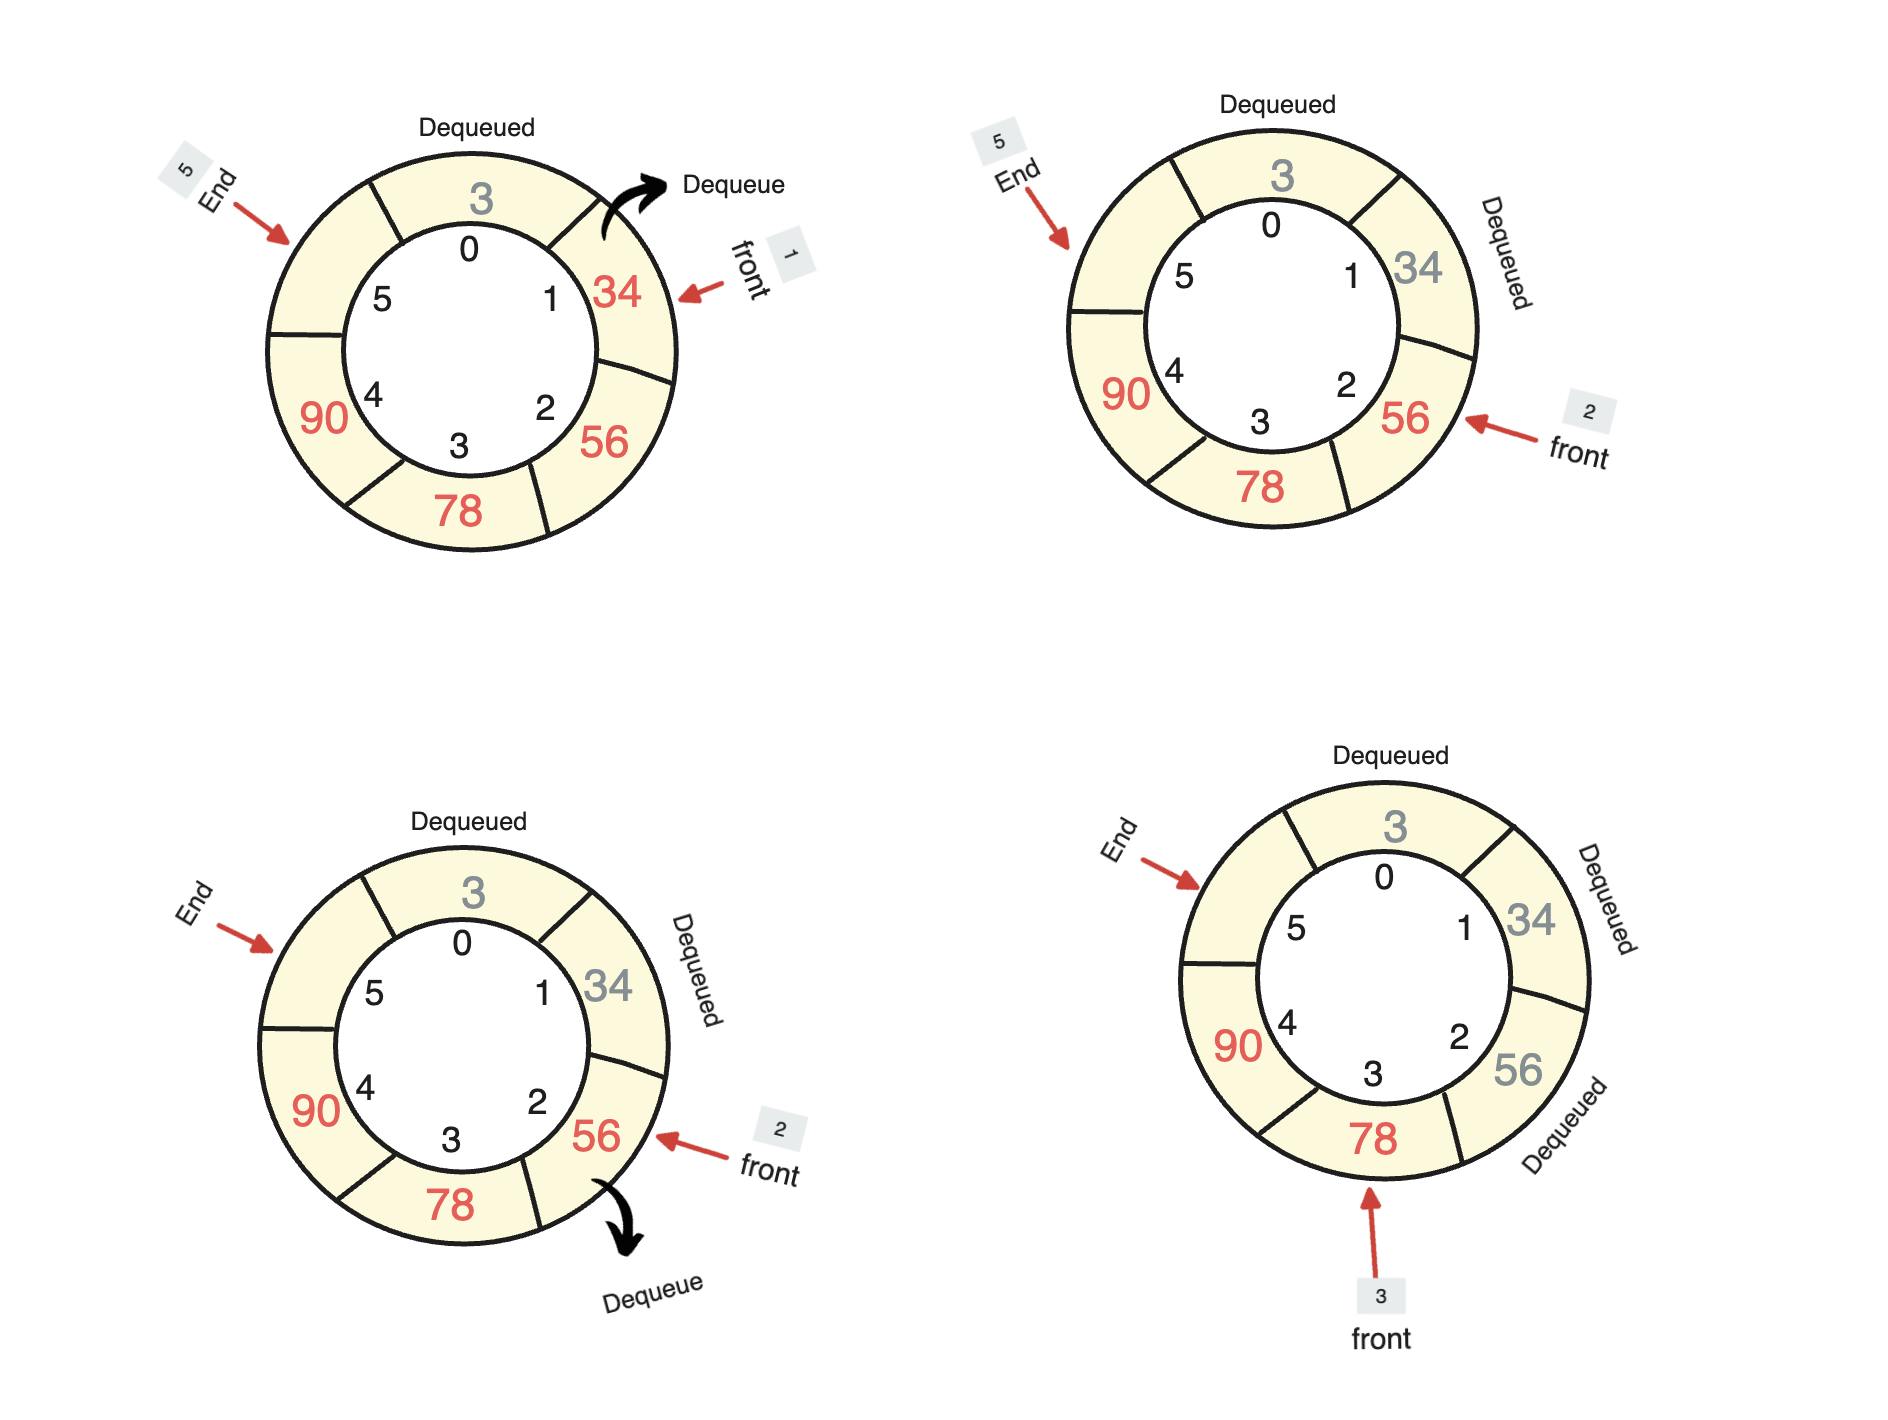
But wait, 3 is not removed, and neither are 34 nor 56. So, why are we saying we have removed them?
We only consider what is between the front and end pointers. All the elements outside of this range will be overridden when we add new elements to the queue.
Now, here's the real challenge: If we have removed some elements and we want to insert new ones after the end pointer, how do we traverse back to index 0? If we simply increase the pointer, it will go out of bounds.


So, how do we traverse back to index 0 then?
We use the modulo operation (%), For example, if we have end % size (5 % 5), it equals 0, and we are back at index 0, (6 % 5) equals 1. This technique allows us to seamlessly move through the circular queue without going out of bounds.
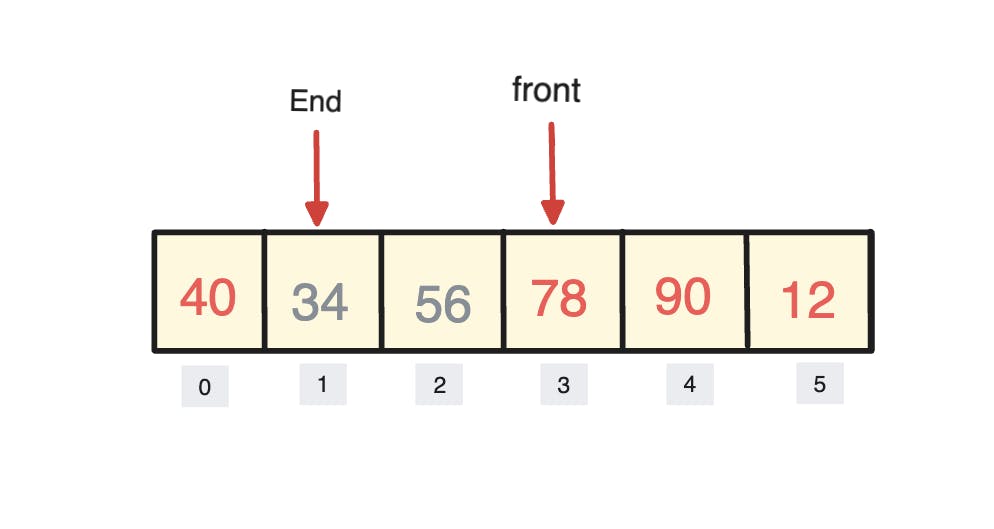
You will always read your array starting from the front, so it would be 78, 90, 12, and then 40.
Custom CircularQueue:
public class CircularQueue {
        protected int[] data;
        private static final int DEFAULT_SIZE = 10;
        protected int end = 0;
        protected int front = 0;
        private int size = 0;


        public CircularQueue() {
            this(DEFAULT_SIZE);
        }

        public CircularQueue(int size) {
            this.data = new int[size];
        }
        public boolean isFull(){
            return size == data.length;
        }
        public boolean isEmpty(){
            return size == 0;
        }
    public boolean insert(int item){
        if(isFull()){
            return false;
        }
        data[end++] = item;
        end = end % data.length;
        size++;
        return true;
    }
    public int remove() throws Exception{
        if(isEmpty()){
            throw new Exception("Queue is Empty");
        }
        int removed  = data[front++];
        front = front % data.length;
        size--;
        return removed;
    }

    public int front() throws Exception{
        if(isEmpty()){
            throw new Exception("Queue is Empty");
        }
        return data[front];
    }
    public void display(){
            if (isEmpty()){
                System.out.println("Empty");
                return;
            }
            int i = front;
        do{
            System.out.print(data[i] + " -> ") ;
            i++;
            i %= data.length;
        } while(i !=end);
        System.out.println("END");
    }
}
Understanding code:
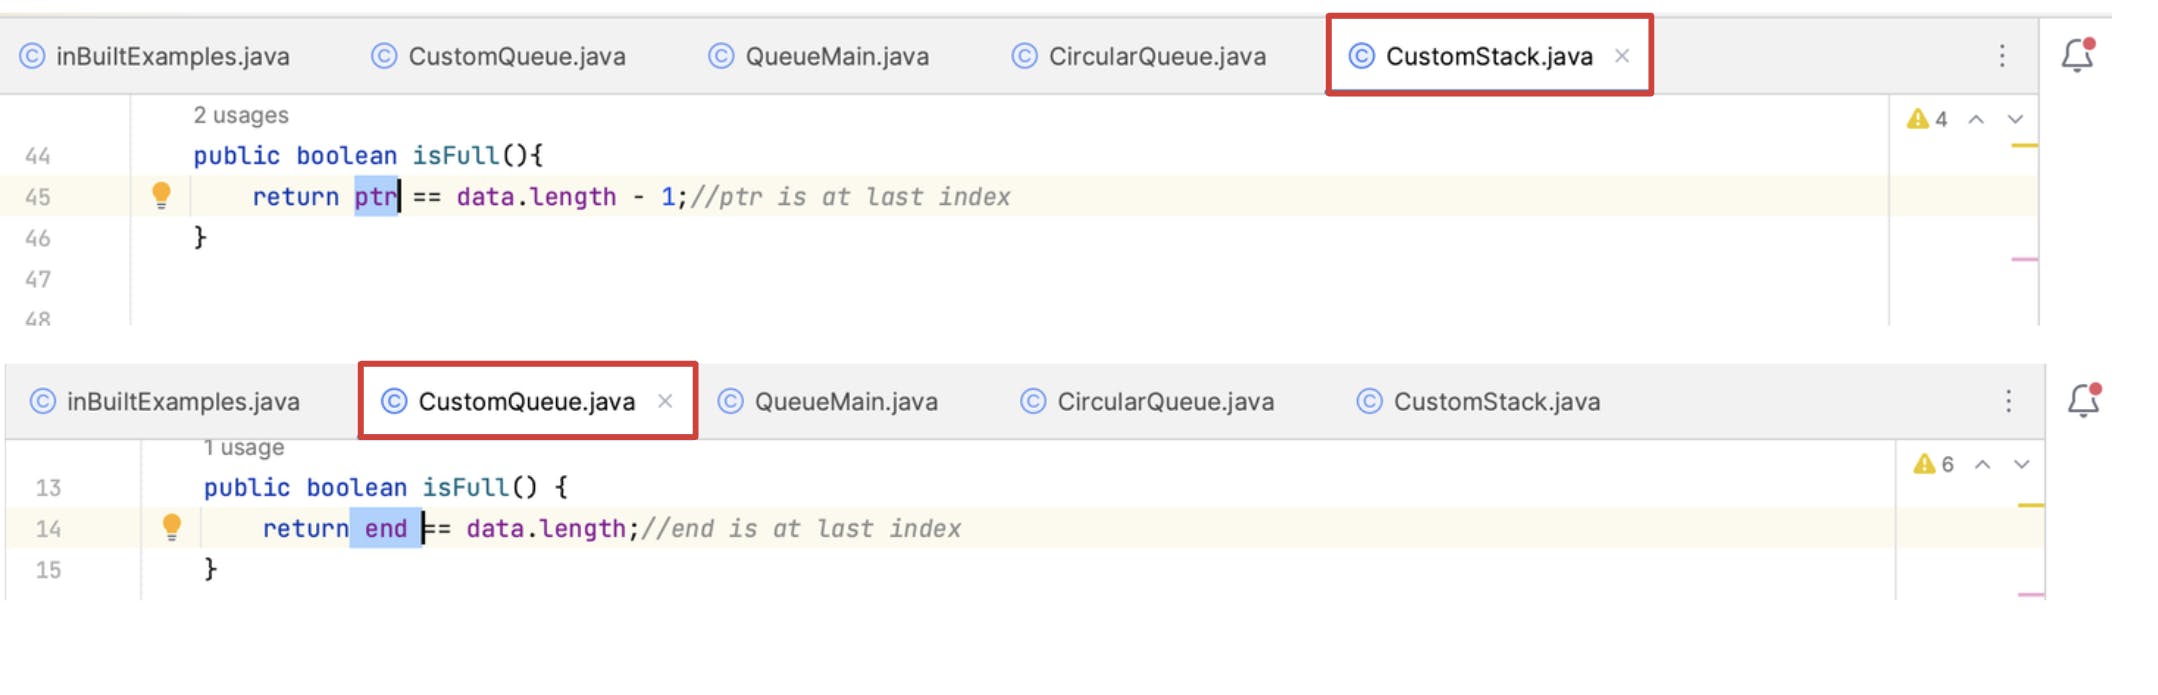
Since when checking isFull(), we were using pointers, in the case of a circular queue, we can't write end == data.length because its index will be continuously changing. Instead, we use the condition:

CircularQueue Main:
public class QueueMain {
    public static void main(String[] args) throws Exception {
        CircularQueue queue = new CircularQueue(5);
        queue.insert(3);
        queue.insert(34);
        queue.insert(56);
        queue.insert(78);
        queue.insert(90);
        queue.insert(12);

        queue.display();
        System.out.println(queue.remove());
        queue.insert(39);
        queue.display();
    }
}